
Message on Health and Safety from KoBold Metals
We are excited to sponsor the AME Safety Guidebook.
Since the 1982 first edition, the Guidebook has been an industry reference standard for best safety practice in British Columbia and beyond, helping companies to execute mineral exploration programs safely and sustainably. With evolving technology, industry practice and societal expectations, we all recognize that the performance bar for our industry is being steadily raised. We are grateful for this opportunity to both acknowledge the need for and to contribute to advancing safety education and safety practice in mineral exploration.

Introduction
This guidebook is designed for use in Western Canada – particularly British Columbia. Note that in British Columbia, mineral exploration is regulated by the Health, Safety and Reclamation Code for Mines in British Columbia (HSRC). All worksites where mechanical disturbance occurs (e.g., trenching, drilling) must have a Mine Manager on site.
The term ‘Mine Manager’ applies equally to mineral exploration and mining, and in exploration, refers to the person in charge of an exploration site. This may be the ‘On-site VP Exploration’, ‘Exploration Manager’, ‘Health & Safety Manager/Coordinator’, ‘Project Manager’, ‘Chief Geologist’, or equivalent.
As will be evident to the reader, this guide does not attempt to provide for safety requirements in any mining operations either under active development or in production. Safety procedures in mining operations are covered by the Mines Act and the HSRC.
Disclaimer
The information contained in these guidelines is provided solely for informational purposes and may not reflect the most current legal developments and should therefore not be considered legal advice. The content of this guide should be considered in conjunction with the regulatory requirements stipulated in the HSRC or similar regulation in other jurisdictions, and in permit conditions. The legal landscape around these topics is subject to change and can vary between jurisdictions. As such, you should seek counsel for your own set of circumstances.
Under no circumstances shall AME or its affiliates, partners, suppliers, or licensors be liable for any indirect, incidental, or consequential outcomes arising out of or in connection with the use of the information contained in this presentation.
Building a Culture of Safety
All workers in mineral exploration have the right to a healthy and safe work environment, and this right extends to all contractors on a program as well as visitors. Traditionally, this guidebook has focused on safety from physical harm in the field; the mental health and well-being of all workers as well as those in surrounding communities are also of vital importance.
Tips for building a culture of safety:
- Demonstrate a commitment to safety. Discuss safety and approach every aspect of a mineral exploration program from a safety perspective (training, camp set-up, transportation protocols).
- Assess and address hazards through risk management (view AME’s tool on Operational Risk Management for details).
- Provide training related to safety above and beyond what is required by legislation (e.g. train all staff in first aid)
- Include discussions around safety in all meetings.
- Create and sustain a culture in which workers at all levels feel safe and free to speak up about safety issues as well as personal issues that may be affecting their job performance.
- Focus on continuous improvement of practices and performance.
Safety and Surrounding Communities
Be cognizant of the health and safety needs of communities near the project. This includes the following:
- Take precautions on local roads – beware of local traffic and drive with care, particularly through communities.
- Be aware of the health care needs and limitations of nearby communities. A local health centre is an excellent component of your emergency response procedure, but it may be easily overwhelmed by non-residents, particularly during events such as wildfires, floods and outbreaks of communicable disease.
Dedication
Since the earliest prospectors first ventured into the mountains of western Canada, mineral explorers have faced the challenge of working safely in some of the most difficult and varied terrain in the world. This exploration has not been without hazard and has not been conducted without incident, although the safety record compiled by these explorers has been a tribute to their resourcefulness and courage.
This guidebook is dedicated to the following explorers who were killed in a tragic helicopter accident on July 3, 1980 in the Iskut River area, British Columbia:
Robert Clarke · Christopher Bruce Gunn · Keith Alexander MacLean · Ruth Anne Nussbaumer · Ian Ross Shaw
In the firm belief that fatalities and serious incidents can be reduced through increased awareness of the risks, the Safety Committee was formed in the fall of 1980 to collect the combined experience gained by those in the industry into one concise manual. It was our hope that it would prove a useful service to the industry as well as assist others who shared our interest in the outdoors.
The tragic deaths of those explorers in 1980, to which the Safety Manual was originally dedicated, have undoubtedly led to a substantially improved recognition of the many factors to be considered in protecting such individuals.
Acknowledgements
Thank you to the following members of the AME Health & Safety Committee for their contributions to this edition: Abby Cousins, Chair; Jonas Schuett, Vice-Chair; Kim Bittman; and Jim McCusker. Thank you also to the following for their contributions: James Mickle at Tetra Tech Canada and Ron Morrison at Raven RSM.
Emergency Response
Mine Managers in British Columbia are responsible for developing a customized and workable Emergency Response Plan in accordance with the Health, Safety and Reclamation Code for Mines in British Columbia (HSRC). Although mining operations may be similar, each operation is unique and requires a different plan in place to accommodate the site, the type of operation, the personnel, the level of training available, transportation, climate, and equipment available on site. Completed plans must be filed with the Chief Inspector as per the HSRC.
Mine/Operation Information
The following list identifies basic information that should be in the plan as it applies to a mining operation:
Note: A Mine is a place as defined under the Mines Act. Sites where mechanical disturbance of ground and/or exploration drilling occur and any place defined as a mine by the Chief Inspector are included in this definition.
- Name of the Mine and the company with a mailing address and contact telephone numbers; (fax and email if applicable)
- Name of the Mine Manager as appointed under the Mines Act
- Mine number and permit number
- Type of operation, i.e.: underground, surface, quarry, exploration, sand and gravel, placer.
- Location of the property (UTM or Latitude/Longitude).
- Number of employees on site, including management and contractors.
- Accurate mine plans showing and identifying areas should be maintained on site and made available to responding teams, personnel, or agencies.
Hazard Analysis of Operation
This section should identify all potential emergencies that could occur on the site. These emergencies may be broadly broken into five basic types. Each operation may choose to include more detail; others may break the five types into fewer or more than five types.
- Fire/Explosion
- Injury to workers
- Environmental
- Climate
- Equipment failure
Emergency Equipment
In this section, list the emergency equipment available on site to deal with identified potential emergencies/hazard. Also include other sources of equipment that may be necessary. Some examples are
- Fire pumps and extinguishers
- First Aid supplies
- Forest fire fighting supplies
- Rescue equipment (e.g. stretcher that can be fitted in helicopter or vehicle)
- Equipment that can be assigned to an emergency task (e.g. a dozer or excavator used to build roads and trails can be pressed into service to dam or dyke a flood).
- Industrial ambulance or emergency transport vehicle.
- Outside sources of specific equipment
- On site and made available to responding teams, personnel, or agencies.
Trained Personnel
In this section list the availability on site of trained personnel capable of dealing with the identified potential emergencies/hazards.
- Contact information for on-site First Aid
- Identify other sources of trained personnel (i.e. back-up teams, other agencies such as local fire department, local search and rescue, and provincial ambulance)
Implementation of the Plan and Incident Command
Clearly define how persons involved in an emergency are to access and implement the plan: (Preplan basic response guidelines based on hazard assessment)
- First steps, including who to call and how to call, and when to call
- Identify who will be responsible for implementing the emergency plan.
- Identify who will be in charge of conducting the emergency operation.
- Define all communication systems to be used (i.e. two-way radio, cell phone, satellite phone).
- Assign tasks by function and how the function will be filled. Examples include:
- call-outs and communication with other access road users including logging companies
- arranging assistance from other agencies or operations
- required notification (e.g. Mines Inspectors (Health and Safety), Provincial Emergency Plan personnel, etc.
- Include an Emergency Notification and Mobilization Chart.
Directions to Site
Provide clear written directions to the site; include maps that can be used for navigation. This is particularly important in remote areas. If using a radio-controlled logging road, include radio frequencies and call-out procedures.
For exploration sites, marshalling points should be established. Coordinates of such points should be provided, and helicopter landings areas should be identified or established
- Clearly define how these directions will be communicated to those who may not be familiar with the area or roads and are called in to assist.
- Identify who has been given copies of the directions in advance.
- On long road transport of injured workers, identify and mark on the map possible transfer sites for BC Ambulance Services.
Contact Lists
Set a standalone page with all contact information for all agencies listed, in addition to Company contacts. The following is not all inclusive.
- Mine Manager
- Corporate Head Office
- First Aid, phone, or radio channel
- Emergency personnel
- Outside agencies ( Federal, Provincial, or Local Government contacts)
- Equipment suppliers
- Transport companies, including air service (float plane or helicopter)
- Back-up rescue team if applicable
Training
- Include a provision for training all persons on site in the application of the plan.
Records
Supplementary to the plan are all the records associated with it. Therefore, the following records should be maintained on site.
- Training
- Equipment checks
- Implementation if applicable.
- Incident debriefing if applicable.
Conclusion
This guide is not all inclusive, and must be adapted to each site according to the risk assessment. It is imperative that the Mine Manager update the plan as may be required, from time to time due to changes in personnel, equipment, mine plan changes, or locations. It is also good practice to test the emergency preparedness plan with all affected persons. In some cases, evacuation drills are required, and if the site requires the evacuation drill, the evacuation procedure must be posted and communicated to all affected personnel.
Personal Protective Equipment (PPE), Tools and Equipment
Follow safe work procedures and wear Personal Protection Equipment (PPE) to help avoid injury.
General PPE Principles
Eyes
- Wear safety glasses at all times while walking through the bush, breaking or hammering rock, core splitting, blasting, using a chainsaw, or when visiting mining operations.
- Wear goggles or a face shield attached to a hard hat when hooking up helicopter sling loads.
- Wear safety glasses or goggles when handling chemicals (e.g. battery acid), boosting batteries, or using ultraviolet lamps for extended periods.
- Wear high quality polarizing sunglasses when working at high altitude or on glaciers, snowfields, and water.
Ears
- Wear properly fitting ear protection in any area of loud noise. Use of hearing protection is required for exposure over 85 decibels.

- Helicopters are noted for deafening noise. In fact, some are so noisy that both earplugs and muffs should be worn to reduce the noise level to acceptable levels. Customers should insist that aircraft are equipped with sufficient earmuffs to accommodate the maximum number of allowable passengers.
- Air hammers, drilling equipment, muskeg tractors, snowmobiles, and outboard engines also produce ear numbing vibrations – beware and take protective measures.
Hands
- Wear appropriate gloves when handling materials or doing heavy manual labour. Drillers and their helpers should use burlap gloves when handling greasy rods.
- Wear long sleeves and long pants at all times. These protect exposed skin and eliminate the need to remove bracelets and watches. Shirt buttons should be buttoned as an unbuttoned shirt can get caught on moving parts.
- Cold-weather working and snowmobile driving require insulated mitts specially designed for the job, such as:
- insulated gauntlets for snowmobiling
- water and fuel-proof insulated gloves for handling fuel and salt
- Wear acid resistant gloves when handling acids or corrosive materials. After handling radioactive materials, wash hands thoroughly with soap and water to prevent ingestion of radioactive particles.
- Wear gloves when handling dynamite as nitroglycerine may permeate the skin and can cause severe headaches.
Feet
- Wear adequate, fully laced footwear at all times. Some companies insist that exploration personnel wear safety-toed boots at all times during field work and subsidize their purchase.
- Wear durable, over the ankle hiking boots with vibram soles when working in rugged terrain. These help support the ankle joints and reduce the frequency of ankle sprains.
- Wear safety-toed boots whenever there is a possibility of heavy objects such as rock fragments or boulders falling on the feet.
- Wear safety-toed boots when using an axe or chainsaw.
- Wear warm insulated boots in cold weather to prevent frostbite. Avoid standing on metal in cold weather.
- Wear waterproof boots in wet conditions.
- Take extra insoles/boot inserts to replace wet ones and allow them to dry out.
Back
Many back injuries are due to improper lifting techniques. These injuries may result in extended periods of lost time and permanent disability.
- Keep your back straight and bend your knees when lifting.
- Keep the weight close to your chest when carrying.
- Use extreme caution when lifting above chest level.
- Be aware of your footing.
- When turning, do not twist your body – turn with your feet.
- Don’t catch heavy objects.
- Don’t lift too much weight – get help.
- Don’t show off – this has injured many backs.
Lungs
- Employment underground in a mine and in assay grinding rooms for more than 20% of working time in any one month is considered a “dust exposure occupation”.
- PPE such as masks and respirators must fit correctly to be effective. Various fumes and dusts produced in industrial processes have detrimental effects when inhaled. Ensure adequate ventilation in the work area to prevent bad air problems.
- The use of a rock saw in a closed space exposes personnel in that space to fine silica dust, which is very damaging to the lungs. Rock saws should be operated only with a water misting or lubricating device, the room should be vented with an exhaust fan and a mask or respirator should be worn by the operator, as the dust level requires.
- Persons cutting core may be required to have a chest x-ray, as required in regulations for a dust exposure occupation.
- Pay special attention to the storage of radioactive samples, as radon gas is given off by these samples and may become concentrated in poorly ventilated areas.
- The Canadian Nuclear Safety Commission requires that XRF analyzers be certified.
Clothing
- In general, clothing should be light, yet warm and water-repellent. Several layers of light clothing are most effective. Avoid jeans as they have no insulating qualities and do not dry quickly.
- Wear clothing with high visibility to make it easier to identify you from the air or at a distance.
- Dress for the environment being travelled through, not the inside of the vehicle or aircraft. Proper footwear is essential – i.e. boots, not running shoes. Particularly in winter conditions, failure to plan for proper clothing can be quickly fatal. If travelling, consider not only the weather conditions at your starting point, but also those likely to be encountered en route and at your destination.
- When travelling in aircraft, the decision must be made whether to wear outdoor clothing or to carry it in the aircraft. In any case, clothing should be stored within easy reach inside the aircraft (i.e. not in the tail or cargo compartment). In the event of a crash landing, survivors of the impact may succumb to exposure if injuries or fire prevent them from recovering outdoor clothing and sleeping bags.
- Carry Gore-Tex type clothing, a wool sweater or shirt, and a waterproof rainsuit at all times, no matter how warm the weather appears when you begin your trip. Use them before you get wet or cold. Hypothermia occurs mainly in cool wet conditions when the insulating value of clothing is lost due to wetness. Loss of body heat with wet clothes is 30 times faster than with dry clothes. Gore-Tex type clothing and wool clothing provide far better protection than cotton in wet weather.
- Avoid overheating by slowing down or by removing layers of clothing. Many plastic or oil-soaked cloth rainsuits trap body moisture. Evaporation of sweat from the body causes great heat loss and when dead air spaces in clothing become filled with heat-conducting moisture; this heat loss is accelerated.
- Always wear a hat (in winter this should be a toque or preferably a 100% wool peaked hat with ear-flaps). Sixty per cent of body heat is lost through the top of an uncovered head.
- In winter, the best outer garment is a long thigh-length parka with hood and bottom draw string. A full fur-trimmed hood will protect the face. Mittens protect the fingers better and are much warmer than fingered gloves. Attach mittens to tape threaded through arms of jacket to prevent loss. Leather mittens with wool liners are the best and should be tightly closed at the wrist. Insulated half rubber-half leather boots with insoles (two pairs if extremely cold) that are warm and waterproof are essential.
Tools and Equipment
Before using tools and equipment, ensure that you are familiar with the operating requirements. Adequate instructions must be provided to those with no experience.
- Understand how the equipment functions and the possible dangers.
- Demonstrate correct operating procedure.
Safety Glasses
Any person who may be exposed to specified risks of eye injury must wear properly fitting goggles, face shields, or other eye protective equipment complying with the current Canadian Standards Association (CSA) Standard for eye and face protectors and suitable for the type of work or activity being performed. Safety glasses should be used in rock sampling, core splitting, and tool grinding. Many companies assume the cost of prescription safety glasses for their field crews.
Hearing Protection
In exploration, the need for hearing protection is common, especially around drills, machinery, and aircraft. Most frequent use is in helicopters equipped with earphones, which facilitate communication between pilot and passengers and reduce fatigue and motion sickness. Hearing protection is also required when using chain saws or rock saws, around drill rigs, or when loading aircraft.
Hard Toe Boots
Protective footwear complying with the current CSA Standard and suitable for the type of work or activity being performed must be worn by any person where there is a risk of foot injury or where required by a manager or a mines inspector. In exploration, hard-toe work boots should be worn during rock excavation work and around underground workings.
Several companies require that exploration personnel wear safety-toe boots during traverses and some provide an allowance toward purchase.
Hard Hats
A protective hat complying with the relevant requirements of the current CSA Standard for industrial protective headwear and suitable for the type of work or activity being performed must be worn by any person who is exposed to risk of head injury or where required by a manager or mines inspector. Hard hats should be worn on appropriate occasions, particularly in quarries, underground workings, and on exploration work around cliffs, icefalls, and all drills.
Hard hats can embrittle, and therefore, should be tested after three to five years of use to ensure that they provide adequate protection and comply with current systems. Avoid painted hard hats as some paints can combine with solvents in the hat and either soften or modify the material. Replace hard hat liners annually if used frequently.
Axes and Knives
All axes should have a blade protector or sheath during transportation, as should hunting knives. When carrying an unprotected axe in the bush, hold handle immediately below the head with the blade facing outward for maximum protection in the event of a fall. In addition:
- Choose a long-handled axe and keep it sharp. The long handle will allow the axe to hit the ground, not your leg. A sharp axe will reduce the work required thereby reducing fatigue-induced incidents. As a general guide, the weight of the axe head should be matched to the weight of the handle, (e.g. a 2.5 lb head to a 26 in (66 cm) handle, or a 3.0 lb head to a 32 in (81 cm) handle.
- Always hold the axe with both hands.
- Clear the work area of obstructions.
- Ensure the axe head and handle are secure. This will prevent fly-off type incidents. Soak axe head area in water overnight and insert new wedges as required.
- Ensure secure footing while chopping.
- Maintain a firm grip on the handle.
- Wear boots with steel-protected toes.
- Maintain an even temper. If you “fly off the handle” the axe may end up in your leg.
Rock Hammers
There are several potential hazards to users and bystanders when rock hammering is in progress, including:
- Eye injury to anyone in the vicinity may be caused by flying rock or metal chips and therefore eye protection must be worn.
- Hammer heads could fly off the handle. Before use, inspect the hammer to ensure the head is secure.
- Ensure swing area is clear of shrubs or twigs which might deflect off the hammer.
- Use caution when carrying the hammer. Injuries have been sustained by people falling on the sharp end of their rock hammers.
Firearms
Guns of any sort are seldom required in the field. The only need may occur when there is a bear hazard. Even so, possession of a deficient or improperly used firearm will not ensure safety and may even contribute to the problem. Although rarely used, firearms are found in most field camps. They are most often carried in vehicles and backpacks to be readily accessible to all crew members. Both lack of knowledge and familiarity of such weapons can lead to carelessness.
As such, the Camp/Project Manager has the right, duty, and responsibility to exercise full control of the transportation and use of firearms by employees. A Firearms plan should be prepared prior to camp start up.
Companies may consider setting up a firing range and having designated firearms carriers practice throughout the field season.
This can help with accuracy when shooting a live target. The firing range should be located away from camp in an area where there is a safe place to shoot without hitting anything or anyone.
If starter pistols for bear bangers are available, everyone in camp should have the opportunity to practice with them.
Field use
Be aware that rifles and shotguns are difficult to carry in combination with day packs, rock hammers, geophysical gear and rock or soil samples, and that allowance should be made for the extra weight and unwieldiness of the firearm. Protect the sights from damage and check regularly to ensure that the barrel and breech have not become fouled by twigs, snow, sand, or other debris.
Firearms Regulations
Ensure that you follow current regulatory mandates. Firearms fall under the Criminal Code of Canada and are therefore regulated by the federal government – not the provincial or territorial government. All enquiries related to Canadian firearms regulations should be directed to the Royal Canadian Mounted Police, and any users must carry a Possession and Acquisition Licence.
General Firearms Safety Rules
- Be sure of your target before you pull the trigger.
- Always be sure that the barrel and action are clear of obstruction.
- Never point your gun at anything you do not want to kill.
- Never leave your gun unattended.
- Alcohol and firearms do not mix.
- Never climb a tree or cross a fence with a loaded gun.
- Never shoot at a hard or flat surface, or the surface of water. Make sure you have a safe backstop.
- Carry only empty guns in trucks, boats, and helicopters. No loaded guns are permitted in camps or tents.
- A padlock through the frame after opening the cylinder will safeguard a revolver from unauthorized use.
- After use, ensure that rifles or handguns are cleaned with cleaning kits.
Chainsaws
This section is designed as a convenient reference for safe power saw operating techniques. Compliance with a few basic safety points will significantly reduce injuries.
Training
The most important aspect of chainsaw safety is the formation of good working habits and familiarity with the equipment. This requires a training program by a qualified instructor. The operator should have a good working knowledge of the function of the power saw and the ability to make minor adjustments and repairs in the field. Physical fitness also results in a more alert approach to the job and the worker is less likely to develop lazy cutting habits – the cause of many incidents.
Personal Protective Equipment
All operators must wear adequate PPE while operating a power saw. This includes:
Leg Protection
Short chaps with interwoven nylon pads protect the leg from 30 cm above the knee to 30 cm below the knee. However, people of above average height will find that these chaps provide only about 5 to 8 cm of protection below the knee thus leaving the shins vulnerable to injury if worn with ordinary hiking boots. Professional faller’s pants with built-in pads provide considerably greater protection and are much more comfortable.
Head Gear
A lightweight plastic hard hat is required to prevent serious injury from falling debris. Head gear should be a bright colour for easy visibility.
Ear Protection
Two types of protection are available and highly recommended for use. A “muff type” protector that clips onto the hard hat is useful during cooler weather while “insert plugs” may be more comfortable and equally effective during warmer weather.
Eye Protection
Adequate protection against eye injuries is available in three basic styles:
- Face shields that clip onto a hard hat and that are composed of a fine mesh screen or clear safety glass or plastic offer good visibility and air circulation.
- Plastic goggles that fit snug to the face are effective, but become fogged and uncomfortable in warm weather.
- Safety glasses made of hard plastic or glass.
Footwear
Wear good vibram-soled leather boots at all times for best possible footing during dry periods. Leather or rubber caulk boots are recommended in extremely wet, timbered areas; particularly on the West Coast, Haida Gwaii, and Vancouver Island. Caulk boots, however, should not be worn on exposed rock surfaces because of the danger of slipping.
Gloves
Chainsaw gloves are inexpensive lightweight nylon gloves with latex webbing that permit a sure non-slip grip on the power saw, especially in wet weather.
Falling Techniques
There are six fundamental steps to follow in falling timber:
- Accurately judge the lean of the tree.
- Plan an evacuation route.
- Clear the ground surrounding the tree and along the escape route.
- Always look above for falling debris.
- Take special care in making a proper undercut and leave an adequate hinge of wood to maintain control of falling direction.
- Ensure that no one is in the immediate area and/or that they are aware of your activity.
Operation Safety Guidelines
The most common injury related to chainsaw operation is kickback. This occurs when the operator momentarily loses control of the saw, resulting in the blade bouncing back off the log into the operator’s neck, face, or leg. Kickback can be avoided by not working in an awkward position (i.e. standing too far away, working off balance, or working with poor footing). Proper care must also be taken while cutting branches, brush, or windfall slightly above ground level where hidden obstructions on the opposite side of the log may cause the tip of the bar to kickback through the cut.
Perhaps the most important aspect in the prevention of kickback is that great care be taken to sharpen the chain properly and to maintain the razor-sharp cutting edge (including height of rakers). If the chain is dull, you must exert great pressure thereby exposing yourself to stronger than normal kickback forces.
Helpful Hints for the Safe Operation of a Chainsaw
- Check the power saw frequently to ensure all parts are tight and that the chain is properly adjusted.
- Maintain the saw so that when the saw is idling, the chain is stopped.
- Keep the chain bar to the rear while carrying the saw. If you trip, you won’t fall on top of the chain. In addition, the dogs and the bar won’t get caught up in the brush.
- Shut off motor when carrying the saw any distance.
- Hold saw firmly against your body when using the tip of the bar to reduce impact from kickbacks.
- When cutting limbs, remember that the end of the bar causes most kickbacks.
- Learn to use the saw equally well with the right and the left hand to avoid awkward positioning.
- Never stand directly behind the saw and never straddle the saw. Always work to one side to minimize injury from potential kickbacks.
- When cutting in heavy windfall, assess each tree for stress. Make a shallow cut on four sides to relieve tension before completing the final cut.
- Carry a portable first aid kit containing band-aids and at least one four-inch pressure bandage with ties.
Electrical Equipment
Observe precautions with electrical equipment, and remember that fatalities have occurred because of the operator being inadequately insulated from electrical shock. Use only CSA approved or double insulated types of electric tools.
When generators are used as a source of power in the field, grounding of this equipment is very important. A fused breaker box must be used for all circuits to ensure any shorts will immediately shut off the current. A ground wire should be carried in all circuits and electrical boxes should be grounded in tents. When establishing a large camp, an electrician should be involved in the design and construction of the system.
An electrically powered rock saw is an example of a potentially dangerous situation where water can accumulate under the operator while using the saw. This equipment must be carefully grounded. You should stand on a wooden platform so water will not collect at your feet.
Particular care should be taken when working with geophysical equipment. Conductor wires used in induced polarization (IP) surveys become energized during use and in some circumstances have caused fatalities. In inhabited areas, when surveys are in process, road crossings should be guarded and warning signs should be posted.
Explosives
This section is only concerned with the transportation, storage and destruction of explosives as related to mineral exploration. No attempt is made to discuss the use of explosives, as all blasting operations must be conducted by the holder of a valid blasting certificate issued under the HSRC. Competency is achieved only by working closely with an experienced blaster.
All blasting operations associated with exploration or mining activities must be discussed with the Mines Inspector and approved under the Mines Act prior to commencement. Adequate warning signs must be placed in the vicinity of blasting operations and access routes must be guarded. All personnel on site must be educated in blasting warning protocols.
Transportation
Transportation of explosives requires a vehicle in good mechanical condition accompanied by an authorization from the owner to use the vehicle for this purpose. If the amount transported exceeds 25 kilograms, the vehicle must display “explosives” signs on all four sides. Absolutely no smoking is permitted near the vehicle (within 50 metres), and no combustible material or compressed gasses or liquids may be carried in the same vehicle. Some insurance policies exclude carriage of explosives without payment of an additional premium.
Fire extinguishers must be carried with the vehicle:
- Two – 5 BC rating fire extinguisher for a vehicle with a gross weight of up to 2,000 kilograms
- Two – 10 BC rating fire extinguishers for a vehicle of more than 2,000 kilograms.
Explosives must be transported in a fully enclosed, locked, fire resistant van, tank or fixed container:
- Standard panel truck (van) with lockable doors and compartments.
- Aluminum, fibreglass, or wood camper-top secured over pickup truck with a suitable lock.
- Fixed container with lockable lid, made of two-inch dressed lumber or ¾ inch plywood.
- For small quantities, the trunk and glove compartments of a car emptied of all loose objects.
- If both explosives and blasting caps are being carried, a separate lockable compartment which will prevent communication of an explosion must be provided (steel plate and fibreglass partition).
- The transporting vehicle must not exceed 90 kilometres per hour on the highway.
Storage
All explosives on a mine property must be stored in an explosives magazine, approved under an Explosives Storage and Use Permit issued by the Inspector of Mines. Explosives magazines must conform to all standards specified and are subject to inspection at any time. The storage for more than 75 kilograms and 100 caps, or for a period in excess of 90 days must be covered by a User’s Magazine Licence. A quantity of explosives and accessories not exceeding 75 kilograms and a maximum of 100 blasting caps may be stored in separate unlicensed magazines for a maximum of 90 days.
If the magazine weighs less than 140 kilograms it must be anchored to an immovable object (i.e. bolted to a truck or chained to a tree). In these cases, the magazine can be used as a “day box” and secured for storage purposes at night. The Mines Inspector has the authority to make judgment decisions to allow for flexibility of the magazine standards.
The following items may be stored within an explosives magazine:
- Explosives.
- Blasting agents.
- Detonating cord.
- Primers and boosters.
Detonating caps, safety fuse assemblies, delays, and relays must be stored within a separate magazine at a minimum distance of 50 metres from the explosives.
Destruction
It is necessary to destroy explosives that have deteriorated through exposure to excessive moisture, heat, and prolonged storage since decomposition causes misfires and instability. Explosives that have absorbed moisture are usually soft and mushy, while heat will cause gelatin-type explosives to “sweat” (i.e. ooze out clear oily beads of nitroglycerine). Remove and transport the explosives to the desired location for destruction.
There are two common methods of destroying high explosives:
- Detonation – the quickest method, but if the explosives are badly deteriorated, some cartridges may fail to detonate and would hence be scattered around by the explosion of others.
- Burning – the most efficient method, although burning of more than 50 kilograms at one time is not recommended.
DISCLAIMER – REFER TO REGULATIONS.
Only a certified blaster should attempt to destroy explosives as per requirements. Confirm approval with the Mines Inspector of where you conduct exploration.
Burning must be done at a distance far enough away that surrounding property and lives will not be endangered in the event of the explosives detonating instead of burning.
- Prepare a combustible bed of dry material long enough so that the cartridges may be spread out without overlapping.
- Douse the bed with kerosene to assist the burning.
- Prepare an ignition trail leading to the combustible bed so that ignition will be against the wind direction.
- Ignite the trail and stay clear of the area until the fire is completely burned out.
- Sift ashes with a wooden rake to ensure all explosives were burned.
- If additional quantities must be destroyed, use a new location.
Most blasting agents can be destroyed by emptying into a pit and pouring water over them as most are water soluble. However, if the blasting agents and blasting slurries contain TNT, they are best destroyed by detonation.
The safest and surest method of destroying blasting caps is to first tie them in compact bundles with the detonating ends together, placing them in a box or bag, and then burying them.
Finally, explode them with a good blasting cap, or for greater assurance, with a primed cartridge.
All other blasting accessories should be destroyed by burning. Special care must be taken while disposing of Primacord: it should never be burned on the spool but rather strung out in parallel lines one centimetre apart.
Health, Allergies and First Aid
Matters of health, hygiene, and allergies are of concern, particularly in remote locations. Employers are subject to confidentiality, and objectivity must be exercised (as per the federal Personal Information Protection and Electronic Documents Act) to protect employees, to anticipate possible problems, and to achieve proper solutions to health problems that may arise.
Health and Allergies
For detailed guidance and resources for maintaining a safe and healthy work environment for all persons within the workplace, consult AME’s Fit for Work tool.
Most companies require potential employees to pass a medical examination prior to employment. A valid Certificate of Fitness is a prerequisite for underground employment, and a similar certificate is required for many catering jobs. Field crew leaders are typically provided with completed health forms for all crew members (on a strictly confidential basis.) This form list ailments, allergies, adverse reactions (e.g. penicillin), medication required, size and frequency of dosages, and circumstances that might cause onset of symptoms (e.g. fatigue, alcohol, hunger, stress). Recent injuries or operations and special dietary requirements are commonly detailed and a personal physician should be noted. All field personnel should keep their tetanus inoculations up to date, and should have regular dental and medical check-ups to avoid problems in the field.
It is not sufficient to rely upon individuals alone to take suitable precautions or countermeasures to sustain their health. This is because certain reactions, such as insulin overdose or allergic shock may render a person incapable of suitable action. It is very easy for one to misplace, use up, or neglect to apply required medication. Dangerous reactions, such as bee venom or cedar wood, may never have been recognized prior to going in the field.
Failure to administer medication on a timely basis can result in comas, seizures, or other severe reactions. Thus unplanned circumstances, such as loss or breakage of medicine containers, being stranded away from the medication due to incident or weather conditions, or non-availability of medicine in a remote settlement, must all be considered.
Co-workers should be alerted to watch for adverse reactions and should know what remedial actions may be effective to mitigate distress and symptoms. Numerous highly infectious ailments can disrupt field camps and, once established, may be difficult to control. Extra precautions with respect to drinking water, cookhouse cleanliness, and personal hygiene may avoid problems; however, once a condition is recognized, victims should be evacuated for proper medical treatment without delay.
As a general rule, any condition serious enough to impair a worker’s ability to do their job should be referred to a first aid attendant or physician. In emergency or in cases of uncertainty, any physician will give advice by satellite telephone. The worker’s personal physician should be contacted if practical.
First Aid
Standard first aid and occupational first aid level 2 courses are appropriate when transport to Advanced Life Support is under two hours. Mineral exploration workers, however, are often in settings that do not accommodate this timeline, and therefore wilderness first aid training is encouraged. This course is offered over 3 days, and in addition to prolonged patient care as described in this section, wilderness first aid also addresses providing care in austere environments and with limited resources. A wilderness first aid course will also better inform and prepare people for environmental mechanisms of injury such as hypothermia and hyperthermia, improvised packaging and critical thinking.
All first aid kits should be equipped with a St. John Ambulance first aid book, and each camp should have a wilderness first aid book. All minor cuts, scratches, and burns should be given attention in the field, as these can develop into major problems if left unattended. Personnel whose work involves the risk of severe wounds, (e.g. axe or chainsaw cut) should carry pressure bandages while working.
Hypothermia
When heat loss exceeds heat production within the body, hypothermia may develop. Hypothermia is one of the leading causes of death to people in the outdoors; it can develop quickly and it can be fatal. Hypothermia is defined as the cooling of the internal body core temperature below 35°C (95°F). Below this temperature internal organs, including the brain, do not function effectively. Mild hypothermia is classified as having a core body temperature above 32°C (90°F) and severe hypothermia occurs below 32°C (90°F).
The major difference between the onset of hypothermia on land and in water is one of time scale. Hypothermia in water develops at an accelerated rate because water conducts heat away from the body 25 times faster than air at the same temperature. After the onset of symptoms, death can occur within one to two hours unless adequate measures are taken. Person-overboard incidents account for the majority of hypothermia related deaths in water. The most common causes of hypothermia on land are due to wet, cold, and windy weather, combined with hard physical exertion and inadequate clothing. Temperatures need not be especially cold for hypothermia to develop; it frequently sets in at temperatures between –1°C and 10°C (30°F and 50°F). The use of drugs or alcohol increases the onset and risk of fatality from hypothermia.
Hypothermia Prevention
Hypothermia can be prevented on land by taking sensible precautions. Use the buddy system to monitor your field partners because victims often do not recognize their own symptoms. If there is the slightest chance that someone is suffering from hypothermia, never leave that person alone or let them wander off as their condition may deteriorate suddenly. Follow these preventive measures:
- Dress appropriately. Always carry extra warm layers and a waterproof outer garment with you. Remember, some types of wet clothing, especially cotton, can extract heat from the body in cold weather much faster than dry clothing, whereas wool and polar-fleece garments even though wet, retain a reasonably good insulating quality. An uncovered head can account for up to 60% of body heat loss in cold weather so carry a wool toque or cap. A hood attached to your rain jacket or life jacket is also a valuable aid.
- Carry waterproof matches or a cigarette lighter and some means of easily starting a fire. Build a fire and/or shelter as soon as you feel chilled.
- Stop and rest or set up a temporary camp depending on the severity of conditions before exhaustion occurs.
- Carry extra food, particularly energy producing items containing fats, sugars, and starches (e.g. candies, raisins, nuts). Eat frequently and drink sufficient water to avoid dehydration because the digestion of food requires water.
Hypothermia prevention for boaters is considerably more complex and difficult. In remote areas, capsizing far from shore in cold water usually results in death. Boaters should be aware that some lifesaving devices offer little or no thermal protection in cold water. Unless adequate thermal clothing, foam-lined life jackets (preferably with a hood and crotch flap) or survival suits are worn, boaters will otherwise rapidly succumb to hypothermia even though safe from drowning. In essence, keep the principle of 1-10-1 in mind: if you enter the water, you have 1 minute to control your breathing, 10 minutes for self-rescue, and 1 hour before you become unconscious.
Any decision to swim to shore must be tempered by the fact that the exertion of swimming causes the body to lose heat 35% faster. Experience indicates that in cold water 4°C to 10°C (40°F to 50°F), one can swim only a fraction (1/10 to 1/4) the maximum distance that one would be capable of swimming in temperate water. Body heat can be better preserved by assuming the “Heat Escape Lessening Posture” (HELP) with arms crossed tightly across the chest and legs crossed and pulled up to the chest or by huddling together with others, provided that life jackets are being worn. Treading water is likewise preferable to the drown-proofing technique if no life jacket is worn. If the boat is still afloat, try to get onto the boat as far as possible and hang on until the boat drifts ashore or until rescued. In addition:
- Always wear a life jacket or personal flotation device (PFD), preferably one that keeps your head out of water, is insulated, has a hood, and keeps the torso fully protected by a foam lining and crotch flap. Such a jacket extends survival time in cold water by about two to three times. Note that a PFD designed for use around swift water should be used in and around whitewater.
- Wear warm, heat retentive clothing (e.g. wool or fleece).
- Keep your shoes or boots on for extra warmth.
- Remain as still as possible to avoid dissipation of body heat.
- Always carry waterproof matches, flares, some cord, and a knife for use when you reach shore.
- Once on shore, build a fire immediately. Concentrate on warming your head and trunk area. Put on dry clothing. If none is available, remove your articles of clothing one at a time. Wring them out and put them back on.
Predicted survival time for the average lightly clothed person in 10°C (50°F) water with a standard life jacket on is two and a half to three hours.
Symptoms
Hypothermia is a progressive disorder. Mild hypothermia can usually be treated in the field, but severe hypothermia is life-threatening and is extremely difficult to treat in the field. It is really important to recognize and address early symptoms so hypothermia does not progress. Note: there are both physical and behavioral symptoms.
Early Stages
Victim may be alert and answer questions sensibly.
- Feeling cold and numb is the first symptom. Victims focus on getting warm rather than the task at hand.
- Shivering may be intermittent, uncontrolled, or violent.
- Pulse and breathing are rapid.
- Urinary urgency.
- Slight loss of coordination: some difficulty performing tasks with fingers and hands.
Moderate Stages
Victim is in grave danger and may die if hypothermia progresses.
- Increased difficulty with coordination and becomes clumsy.
- Fatigue—wants to rest or go to sleep.
- Reduced shivering.
- Slurred speech and amnesia.
- Weakness and drowsiness.
- Apathy and poor judgment.
- Dehydration.
- Frequent stumbling.
- Uncooperativeness and confusion.
- Victim may wish to be left alone.
Severe Stages
Cardiac arrest occurs when the body core temperature cools below 30°C (86°F).
- Shivering diminishes and then stops.
- Inappropriate behavior, such as removing clothing.
- Speech is slurred.
- Reduced heart and respiratory rate and depressed brain function.
- Irregular pulse (cardiac arrhythmia).
- Muscle rigidity.
- Unconsciousness.
Treatment
Take immediate action to PREVENT FURTHER HEAT LOSS.
- Get the victim into some sort of shelter. If there is no outdoor shelter, use whatever is available—a tent, an overturned canoe, a space blanket or tarp, branches rocks or snow for a windbreak. Build a fire as soon as possible.
- Remove wet clothes gently without exposing bare skin to wind or rain, if possible. Share dry clothing to the extent that no other member of the party is endangered.
- Use blankets or sleeping bags to insulate the body against further heat loss.
- Concentrate on warming the head, neck, chest, and groin areas. Apply heat with skin-to-skin contact with a healthy person, or with heat from hot water bottles, chemical heat packs, or even heated rocks, if they are wrapped to prevent burning the victim’s skin.
- Insulate with hat, gloves, and socks, to prevent further heat loss, but do not apply heat to the extremities. Applied heat causes peripheral blood vessel dilation, which may result in a drop in blood pressure and other circulatory problems.
- The victim should avoid unnecessary activity, as this circulates cold blood from the extremities into the body core thus increasing the rate of heat loss. Do not rub their skin or extremities.
- Administer warm, sweet drinks (non-alcoholic and caffeine-free) to a victim who is conscious and not shivering uncontrollably.
- For moderate hypothermia: keep victims as still as possible and handle them very gently, as a cold heart is susceptible to ventricular fibrillation, which can cause death.
- Gently transport victims to a medical facility as soon as possible.
- An unconscious severe hypothermia victim requires considerable care in order to survive. Carefully assess pulse and respiratory rate for up to two minutes. If respiration only is absent, begin mouth-to-mouth resuscitation to donate heat. If a pulse is absent, start CPR only if it can be maintained until a pulse is restored or until Advanced Life Support personnel arrive. It may be better to leave the victim cold and untreated, as intermittent application of CPR will likely cause ventricular fibrillation to occur.
Always remember that a victim is never considered dead until “warmed and dead”.
Hyperthermia
When heat production exceeds heat loss within the body, hyperthermia may develop. The four main types of hyperthermia or heat stress are:
- Heat cramps
- Heat syncope (fainting)
- Heat exhaustion
- Heat stroke
Heat cramps and heat exhaustion result from dehydration and salt depletion as the body sweats to lower its internal temperature. Heat stroke occurs when the core body temperature exceeds 41°C (105°F) and the body cooling mechanisms have failed. Hyperthermia can develop during exercise in only moderate to hot temperatures (e.g. 30°C or 86°F) with fairly high humidity (50% or more).
Prevention
Risks of hyperthermia are increased by rising air temperature and humidity level, by solar and reflected radiation, by clothing that doesn’t allow good ventilation close to the skin surface, by low fitness level (but not exempting even the best athletes when they’re competing in extreme conditions), and by large body build (the less bulk, be it muscle or fat, the more efficient the body’s cooling system). Recent illness and lack of heat acclimatization increase the risk of hyperthermia. Excessive exertion is often the precipitating cause of body core overheating.
As with hypothermia, common sense is the best prevention. Dress for the weather and activity level – wear loose fitting clothing that protects the skin from sun. Drink plenty of fluids before feeling thirsty, take salt with food in normal to liberal quantities, and always wear a hat in the hot sun.
Symptoms and Treatment
Recognizing hyperthermia is not easy as the early or mild stages may generate few clear symptoms.
Heat Cramps
May indicate dehydration and salt depletion.
Treatment: Rest in a cool place out of the sun and provide fluid replacement (an electrolyte replacement solution such as Gatorade or other commercially available drink).
Note: Saline solutions are no longer recommended for treatment of heat stress. Gently stretch the affected muscles and apply ice.
Heat exhaustion
Has a variety of symptoms ranging from mild to severe:
• Cool, clammy skin
• Headache, dizziness, and fainting; hyperventilation
• Nausea and vomiting
• Confusion
Treatment: Cool the victim. Rest in a cool, shaded place with legs slightly raised and clothing loosened. A conscious victim should drink an electrolyte replacement solution to replace the water and electrolytes lost by dehydration. 24 hours of rest and rehydration are necessary before resuming work.
Heat Stroke
A life-threatening condition demanding immediate medical attention. As the body core temperature approaches 41°C (105.8°F) the victim can no longer produce sweat. If any heat stroke symptoms are apparent, treatment must begin without delay. As the core temperature rises above 41°C (105.8°F), unconsciousness, delirium, and convulsions may occur.
There are two forms of heat stroke:
Exertional Heat Stroke (more commonly affects field employees)
- Pale, cool, damp skin or hot, dry, red skin
- Irrational hostile behaviour
- Rapidly rising core temperature
- Headache, dizziness
- Nausea and vomiting
- Collapse
Classic Heat Stroke
- Hot, dry, red skin
- Rapidly rising core temperature
- Rapid pulse
- Headache
- Nausea and vomiting
- Delirium
- Convulsions
- Collapse and coma
Interim Treatment (prior to evacuation to a medical centre):
- Move victim out of the sun into the coolest place possible.
- Cool the victim as quickly as possible, paying particular attention to the head, armpits, and groin. Drape the victim with lukewarm wet sheets or towels to conduct heat away from the body.
- Fan the body using electric or handheld fans. Try to place the victim on a screen so they can be cooled both from above and below. The aim is to maximize evaporation from the body to cool the core body temperature without chilling the victim.
Lightning
Inriver Camp
When a lightning storm approaches camp or drill rig:
- Disconnect radio antennas and move them away from the radio.
- Move the antenna leads of both personal and short-wave radios away from both people and the radios. Lightning strikes in the general area can induce a high voltage in the antenna, resulting in an arc discharge to the nearest ground.
- All employees should move away from the drill rig – the mast may act as a lightning rod.
While Outdoors
During a lightning storm:
- Avoid standing in areas that are susceptible to a strike (e.g. a single large tree, a mountain ridge, or a large open area where you are the only tall object).
- Move to a safe place before the storm arrives, such as inside a car or truck. Look for shrubs or trees of uniform height, ditches, trenches, or low ground.
- If fallen live wires are touching the vehicle, do not step onto the ground while they are touching the vehicle; you are a better conductor than the tires.
- Head for shore immediately if you are in a boat or canoe.
- Geophysical crews must be especially alert for storms in their area as equipment may stretch for kilometres. Disconnect all wires from equipment and stay well clear for the duration of a storm.
- Maintain high awareness for thirty minutes after the last observed lightning or thunder.
If lightning strikes in the vicinity, you must minimize your contact with the ground.
- Crouch down with your knees drawn up and your feet close together. Crouch on insulating material if possible, such as a dry sleeping bag. Never let your hands, shoulders or head touch the ground, as current passing through them will also pass through your vital organs.
- A field party should spread out at least 20 metres apart so they do not provide multiple paths for the current.
If a person is struck by lightning, check if the victim has a pulse and is breathing. Follow the ABCs of first aid.
- Airway – check
- Breathing – respiration rate
- Circulation – CPR
Treat burns as required. After effects may include impaired eyesight and loss of hearing.
Note:
- You cannot receive an electrical shock from someone who has been struck by lightning.
- Lightning rarely kills outright—it paralyzes body functions. Recovery is common, even if some time has elapsed since the strike.
The National Lightning Safety Institute recommends that all organizations prepare a Lightning Safety Plan and inform all personnel of its contents.
Camp Life
Camp safety is a matter of common sense combined with adequate preparation. It is extremely important for the Camp/Project Manager to be safety conscious as it is this individual’s attitude and actions that ultimately sets the tone for the crew.
The following checklist is not comprehensive, but rather is a guide to the types of hazards that are present in locating, designing, and running a small to moderate-size camp. For detailed information, refer to requirements in the Health, Safety and Reclamation Code for Mines in British Columbia (HSRC) and the Industrial Camps Regulation.
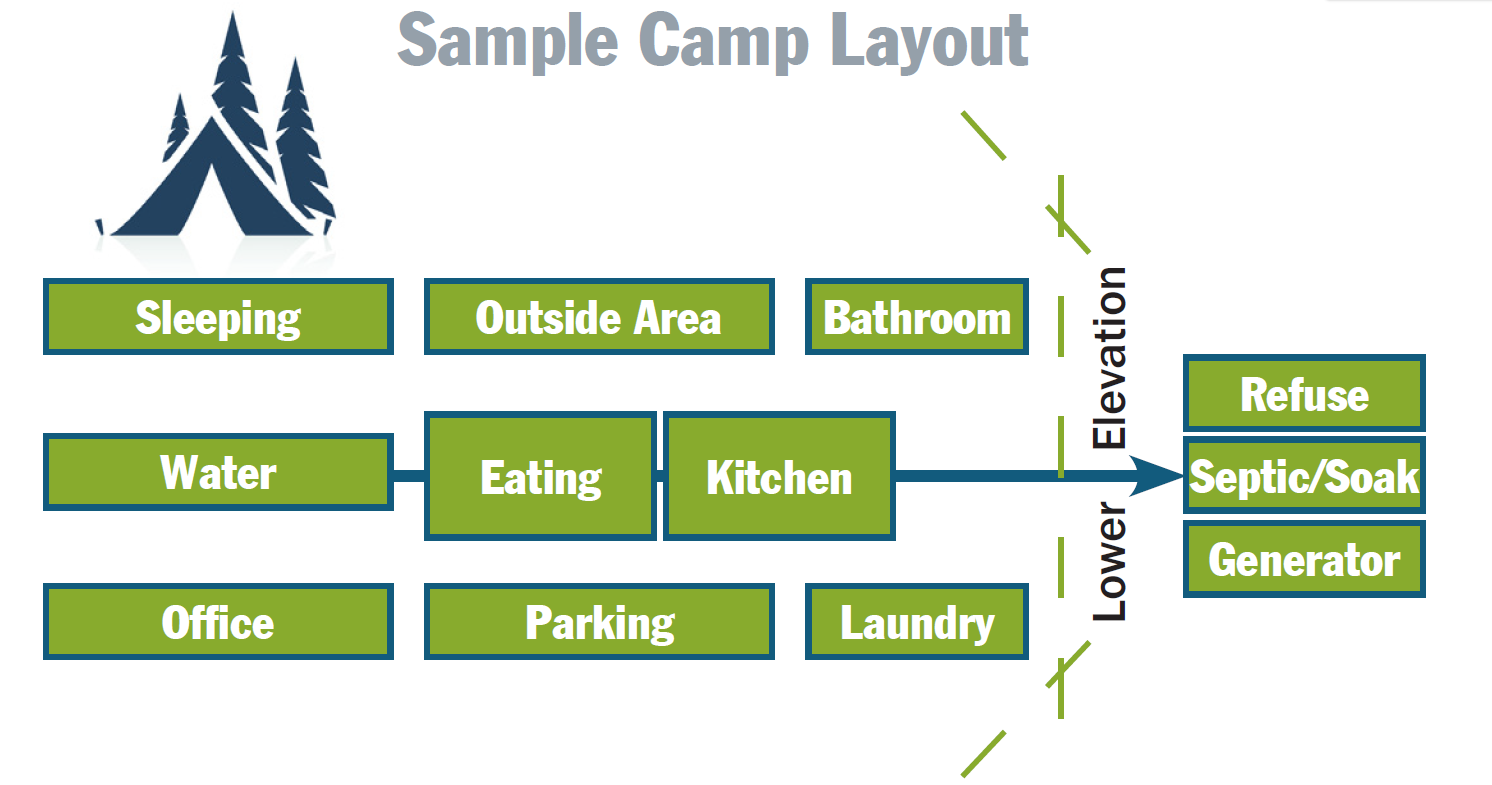
Location and Layout
Camps should be constructed:
- In a safe location away from environmental threats such as avalanche, flood, falling trees, animal trails, aircraft take-off/landing/operation paths, etc.
- To have minimum environmental impact.
- With camp structures located at minimum safe distances apart (at least 6 metres) to prevent spread of fire and within an area protected by a fire break.
- With an emergency tent/building far enough removed so that it can act as a separate shelter if the rest of the camp is destroyed. This tent must have 3 days of emergency rations.
- With tents located in a straight line. It is important not to arrange tents in a circle, so that if a bear must be shot, no one is in the way of fire by being in their tent.
It is important to consider the following:
- Rising water or flooding at times of high runoff.
- Vulnerability from potential forest fires.
- Avalanche, rockfall, or slide danger.
- Tall or dead trees and especially dead branches nearby that could fall into the campsite area with strong winds or lightning strikes.
- Safe drinking water.
- Animal habits – bear encounters may be increased near old garbage dumps or camps, bear trails, spawning creeks, and berry patches.
- Camp size – is the area sufficient to carry out operations safely?
- Appropriate camp permits where needed from provincial or territorial authorities.
- If the campsite has been used previously, enquire of previous users as to its suitability.
- Winter sites should be selected with regard for potential wind and snow drifting problems and must be kept clear of snow for instant use in case of medevac.
- Situate fuel caches or flammables away from camp.
- Situate helicopter pad 100 metres away from camp.
- Situate garbage disposal and kitchen area away from sleeping area (at least 100 metres and 50 metres respectively). These first two areas are the most likely sites for nocturnal animals.
- Burn garbage in a safe open area away from camp (at least 100 metres away and visible from a distance so as not to surprise bears).
Electrical supply to camps usually will be by generator. Diesel-fueled generators are preferred as they have a longer durability and diesel reduces the danger of fire.
- Power lines should be buried a minimum of two feet or suspended from insulated poles at a safe height and protected from damage by vehicles.
- Except for simple extension lead electrical distribution, wiring must be installed by a qualified and registered electrician or must be checked by an electrician before start-up.
- All cables and extension leads should be regularly inspected and replaced if damaged.
- All outlets must be installed with over-current protection and/or ground fault circuit interruption.
- All electrical distribution and supply will conform to local electrical code and regulations. This may require wiring diagrams.
- All computers and electronic equipment must be protected by surge protectors and line conditioners.
No one is obliged to live or work in a camp that they feel is unsafe or unhealthy.
Fire Hazards and Prevention
Prevention is the best way to combat fire. However, incidents do happen, and therefore early action with pre-positioned equipment and carrying out an established plan is key. Fuel, oxygen, and an ignition source are required for a fire to burn. Therefore, removing any one of these three components will prevent or extinguish a fire.
Regulations
On an annual basis, good practice entails that companies check the fire regulations in the jurisdiction where personnel will be working (provincial or territorial) for the type and quantities of fire equipment that are required for the main camp and for each subsidiary camp.
Fire Officer
The Fire Officer must be constructively aware of fire safety; in a large camp, good practice assumes that one or more mature persons are responsible for the implementation of fire safety measures. The Fire Officer or designee establishes procedures (and equipment deployment) for various types of fire occurrences, and advises all other personnel of the measures. Periodic fire drills should be held.
A fire plan should be written up prior to arrival in camp – a plan for “fire in camp” and another for “forest fire in the area”. Everyone arriving in the camp should be made aware of both plans and the locations of the muster point and all firefighting equipment.
Types of Fires
Fires are classified as:
- A > Fires in ordinary materials (paper, wood, rubbish, etc.)
- B > Fires in petroleum products (fuel, oil, grease, paint, etc.)
- C > Fires in electrical equipment (control panels, switches, etc.)
- D > Fires in combustible metal (magnesium, sodium, etc.)
Firefighting Equipment
Firefighting equipment includes fire extinguishers, portable water tanks, buckets of sand, axes, and shovels. Dry chemical fire extinguishers can be used on A, B, or C fires, which are the most likely type to start in a camp. Accordingly:
- Each camp occupant must know how to operate a fire extinguisher.
- Place at least one dry chemical fire extinguisher in each tent/building/room and in other strategic locations (e.g. next to stove in kitchen, near engines (such as generators), and each fueling point (such as for vehicles, power saws, or pumps).
- Place a dry chemical fire extinguisher in each vehicle including UTVs.
- Locate a foghorn and flashlight beside each fire extinguisher.
- Check fire extinguishers regularly to ensure that they are visible and free from obstruction.
Fire Precautions
Every camp should take the following precautions:
- The general campfire equipment should be kept at one location. Have it painted red and ensure that it is not used for any other purpose.
- Locate a large container (45-gallon drum) of water near each tent in addition to a water bucket and sand bucket.
- A reservoir should be available from which water can be drawn by pump or bucket line.
- Have a fire alarm system or similar system in place, and firefighting equipment appropriate for the situation.
- Equip each tent/building/separate room with a smoke detector and carbon monoxide detector.
- Carry out fire evacuation/emergency drills.
- Arrange camp appropriately to reduce risk or spread of fire.
- Acquire appropriate permits for campfire or garbage burning from provincial or territorial authorities. In some areas (e.g. BC), firefighting equipment is required by regulation, the type depending on the size of the camp.
Flammable Items and General Fire Protection
Be aware of dangers from:
- Smoking – do not smoke or use a light source with an open flame when refueling anything. If light is required, use battery-powered illumination.
- Stoves and fires – do not leave unattended. Completely extinguish fires before leaving camp.
- Flammable items and debris – maintain a clean camp
- Propane tanks – fuel storage tanks and motors have plastic-lined confinement or storage areas underneath, lined with absorbent pads, capable of holding all the fuel in the tank if a leak occurs. Spill kits should be strategically located.
- Fuel drums – should be clearly marked with respect to contents and grouped according to contents to minimize the danger of using the wrong type of fuel.
- Vaporizing gasoline or naphtha – highly flammable.
- Oil and propane heating tank units – turn off when the camp is unoccupied.
- Flammable liquids – store away from living and working quarters and overhanging trees.
- Lanterns, flares, mosquito coils.
- Forest fires.
Heated Tents
Extra caution should be taken with heated tents.
- Ensure that chimneys are adequately insulated from the tent wall with fire-retardant materials.
- Use non-clogging spark arresters on both oil and wood stoves.
- Use aluminum foil reflectors to ensure that radiant heat from the stove or pipe does not set fire to the canvas or wooden tent walls.
- Ensure that stove pipes are properly wired and braced to resist wind storms. Secure a rotating wind cap on the top and a one way damper in the chimney to prevent back draft of gases.
- Separate the tents to prevent the spread of fires.
- Place metal safety guards around all oil heaters.
- Place metal baking sheet under heaters. This can protect the wooden floor from the heat and catch any drips.
- Place stove lighting instructions in the tents and inform all tenants how to use them safely.
Heaters and Water Heaters
Airtight heaters should have a thin layer of sand or sandy soil spread on the bottom to prevent metal from being burnt through.
- Space heaters and water heaters should be placed on metal stands and have clearance from flammable surfaces as specified by the manufacturer. If flexible fuel lines are used, it is necessary to provide extra lengths to accommodate possible movement of the fuel tank or propane cylinder. Semi-permanent and permanent propane installations should be done by licensed fitters – inspectors will insist upon it, and you will be relieved of many potential disasters. Temporary hook-ups are equally hazardous – protect the lines and double-check the fittings after each move.
- In a fly camp, if a small wood stove is set on the ground, ensure that the mineral soil is exposed for a sufficient area around the stove, then set the stove on small stones or gravel. Furthermore, ensure that there are no hidden roots beneath soil level that may eventually dry out, smolder, and carry the fire to the tent wall, or cause excessive smoke inhalation while occupants are asleep.
- Avoid starting wood fires with flammable liquids. Plan ahead and purchase solid-fuel fire starter if you intend to use wood fires.
- Never pour a flammable liquid into any stove, or into a fire area that is still warm; the immediate fuming of the liquid will result in an explosive vapour. In the event that a flammable liquid is used to start a fire, ensure that it is “contained” in an absorbent material (e.g. absorbent paper) to reduce fuming.
- When starting a wood stove, a small piece of burning paper placed directly under the stove pipe creates a column of heated air in the pipe, so that when the tinder and kindling are lit, there is already a favourable draft.
- Build fires from “small to large”. Get the tinder, kindling, and small wood burning before piling on large pieces.
Lanterns
Fuel-powered lanterns and stoves require particular caution. For optimum safety, upgrade to LED or battery powered products.
- Lanterns should be hung up so that they are not easily dislodged.
- The handle of a lantern that is hung up while lit will become dangerously hot; use caution in taking the lantern down.
- Lanterns should be taken down for lighting so that they can readily be taken out of doors in case of incident.
- Before lighting a lantern, think of where you will take it, and how you will carry it (such as with a stick through the handle) if it flares up because of a gasoline leak. Alternatively, light it outdoors.
- Fill pressure tanks only to the recommended level.
- Do not pump in excessive pressure.
- Ensure that radiant or convective heat from a lantern is not at risk to set fire to the wall or ceiling of a tent.
- Do not leave lit lanterns unattended.
Campfires
- Use care and foresight when choosing the location of a campfire or signal fire to ensure that it does not spread into trees or forest litter.
- Clear the immediate fire area down to mineral soil.
- Build a small fire pit. Square-faced stones built up to form a wall about two feet high on the back of the fire pit will help reflect heat to the front. To prevent stones from cracking or possibly exploding, avoid using wet rocks or rocks containing water such as sandstone.
- For a small signal fire, it may be convenient to use a large flat rock.
- Use particular care in extinguishing camp and signal fires. Extinguish with ample water wherever possible; a plastic sample bag is useful for carrying water for this purpose in the field.
- Check the ashes carefully and test for hot spots with your bare hand.
- Avoid scattering of signal fire ashes by helicopter blade wash.
Wildfire Preparation and Response
Explorers should take various precautions for wildfire season.
- Fill out and submit an Emergency Contact Information form before the start of any mechanized activity.
- During forest fire season the local fire rating and local fires should be monitored daily. An escape route and evacuation plan should be made in advance of the project start up.
- Forest fire reporting numbers should be made available in camp along with the coordinates of the camp, in a format familiar to the authorities. Review the questions that you may be asked when reporting a fire.
- Sprinkler systems can be set up to protect assets such as core but the primary goal is protection of life.
- Follow protocols for high risk activities.
- If a forest fire is nearby, camp personnel should be alerted and ready to evacuate within short notice. Vehicles should be kept full of fuel and the exit route kept clear at all times. Have an alternate route handy if the primary access route is required for firefighting.
- If a fire is spotted near camp or where people are working, they may be able to try to contain the fire but keep in mind we are exploration personnel, not professional forest fire fighters. Under no circumstances should exploration personnel be put at risk to protect the environment.
Santitation and Hygiene
Sanitation facilities must comply with all applicable legislation.
- Small, short-term camps must employ a drop toilet with a drop hole of greater than one metre. Do not build drop toilets in a drainage way. They must be located downstream of water supply.
- Use lime to speed decay.
- Cover drop toilet with a minimum of one metre of soil prior to leaving camp.
- Larger and longer-term camps must have a septic or filter/ incinerator system installed by a qualified and registered engineer.
Water and Food
- Do not use water from open water supplies unless it has been tested and shown to be fit for drinking or has been treated to ensure it is safe to drink.
- Store water in dark, cool, insect and animal proof containers.
- Store dry and packaged food in clean, insect and animal free conditions. Perishables and frozen foods should be stored in cool or frozen conditions.
- If in doubt about food quality, do not eat it.
Refuse
Follow a “If you can carry it in, you can carry it out” policy to minimize environmental impacts and the chance of attracting wildlife.
- All non-biodegradable refuse should be removed from the site and disposed of at an appropriate location (i.e. municipal dump).
- Biodegradable refuse can be buried in pits above the water table or burned at high temperatures.
- No refuse must be left exposed.
- Waste water must be disposed of in septic systems or soak pits.
- Kitchen garbage must be burned daily.
Animal, Insect and Disease Control
Camps can attract animals, insects, and diseases, causing camp life to be unsafe and unhealthy. In addition to having a Communicable Disease Prevention Plan, as required by law, here are additional tips:
Taking a proactive approach to good health is key:
- Locate garbage and waste disposal areas such that fresh water supplies are not contaminated.
- Do not feed wild animals, take precautions against attracting them, and do not bring them to camp. Be aware that pets in camp (e.g. dogs) can attract bears.
- Refrain from threatening or provoking animals that do appear in camp.
- Keep insects out of camp buildings by using screens and/ or the mildest effective repellants/poisons (use only as directed). Cleanliness and proper refuse/waste disposal will minimize insect invasion and disease. (No food in sleeping/ office/tents).
Although COVID-19, norovirus and influenza are the most commonly known communicable diseases, others to consider include hepatitis, dysentery, eye infections, boils and mononucleosis.Although less common in cities, tuberculosis is still encountered in all parts of rural Canada, especially in the north.
Bears (see also Chapter 9: Wildlife)
Good garbage disposal practices greatly reduce the probability of bear problems. After bears have discovered and fed at a garbage dump, it is almost impossible to discourage their return. Reduce encounters with proper camp layout, proper garbage disposal, and daily thorough burning in commercially available incinerators. Fuel drum-based incinerators are no longer recommended.
For a fly camp of less than one week in duration, washing and flattening tin cans and storing them in an airtight garbage bag is likely sufficient. The garbage bag can be returned to the main camp or town for incineration and burial. In addition to proper garbage disposal:
- A suitable calibre firearm should be kept in base camp for use as a last resort to protect life or property. Current gun legislation must be followed.
- Bear spray may be used as an additional defense.
- Problem animals should be reported to local wildlife authorities. When an animal is shot, it is a legal responsibility in most areas to turn in certain portions of the remains to wildlife authorities for recording.
Firearms (see also Chapter 3: PPE, Tools and Equipment)
Learn from the past…
…In light of an incident of a Camp Cook/Medic being shot in the stomach through her tent, the project Safety Committee implemented a “Bear in Camp” emergency plan – three blasts on the air horn and someone yelling bear, everyone gets in the closest building and gets down on the floor. The designated bear guard gets the gun and can work on getting the bear or wolf away from camp without worrying about other people. Getting on the floor reduces the chance of being hit by a bullet coming through a tent.
Firearm laws and regulations vary from province to province, state to state, country to country, and under local ordinance legislation.
- Understand and comply with the general firearm laws policy.
- Learn where it is necessary to use firearms for protection against bears and other predatory animals.
- Secure firearms and ammunition together at a safe place in camp and under the supervision of the Safety Coordinator or a certified person.
- Know how to use the firearm(s) for protection if the camp is in an area with large predatory animals.
- Know and adhere to the camp firearm safety systems.
Hazardous Substances
- Hazardous substances are governed by the Government of Canada Hazardous Products Act and Hazardous Products Regulations. WHMIS (Workplace Hazardous Materials Information System) provides information on the safe use of hazardous products, and this information can be managed either in print or online.
- Substances in camp must be clearly labeled, stored in a safe and secure place, and used only as directed.
- If a crew member brings hazardous substances into camp, the Camp/Project Manager should be notified and substances should be stored as directed.
- Unused hazardous substances and containers must be disposed of in a safe, appropriate manner, and location. Refer to the Safety Data Sheet (SDS).
- Should an incident involving a hazardous substance that requires medical attention occur, take the SDS with the patient to the medical facility so doctors know immediately what must be done for correct treatment.
- All crew members should have current WHMIS training, which is easily available online.
Drugs, Alcohol and Tobacco
It is the responsibility of all individuals to know what the drug, alcohol, and tobacco policies are in any given camp and to observe them. Other considerations include:
- Strict adherence to company zero-tolerance policy for the use of illegal drugs or the abuse of prescription drugs in camp. Users may be removed from camp (NO WARNINGS), are subject to termination, and may be reported to the authorities.
- Policy regarding alcohol and cannabis use.
- First aid attendants on 24-hour duty must refrain from consuming alcohol.
- Intoxicated workers will be removed from the work site as per zero-tolerance policies toward alcohol abuse.
- Individuals taking prescribed medication that affects judgment or performance must advise the Project Leader and Project Coordinator.
- Smoking policy variations ranging from tolerance to a total ban, and in accordance with local regulations. Smoking may be permitted in designated smoking areas only, and is always banned from kitchens, eating areas, field offices, fuel caches, helipads, and sleeping areas.
- For further guidance, access AME’s Fit for Work tool.
Personnel
- All crew members must be aware of the safe procedures for operation of any equipment that they use or work around.
- Appropriate Personal Protective Equipment (PPE) must be worn (i.e., boots, goggles, gloves, etc.)
- All crew members must be advised on the proper course of action if lost or if, through circumstances, they must spend an unexpected night or nights out.
- Individuals must carry suitable clothing and safety gear in case of emergency. (e.g. signal mirror, signal cloth, matches)
- Working in pairs is safer than working alone. This is stressed when working in dangerous areas or when one of the individuals is inexperienced. It is the responsibility of the Camp/Project Manager to evaluate the hazards of working alone against the experience of the individuals concerned.
Communications
In the event of an emergency, good communication is extremely important. If working in the bush alone with the camp as a base, maintain regular communication with the camp and/or a co-worker.
- Each camp should have a reliable means of communication (radio, phone, fax), and at least one daily contact with the site head office via the Camp Manager and/or head office.
- It is the responsibility of all workers to know where the communication equipment is, how to operate it, and to follow regular communications schedules.
- In remote areas, dependable radio communication and backup between camps and between aircraft and camp is essential.
- Know the limitations of handheld radios both for distance and line of sight. Repeaters may be necessary.
- Handheld radios require regular battery charging. Backup batteries should be carried in the field.
- Radio frequencies used should allow communication with outside camps or other outside contacts. In some areas (e.g. Yukon), there is a common frequency used by industry over which help can readily be obtained.
- Antennas and lead-ins should be well flagged to avoid entanglement with aircraft, vehicles or people, and should not be located on potential flight paths.
- Radiotelephones and satellite telephones require clear lines of sight to repeaters or satellites. Camps should not be in closed valleys if possible to minimize the restrictions on communications. A generator is necessary to recharge batteries.
- At project on-set, establish radio or other contact with local expediters, RCMP, forestry, the local ambulance service and other officials so that your timetable and whereabouts are known locally.
- An emergency call list of the nearest medical facility, RCMP, government officials and air transportation facility should be kept at each communication station.
- All crew members at each location should know how to operate all communications equipment.
- Individuals who carry firearms must be licensed and proficient in their safe use.
- A member of the crew, preferably the Camp/Project Manager or a dedicated Occupational First Aid attendant, must have a knowledge of first aid, and be backed up by a suitable first aid kit and manual.
- All crew members should carry a personal medical kit. It is recommended that all members of the crew have first aid training and/or wilderness survival training (legislated in some jurisdictions).
- Camp/Project Managers should be aware of the medical condition of each crew member (e.g. allergic reaction to insect stings).
- Should seriously injured or sick individuals require medevac transfer in British Columbia, contact should be made immediately with the British Columbia Ambulance Services (BCAS) by calling 9-1-1 from a cell phone or 250-374-5937 from a satellite phone. BCAS coordinates air and land transfers of sick or injured individuals from one area to another. Note: Injured individuals will likely need to be transported from the place of injury to a place with road access.
If a badly injured worker needs medical evacuation, the Camp Manager/Project Manager should know:
- Who to telephone for a medevac.
- The location of nearest medical facility to which evacuation would proceed.
- Who to contact for medical advice and to advise of arrival.
- The location of nearest available fixed-wing or helicopter aircraft, and how to contact these quickly in an emergency.
The following information should be available when the request for assistance is placed:
- Description of injury and/or sickness.
- Specific grid reference for emergency aircraft required to transfer the victim.
- Available history of injured or sick individual, including name, home address, and date of birth.
Medical Equipment
Each camp must have first aid kits according to the Workers Compensation Board regulatory policies of the area and the HSRC.
- Every camp should have a comprehensive medical treatment kit and a designated person that is responsible for administering emergency medical treatment and maintaining medical treatment supplies and equipment.
- It is each worker’s responsibility to know where the first aid kits and medical treatment kits are, who the camp first aid attendant is, and to seek treatment when needed.
Emergencies
In the event of an emergency in camp, follow the instructions of the Camp/Project Manager and the camp specific emergency procedures.
Personal Responsibility
Do not go into a new area or region without doing your research first. Reference the internet, and if possible, talk to someone who has worked there before – obtain the name of the outside contact and phone for information. It is the Camp/Project Manager’s responsibility to conduct an orientation with crew members; however, it is personal responsibility to understand the possible risks of venturing into new territory.
Transportation
More than two-thirds of fatalities in mineral exploration are related to transportation. Between 1980 and 2021, surface and air transportation incidents resulted in 70 deaths in mineral exploration in Canada.
Boats and Canoes
Travelling and rescuing yourself and others in non-motorized and motorized boats on flat and moving waters are skills that require training and hands-on practice. Transport Canada legislates the requirements for operating a motorboat and provides comprehensive marine safety guidelines, certification information and training options. Individuals piloting vessels measuring between zero and 15 gross tonnage, carrying between zero and 12 passengers which are not pleasure craft must comply with federal training and certification standards.
Water safety is particularly important in BC and Yukon because of the presence of fast flowing cold rivers, cold lakes, and tidal marine environments – all subject to changeable weather conditions. Hypothermia can be a major risk factor.
PFDs are designed to be worn – wear them!
Lakes bordered by mountains with late afternoon winds can cause sudden storms, resulting in rough water. Waves tend to build in the longitudinal direction of the lake (i.e. broadside to any small craft attempting to cross from one side to the other – the worst possible configuration). Camp/Project Managers are responsible for exercising discretion when such conditions arise and, if necessary, postpone the crossing until the wind has abated. Always check local weather conditions prior to departing.
Persons caught in rough waters should head into the waves at a 45 degree angle. To capsize in cold water far from shore in a remote area is to risk almost certain death due to hypothermia, even if a PFD is worn. Inflatable boats offer a high degree of flotation, but even they can flip over in strong winds and turbulent water. No attempt should be made to utilize rivers for transportation due to rapid changes in elevation. The use of boats in ocean waters for exploration purposes requires special knowledge of seamanship and should only be undertaken by those with appropriate training and experience.
Preparation
Several essential factors should be considered prior to beginning any boating activity:
- Transport Canada requires that all small craft less than 18.0 feet (5.5 metres) in length and under 10 horsepower (7.5 kW) in power must carry:
- one approved PFD per person (being worn) aboard – paddles or oars
- a bailing device (empty pail attached to boat with a line)
- a sounding device (whistle or air horn)
- Other useful items include:
- towline (minimum 2.5 times boat length)
- anchor
- survival kit (first aid, blankets, flares, waterproof matches, emergency rations)
- radio telephone or satellite telephone
- repair kit (tools for outboard motor, shear pins, operating manual, patching equipment, spare fuel and lubricants)
- throw bag
- for swift water travel, use the 4321 principle:
- 4 carabiners
- 3 pulleys
- 2 prusiks
- 1 section of webbing (and one rope).
- All operators of small motorized watercraft are required to hold a current Pleasure Craft Operator Card.
- Being a strong swimmer is imperative for anyone doing exploration work using boats.
The following is strongly recommended:
- All small vessels (canoes, zodiacs, etc.) should have specification plates stating maximum load, recommended size of outboard motor, and maximum numbers of persons allowed.
- An orange strip or other recommended colour should be placed along the keel of all small vessels so if overturned, they can be more easily detected from the air.
- Notification of abandoned or empty vessels floating on the surface of the water should be made immediately to the RCMP.
- The use of unpowered canoes less than 5.5 metres in length be avoided and that preference be given to the use of inflatable or other more stable craft of the size required for the operation.
- PFDs should provide the best insulation available and the size of the PFDs should be specific to occupants.
- Adequate communication should be maintained with a base camp containing a support craft manned with the required operating personnel.
- All equipment is in good working condition (despite having a bailer, a small leak in the boat may become a significant problem).
- A travel plan that includes a photo/diagram of your boat, destination, route, and time of return is left with someone responsible. This may be instrumental should you get delayed due to equipment failure, weather conditions, or injury.
- You monitor the weather reports well in advance of your departure to ensure good weather. Observe water conditions before setting out (i.e. tides, currents, water levels, etc.).
- You learn basic navigation and safety skills – such as boating and swift water training.
- You take courses relevant to the type of water travelled (e.g. Motorized (and Non-Motorized) Swiftwater Boat Operator.)
- You are always aware of personal limitations!
En Route Safety
Once launched, a boater can reduce the chances of being involved in an incident. Major considerations include:
- Practising proper navigation and safety skills. Enough emphasis cannot be placed on the use of proper boating safety techniques. It is important to learn these in a formal setting from professionals.
- Keeping a constant watch on the wind and developing weather as squalls may build up in a matter of a few minutes, especially on interior lakes.
Loading
- Avoid overloading. Passengers and equipment must be arranged with respect to centre of gravity. Make an allowance for larger waves if loading in sheltered water and travelling in open water.
Fuel
- Ensure that adequate fuel supplies are carried with provision for emergencies.
- Monitor fuel consumption closely so that refueling may be carried out onshore. This avoids possible stranding due to restarting failure.
Lake Travel
- Stay close to shore whenever possible. When travelling across large bodies of water, steer at a 45° angle into waves.
Ocean Travel
- Never travel without local tide charts (know how to use them).
- During rough conditions, keep well clear of shore break and keep land in sight.
- Make allowance for tides when beaching small boats.
- Do not travel in foggy conditions.
River Travel
- Do not use rivers for transportation; use for reconnaissance only.
- Do not attempt to run rapids – be prepared to portage or to “line” vessel from shore using lines attached to the bow and stern of the boat.
- Strong currents must be taken into account when approaching shore – watch for fallen trees or sweepers.
- Log jams are a major hazard. In unknown terrain examine aerial photos for evidence of predictable hazards and portage around any suspicious areas.
Ensure Survival
If an incident occurs on a small craft, your chances of survival are increased by having basic knowledge of small craft safety survival and rescue procedures. Everyone should stay by the craft in the event of an upset. Climb on top of the craft or get as high up as possible and huddle together. Use an emergency whistle or sound-making device (see Hypothermia).
Secondary Drowning
This is a condition that can occur after a near-drowning event in flat or moving water (whether after canoeing on a lake or crossing a creek during a traverse in the mountains on foot). An individual has the potential to drown later on (upon return to camp for instance). Workers should be aware of this danger and be trained to observe the warning signs in order to prevent such a tragedy.
Snowmobiles
- Snowmobile travel is one of the top causes of fatalities on surface ice. Completing an ice rescue course is highly recommended.
- Obey all laws enacted by federal, provincial, and local government agencies pertaining to safe use and operation of snowmobiles. Note that WCB regulations pertaining to Mobile Equipment apply to snowmobiles.
- WCB regulations state that all operators and passengers shall wear approved (by Motor Vehicle Branch) safety helmets, faceguards, and suitable eye protection.
- Be aware of the effects of wind-chill factor on exposed skin and dress accordingly. Learn the signs and symptoms of hypothermia and its treatment. Hypothermia is the greatest hazard encountered with snow vehicle travel.
- Maintain a safe speed and keep the snowmobile under control.
- Avoid areas where avalanches are possible. Travel in heavily treed areas, tops of ridges, or flat areas away from avalanche paths.
- If travel over lakes or rivers is absolutely necessary, test the thickness of ice beforehand and avoid areas with fast flowing water, such as narrows.
- Watch out for overflow conditions.
- Beware of hidden obstacles such as fence wires and boulders.
- Various light conditions make it difficult to see hazards. Drive so you can stop within your limits of visibility.
- Learn general maintenance and trouble-shooting procedures for the machine.
- Become familiar with maps and compass readings, survival techniques, and ground-to-air rescue signals (see Aircraft – Hand Signals).
- Do not unduly damage the environment or harass wildlife.
- Carry repair kits.
- Carry survival kits on extended trips.
- If using a Sno-Cat, ensure that there is an escape hatch in the roof.
Essential Equipment
Essential equipment, sufficient for each person and machine, to be carried on extended trips includes the following:
- Extra fuel in safe containers.
- Two-cycle gas deicer.
- Map, compass, and GPS unit.
- Communication (radiotelephone or satellite phone plus an InReach or SPOT satellite messenger).
- Snowshoes.
- Knife.
- Ice awls.
- Candles.
- Extra clothing.
- Tool kit and spare parts.
- Block and tackle or “come-along”.
- Waterproof matches.
- Axe or saw.
- Flashlight and extra batteries.
- Flares.
- First aid kit (level 1).
- Large metal cup or small pot.
- Steel wool.
- Bright tarp or plastic sheet.
- High-energy food.
- Emergency shelter.
- Rope.
- Spare key.
Light Vehicles
For detailed guidelines, view AME’s Light Vehicle Training tool.
Learn from the past…
…In 1983, an employee at an exploration site in northern British Columbia was fatally injured when falling from the back of an open pick-up truck in which she was riding. In the same year, a diamond drilling employee was fatally injured when struck in the chest by an unsecured fuel drum after both passenger and the fuel drum were thrown out of a pick-up truck.
- Vehicles should be mechanically sound, properly equipped, suitable for the job and under the control of a licensed, mature, and competent operator at all times. Defensive driving courses are recommended, and the recreational use of vehicles is strongly discouraged.
- Drivers should be familiar with the operation and maintenance of vehicles with safety checks performed regularly and following exposure to unusual conditions. Broken, worn, or missing items should be replaced. Vehicles with defective steering or brakes, or damaged or leaking exhaust systems must be parked until repaired. A vehicle log book should be carried in the vehicle and maintained.
- Safety equipment, including mirrors, lights, seat belts, tires, brakes, wiper blades, windshield glass, ROPS (rollover protective structure) canopies, fire extinguishers, flares, shovel, fan belt, and first aid material should be considered part of the vehicle and not “borrowed” from other vehicles or for other uses.
- Vehicles should not be used for a specialized task (e.g. ambulance, tow truck, explosives truck) unless suitably equipped for that task.
- Vehicles with tidy tanks (portable service tanks designed for the transportation of petroleum fuels) must have additional safety equipment and drivers must have ‘Transportation of Dangerous Goods’ (TDG) certification.
- Operation of any vehicle by an operator who is impaired by alcohol or any type of drug is prohibited by law and may result in employment termination and legal action.
- Operators should be aware of hazards or potential hazards that may be encountered in areas of work (e.g. washouts, mud holes, unsafe bridges and culverts, avalanches, landslides, wide or heavily loaded vehicles, snowplows, graders, livestock).
- Loose cargo items (e.g. fuel containers, boxes, crates, bumper jacks, spare tires) that might become lethal projectiles in cases of sudden deceleration must be secured and restrained by suitable holders, racks or clips, or should be tied securely to vehicle chassis by lashings or cargo nets.
- Do not stand up in the back of pick-up trucks.
- If more than one vehicle is travelling to the same destination, each driver should know how to arrive there independently.
Ensure that a spare vehicle key is secured in a safe place outside of the vehicle and known only to the occupants. Your life may depend on this when in a remote location during the winter.
Recommended Safe Driving Practices
- Wear seat belts at all times, except if crossing ice bridges.
- Be aware of your position relative to other vehicles – check the rearview mirror frequently.
- Adjust your speed to the driving conditions. Maintain sufficient distance between your vehicle and the one ahead.
- Stop and nap or change drivers if you begin to feel sleepy.
- Don’t lose your temper because of someone else’s bad driving.
- Yield your right-of-way if necessary; don’t insist on it.
- Maintain the vehicle properly.
- Know how to control skids.
- In snow, wait in a safe area until the road is plowed. In fog, wait until it clears or drive at a speed that does not exceed your visibility with low beam lights on. In rain, reduce speed. In freezing rain, avoid driving if at all possible.
- Do not assume other vehicles will turn in accordance with their turn signals. Wait until they have commenced their turn before passing or pulling in front of them.
- Do not run yellow lights. When leaving a stop light, wait a few seconds and look both ways to avoid collision with “red light runners”.
- Proceed with caution near crash sites. Other drivers looking at the incident may not be paying attention to the road.
- Do not overload the vehicle. Use extra caution if hauling field gear and personnel, or pulling trailers.
- Slow down on one-lane bush roads as corners and hills are usually blind. Roads within active logging areas may require that special radio communications be set up with the logging company to determine when the road can be travelled safely.
- There are different opinions on how to safely recover a vehicle. One option is to use a tow strap with clevises attached to tow points on each vehicle. When using a strap, ensure everyone is at least 20 metres clear of the vehicles in case the strap breaks. – If in doubt, you may need to leave the vehicle behind until it can be extracted by a professional. Vehicle recovery using winches is not recommended.
All-Terrain Vehicles (ATVs) and Utility Vehicles (UTVs)
Learn from the past…
…One summer, In Yukon, a company decided to build a camp at the bottom of a hill and access drill sites at the top of the hill by ATV on an access road. In the course of the summer they recorded three incidents involving ATVs where drill personnel were medevaced.
- Vehicles with rollover protection are strongly recommended. Most large companies have banned motorcycle-style (straddle) ATVs and now require the use of side-by-side quads fully equipped with seatbelts, roll cage, and doors.
- Consider using utility vehicles such as Mules, Bobcat UTVs or Argos, as these are more stable, and carry more cargo and people that ATVs.
- ATV-related activities are the third most common cause of severe injuries next to cycling and snowmobiling.
- If ATVs are used in the field, training by a well-qualified instructor is highly recommended. Always make a pre-ride inspection before you start the engine.
- Do not ride fast on unfamiliar terrain or when visibility is limited. It is sometimes impossible to see obstructions, holes, and depressions. Always exercise caution.
- Follow the manufacturer’s rated vehicle capacity for loads and speeds if carrying loads or towing a trailer.
- Most ATVs are designed to be ridden only by the operator. Their design does not permit carrying a passenger safely, as attested by the many injuries experienced by the passengers.
- Avoid the more obvious pitfalls – steep, rocky or irregular slopes; unsafe speeds; and exceeding your physical capability in righting an overturned ATV.
- Wear a crash helmet, scuff-resistant clothing, gloves, and goggles or face shields.
- Carry a dry chemical fire extinguisher and first aid kit.
- All ATVs must be insured and carry at least the minimum liability insurance requirements when ridden on active Crown logging roads and off-road; extra insurance is recommended.
- All ATVs and personnel must meet the current provincial or territorial legislation.
- Racing ATVs is extremely dangerous and is prohibited.
The ATV is a valuable aid to the prospector or geologist; however, its limitations should be respected. Special hazards include the following:
- Sprains or back injuries may occur when picking up a fallen ATV.
- Burns may result from contact with exposed exhaust pipes.
- Blind corners on narrow trails or roads may cause collisions with other vehicles or persons unless particular care is exercised – slow down!
- Overhanging branches may lead to serious eye injuries.
- When crossing small streams, the depth of water and the type and condition of the banks and stream bed should be checked as they can cause spills.
- Be aware of the possibility of fallen trees across your trail.
Motorcycles
Use of motorcycles is not common practice in exploration in western Canada, and is discouraged. If used, personnel must be properly trained and licensed in the operation of such vehicles. When operated by a novice, motorcycles are extremely hazardous in any environment.
Aircraft
The nature of mineral exploration requires the use of chartered fixed-wing aircraft and helicopters. By following safe operating procedures, the risks associated with flying can be minimized.
Aircraft Operations
There are four authorized conditions for aircraft operations that should be followed:
- Use of registered, chartered, passenger aircraft, preferably from an audited charter company, or a company that has a reputation for safe and reliable operations.
- Acceptance of pilots only who have flown more than the minimum number of required hours on the type of aircraft to be used, and who are rated for the conditions.
- Never fly as a passenger or an ad hoc crew member on:
- an aircraft chartered for cargo
- geophysical surveys
- a helicopter carrying a load on the cargo hook
- Report to your employer any stunt, trick, or extreme flying on aircraft. Transport Canada Visual Flight Rules (VFR) state a maximum flight path of one mile horizontal and 500 feet vertical.
Pre-Flight Actions
- A flight plan should always be filed. In remote areas, base camp is to be notified as are the local police (or similar authority) of your planned route. This includes your destination, estimated time of departure (ETD), estimated time of arrival (ETA), passenger numbers, and names.
- A Search and Rescue (SAR) plan should be established.
- Identification of any obstacles/restrictions that might be present in the operational area should be understood.
- A safety check is required to ensure that no flags, tags, or tie downs are attached to the aircraft.
- Emergency exits, the SAR plan, seat belts, life jackets, radio operation, fire extinguishers, emergency locator transmitter (ELT), first aid kits, and survival kits should all be inspected and discussed regarding their proper use.
- Aircraft is to be equipped with mobilization equipment and a litter kit.
Helicopter Selection
Helicopters are selected based on the needs of any given exploration program. It is important for companies to reference the aircraft’s performance section in the pertinent flight manual and discuss the aircraft capabilities with the operator to ensure that it can safely fulfill the needs of the exploration program.
The type of terrain has an influence on helicopter selection. For instance, a reconnaissance-type program may require many landings on irregular ground surfaces with relatively confined landing sites. In such a case, it would be prudent to have excess power available and a machine with relatively short rotor blades and a high skid to ensure sufficient ground cover clearance.
Although similar hazards are present in the operation of all helicopters, including lighter models, there are several safety implications associated with the use of medium and heavy-lifting helicopters. Larger helicopters are used for the development of vertical reference slinging (long line) and the transportation of sophisticated externally carried electronic equipment. Due to this, increased rotor downwash and possibly more confusion in the landing or loading area is more common. Some operators provide loadmaster specialists as crew members who are given the responsibility for organizing and positioning loads. In the absence of a loadmaster, it is essential that exploration personnel have clearly defined safety responsibilities and authority.
Aviation Threats to Safety
Aircraft can be involved in incidents whether on the ground or in the air. The following hazards and mitigations are recommended:
- Landing sites – airfield inspections, adequate length of landing site.
- Adverse weather – VFR minimums, cold weather training, weather training.
- Incorrect loading – passenger weights, cargo weights, weight and balance.
- Fuel exhaustion – fuel check, flight plan, fuel reserve.
- Fuel contamination – fuel testing, fuel filtration, fuel storage, fuel sampling.
- Collision on ground – passenger control, ground procedures.
- Collision in the air – airspeed, weather procedures.
- Medical evacuation – medevac capability, securing equipment, aircrew experience, simulations.
The Pilot
In the field, if you are unfamiliar with the pilot’s credentials, it is your responsibility and your right to satisfy yourself that the pilot meets or exceeds the required skill and experience level needed for the project. Inquire about total flying hours, total hours on aircraft type, formal mountain flying training (if applicable), vertical reference training and experience, safety record, experience on your type of operation, date of last Pilot Proficiency Check, and hover exit training.
The pilot is in command of the aircraft and his judgment shall be respected concerning such items as adequacy of weather for flying operations, suitability of landing sites, and payload to be carried.
Under no circumstances should the pilot be harassed, coerced or otherwise encouraged to act against the pilot’s own judgment.
Pilot Fatigue
Fatigue is a progressive decline in one’s ability to perform safely. For pilots, fatigue results in an insidious change of attitude toward flying. The pilot’s personal standards decline; more risks are taken; and small (warning) incidents tend to occur. If the pilot exhibits stress symptoms (e.g. irritability, isolation, missing cues, distracted attention), contact the helicopter company immediately and advise them of the situation. Flight and duty times are clearly defined and governed by the Canadian Aviation Regulations (CARs). Fatigue is the cause of many aircraft-related incidents.
The aircraft operator or maintenance service provider must establish a program to minimize the effects of acute and chronic fatigue amongst maintenance personnel which shall include maximum working hours, minimum rest periods and roster schedules.
Clear communication between pilots and workers will reduce fatigue and stress.
The Passenger
Although serious passenger-related incidents are few, the passenger or individual working around aircraft must be aware of potential hazards which can be dangerous. A passenger should not perform any crew function unless safety is otherwise in jeopardy. An inexperienced float plane passenger attempting to assist the pilot to dock is exposed to extreme danger from the rotating propeller. Passengers have been struck by propellers while walking forward to the front end of the float to tie the aircraft to a dock or mooring point.
Many fatal and serious incidents have occurred when a passenger or bystander walked into a moving helicopter tail rotor or main rotor. Fatalities and incidents have been caused by hats or other loose items being blown into the main rotor blade of a helicopter. Inexperienced personnel frequently misjudge the location of a revolving main rotor blade. Therefore, items such as backpacks, shovels, skis, and drilling rods should be carried low and parallel to the ground in the vicinity of the helicopter to prevent them from striking the blade.
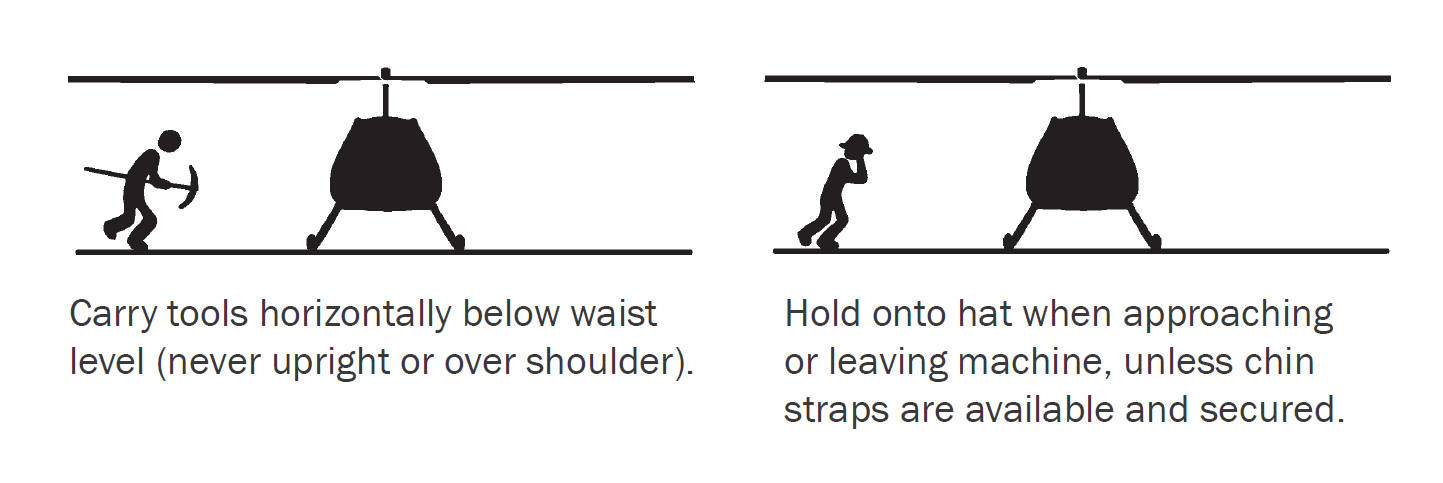
During flight, when passengers are seated next to the pilot, ensure that no loose items interfere with controls or obscure the pilot’s view. A seat belt buckle or earphone jammed underneath the pilot’s collective lever at a toe-in landing site where both pilot’s hands are occupied would almost certainly result in an incident.
In-Flight Procedures
- Wear seat belts at all times.
- Do not smoke.
- Do not open doors or windows in flight unless instructed by the pilot.
- Do not extend parts of your body or equipment out of the aircraft unless instructed by the pilot.
- Do not throw anything from a moving aircraft unless specifically approved by the pilot.
- Do not talk to or unnecessarily distract the pilot during take-off, climb, descent, landing, or when flying in difficult conditions.
- Calmly advise the pilot if you think there is something wrong.
- Follow the pilot’s instructions and do not pressure the pilot to fly against his judgment or against regulations.
Ground Safety
- Do not remain on an aircraft that is being refueled and do not smoke within 15 metres of refueling operations.
- Do not approach, enter, exit, or refuel a fixed-wing aircraft with the propeller turning.
- Use extreme caution if you approach and leave a helicopter with the rotors turning. The rotors are flexible and generally 2.5 metres above the skids of the helicopter. This clearance can be greatly reduced if the ground is uneven, in gusty or windy conditions, or if the engine is running down or idling. (Figure 1)
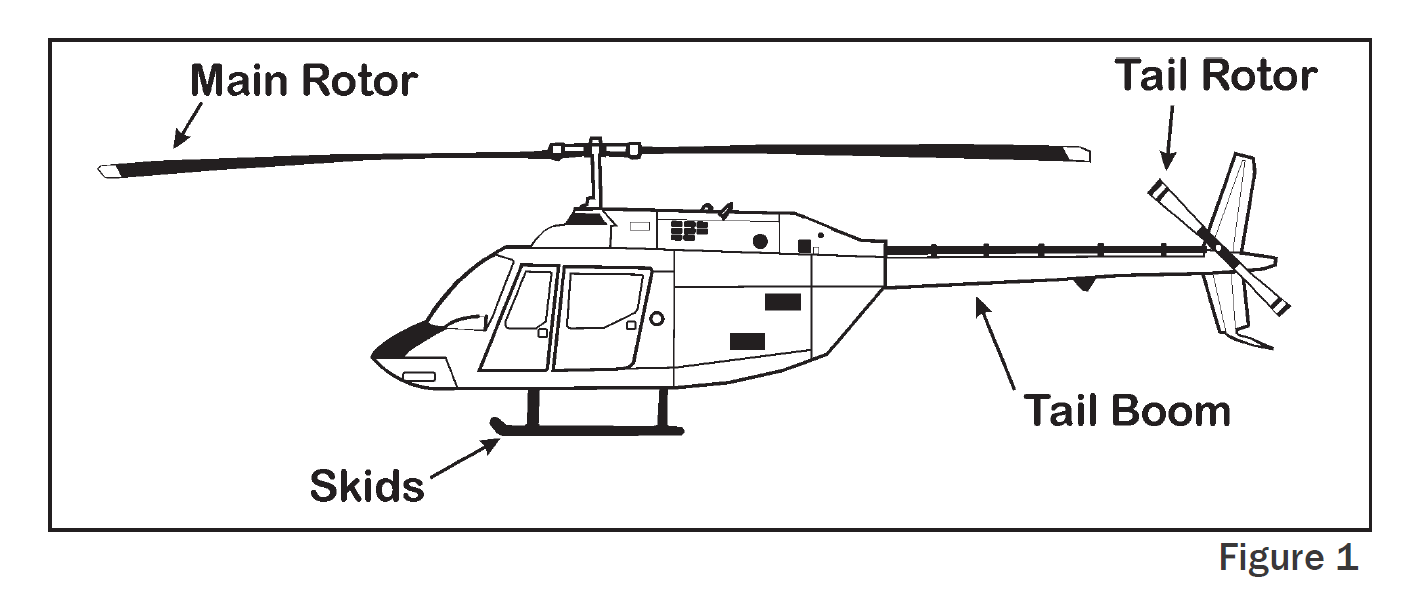
- Always approach a helicopter and leave a helicopter from the downhill side in a semi-crouched position and in full view of the pilot. Only approach from the front after the pilot has seen and acknowledged you. Walk – never run. (Figures 2,3)
- Never approach the tail rotor, move behind the rear passenger doors or baggage compartment, or move to the other side of the helicopter by crossing under the tail boom. (Figure 3)
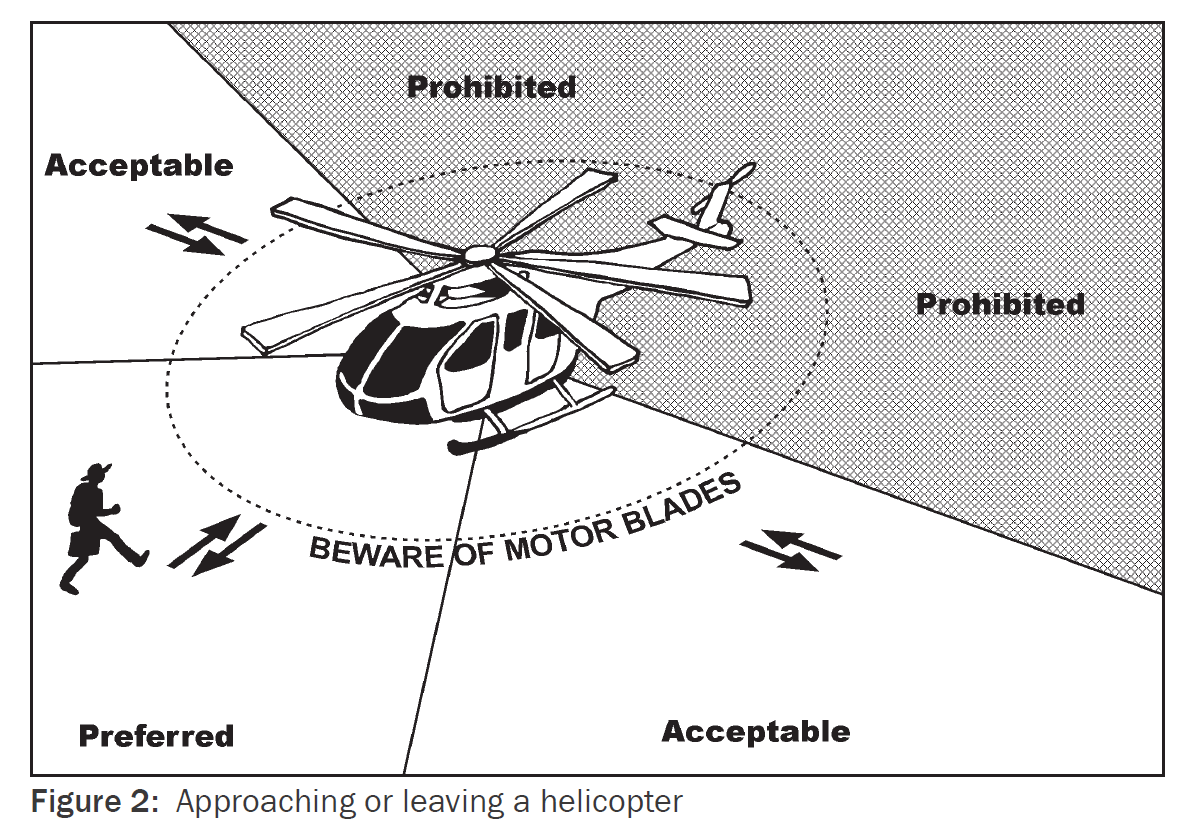

Helicopter Approach and Take-Off Procedures
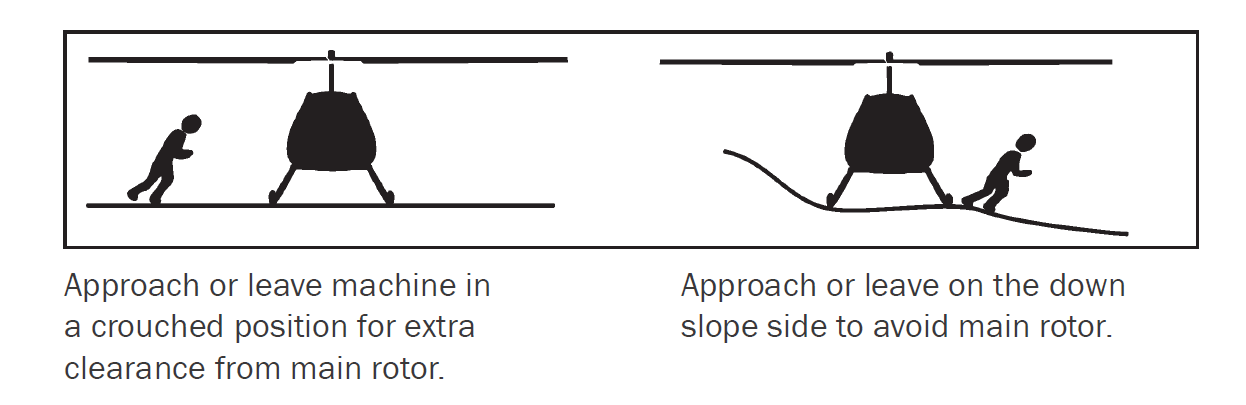
Do not damage the body or the bubble of the helicopter. Scratches on the bubble impair vision.
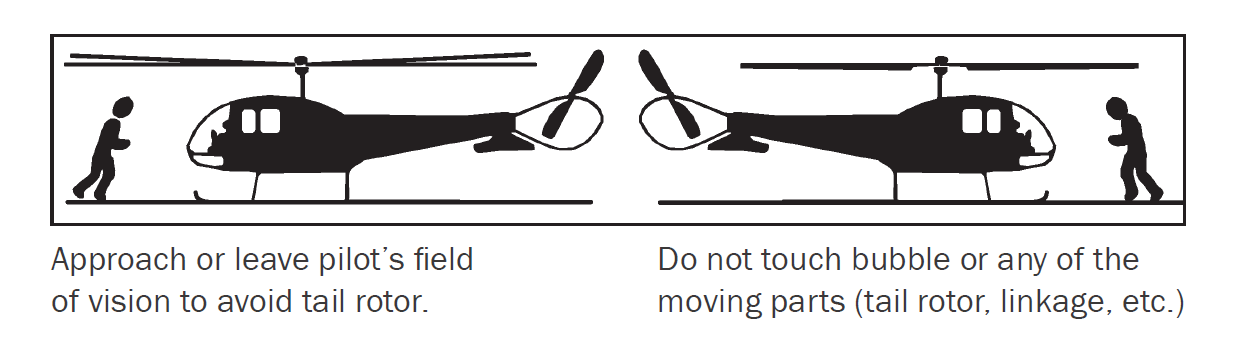
Give the pilot a clearance to take-off after ensuring that his skids are free from possible obstructions and that all personnel are at a safe distance from the helicopter.
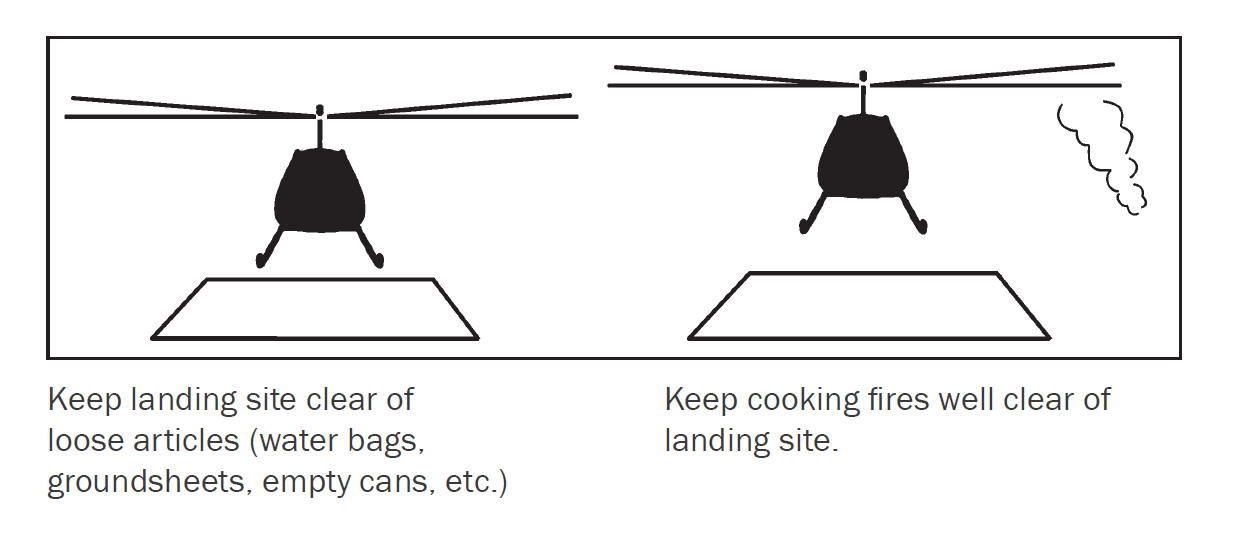
Ensure that there are no loose items near the landing site which could be blown into the rotor blades either during the approach or take-off of a helicopter (see Landing Site).
Helicopter supported reconnaissance programs commonly involve landing, hovering, vacating, entering, unloading or loading a helicopter in undesignated landing sites. These are potentially hazardous operations that require a high degree of cooperation and trust between pilot and passengers. No personnel should feel pressured to conduct these operations and never pressure a reluctant pilot to participate.
Passenger Briefing – Pilot Responsibility
The pilot must thoroughly brief each passenger concerning safety procedures. If the pilot neglects to provide a briefing and you are unfamiliar with procedures, do not hesitate to ask for the information before an emergency arises.
Briefings should be repeated frequently throughout a sustained operation to combat complacency and when a new pilot is assigned to the aircraft.
The safety briefing should include but not be limited to:
- Aircraft description
- Approaching and departing
- Hazards of main rotor and tail rotor
- Crouch position
- Eye contact with pilot
- Sloping ground
- Obstacles
- Pilot’s field of view
- Communication
- Use of headset
- Hand signals
- Caution Areas
- Antennas
- Floats
- Baskets
- Doors
- Opening
- Closing
- Latching and locking
- Baggage and Cargo
- Bear spray
- Dangerous goods
- Long items
- Thrown objects
- Secured cargo
- Weight
- Baggage doors
- Cabin baggage
- Electronic devices
- Seat Belts: use of
- Adjustments
- Release
- Stowage
- Electronic devices
- Emergency Procedure
- Pilot’s direction
- Exits: location, operation, disabled person
- Ditching
- Life jackets: location, operation
- Raft: location, operation
- ELT: location, operation
- Briefing card: location
- Safety Equipment
- First Aid kit: location
- Survival kit: location
- Fire extinguisher
- No Smoking
- In helicopter
- Within 15 metres of helicopter
- Within 30 metres of fuel storage
Special Operations Procedures Briefing
- Helipad Procedures
- Size
- Function
- Clear of loose objects: clothing, tarps, plywood, etc.
- Approach and Departure
- Clear of personnel
- Clear of vehicles
- Clear of power lines
- Landing Sites
- Size
- Terrain
- Loading procedure
- Unloading procedure
- Special conditions
- Pilot’s instructions
- Special Equipment
- Long lines: type, function
- Carousel: type, function
- Hook(s) manual release
- Hookup procedure
- Ground crew safety
- Hand signals
- Radio communication
- Hover Exit
- Seat belts
- Headsets
- Baggage
- Weight transfer
- Mustering (gathering) point
- Pilot signals & instructions
- Radio communication
In helicopter operations, it is good practice to buckle both ends of the seat belt together when leaving the helicopter, as this avoids a loose buckle from interfering with the pilot’s controls or flapping against the outside of the hull during flight.
Emergency Procedures and Exits
In large fixed-wing aircraft, each passenger seat is provided with printed information listing the emergency equipment carried and the location and operation of emergency exits. In smaller charter aircraft, there may be no emergency exits. Passengers should be aware of the location of life jackets or flotation devices on float planes. Certain authorities insist that life jackets be worn when in flight over open water.
A seat belt is required for every passenger. The seat belt must be secured during takeoff and landing and whenever considered necessary by the flight crew. In the event of an incident, correct use of available restraints and proper body positioning immediately prior to impact can reduce the chances of serious injury in a high impact landing or a crash.
Occupants should have their restraint systems securely fastened and tightened to a snug position at all times when seated. Shoulder harnesses should always be used whenever available. When high impact landing or crash is imminent, crew and passenger safety can be further enhanced by assuming the following body positions:
Seats with Lap Belt Only
Passengers should lean over until their chest rests on their thighs and should attempt to protect face and upper body with any garment available. Their arms should be clasped together under their thighs to hold this position. Front seat passengers must avoid interfering with the flight controls.
Seats with Lap Belts and Shoulder Harnesses
Occupants should sit with their backs straight and against the seat back as much as possible. If a manual inertia reel lock is available, and time and conditions permit, the inertia reel should be manually locked. Unless hands are required on the flight controls, the arms should be used to brace in the upright position.

Emergency Locator Transmitter (ELT)
All Canadian aircraft operating in Canada are required to carry one or more serviceable emergency locator transmitters and a compact radio or satellite phone in a crash-proof container. The radio will pick up distinctive signals on the emergency frequency of 121.5 MHz, permitting the detection and location of other downed aircraft equipped with ELT. Although the ELT is normally activated automatically during a forced landing, it can also be turned on manually if this does not occur. The battery life of an ELT is at least 60 hours with signals heard up to 100 miles (160 km) line-of-sight distance by high-flying aircraft. The ELT provides a homing signal to pinpoint location and greatly reduces rescue time. The location of ELT devices is indicated by placards inside the cabin and is externally marked on the aircraft. Passengers should know how to remove and operate the ELT manually should the pilot be unable to activate it. ELT orientation should be provided to all staff members.
Flight Plans
Flight plans provide air traffic control with a record of the destination and routing of the flight. In a helicopter-supported mineral exploration program, contact between the aircraft and airbase may not be possible or reliable. Accordingly, each Camp/Project Manager should leave information on the proposed flight plan. One of the most convenient procedures is to plot the flight plan. Drop-off or pick-up points should be on a map of the general area (1:250,000 scale preferred) which are displayed at base-camp at an appropriate location (e.g. next to the radio/satellite telephone or in an office-tent).
If the only means of communication with the outside world is by radio, the Camp/Project Manager should ensure that whoever is left in camp is conversant with the operation of the radio and knows how to describe the camp’s location and the proposed routing of the aircraft. There have been many instances where proposed or changed flight plans were not filed or the flight plan was inadequate or changed. Consequently, locating missing aircraft and passengers was seriously delayed.
- A properly filed flight plan leading to rapid location of downed aircraft and passengers and crew could be the determining factor in whether or not injured individuals survive.
- Pilots must be provided with a copy of maps covering the complete flight area.
- Pilots should be able to accurately locate the drop-off point on a map.
- If the pick-up point is at a different location from the drop-off point, be sure that it is accessible to the aircraft and agree with the pilot on an alternate pick-up plan if necessary. As a general rule, if the pick-up point is different from the drop-off point, the proposed route should be flown before drop-off. This will only take a few minutes of extra flying time and it may save the ground party several hours, particularly if the pilot needs to rendezvous with the ground party before the designated pick-up time.
Transport of Large Crews
- Safety briefing is required.
- Everyone should stay together and well back at the side of the landing zone. This gives the pilot more space to maneuver in the event he has to land suddenly either during landing or take-off.
- Face away and shield eyes from machine during landing and take-off.
- Each passenger is required to look after their personal gear.
- Passengers should be paired off and ready to get aboard as soon as pilot gives the signal.
Landing Sites
Prior to arrival of larger helicopters, it is necessary to prepare loading and landing sites free of loose debris and with dimensions adequate to accommodate freight being handled. Normally the volume of freight and weight of individual pieces is such that very little can be organized once freighting begins. If possible, a tractor should be on hand to move heavy pieces from nets and slings so that hernias and other muscle damage can be avoided.
Experience will give you an idea of how much room is required and type of site each pilot requires. Some pilots and helicopters require more room and more level sites than others. For your own safety, it is essential that you find or prepare a site which your pilot will use with confidence. Remember that every helicopter landing is a unique combination of winds, terrain, elevation and temperature. If you are on the ground, stand on the upwind side of the landing site, if possible, and signal the wind direction, preferably with flagging or, alternatively, with your arms (back to the wind with arms pointing in wind direction). Remember that all aircraft take off and land into the wind.
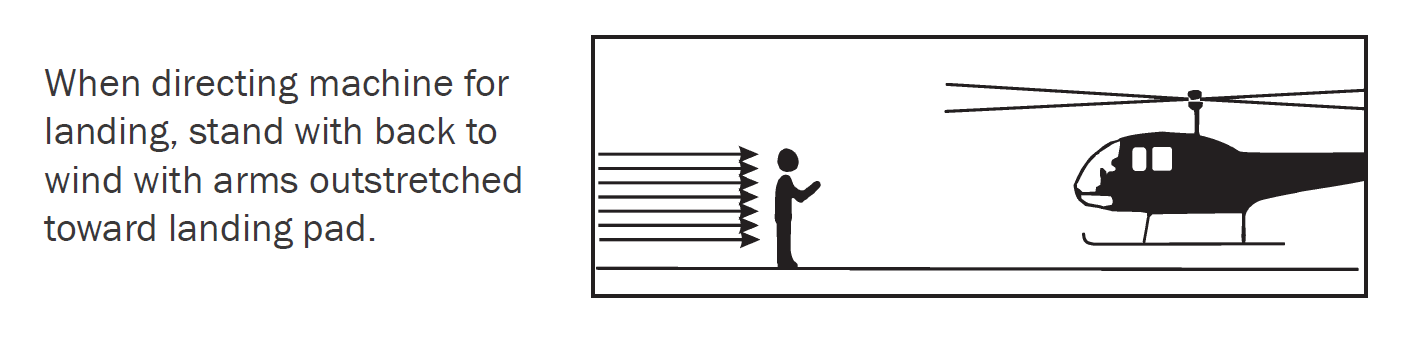
Clear any obstructions from the landing site area, bearing in mind the clearance required for the tail rotor. In tight landings, the pilot may want you to help him position his tail, which he cannot see (whether you are inside or outside). Use your thumb to indicate direction tail is to move and your palm to indicate vertical movements (see ‘Signals’). If the terrain is too rough at the site to land solidly, the pilot will sometimes steady the helicopter by resting only part of the skids on the ground while you enter or leave. You must shift your weight very slowly in these situations so that the pilot can maintain his delicate balance.
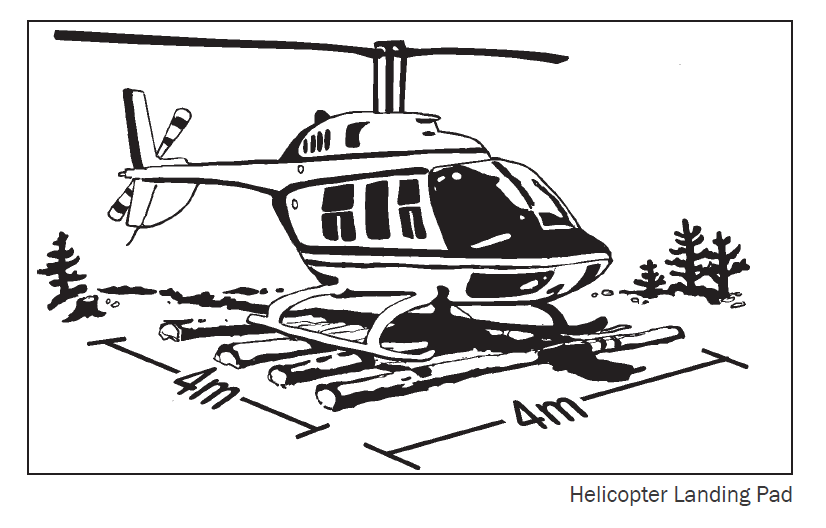
For landing small helicopters, if the pilot has not provided instructions on an adequate landing pad, allow a level landing area about four metres by four metres and clear the area to ground level within six metres of the landing pad to provide main rotor clearance and tail rotor clearance in two directions.
If a landing pad is required in soft ground, place five or six poles on the ground; each about four metres long and about half a metre apart, perpendicular to the prevailing wind direction (i.e. the flight path). Poles must be secured to ensure they cannot move. Poles rot quickly, and old or unfamiliar heliports should be checked very carefully before being used. Finally, prepared landing sites that are old or abandoned should be destroyed.
Toe-In Landing Sites and Disembarking at the Hover
Toe-In Landing is classified as a Hover Exit. The pilot must be trained in the maneuver and passengers must be trained by the pilot according to CARs. Generally, toe-in landings are discouraged; and the following guidelines are in place for when toe-in landings are the only practical means of accessing terrain.
Toe-in landings are illegal unless the operator has an amendment to his Operating Certificate and Operations Manual which provides for such landings.
In mountainous terrain, a pilot may permit passengers to leave or enter the helicopter on mountain sides while the front part of the skids is resting against the ground. The pilot must ensure the safety of the landing site, particularly on steep slopes where considerable judgment is required to ensure that the tips of the main rotor blades are a safe distance above the ground. Since both the pilot’s hands are occupied with the controls, passengers must ensure that doors are securely latched before the helicopter departs and that no items interfere with the control of the aircraft. In addition, passengers need to carefully control their movements to avoid sudden shifts of weight.
The order for passengers to embark or disembark the helicopter should be confirmed with the pilot as it may affect the aircraft balance. Remember to ensure that the cabin door is firmly closed and that seat belts are inside the cabin when disembarking.
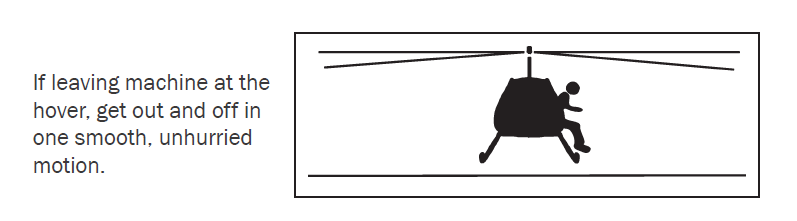
Cargo
Personal baggage and equipment should be properly secured. In fixed-wing aircraft, cargo carried inside the cabin with passengers should be secured by nets, strapping, or another tie-down to prevent shifting in flight and possible injury or fatality to passengers in the event of a crash or hard landing. Cargo should not restrict the use of emergency or regular exits. It is the pilot’s responsibility to ensure that the aircraft’s total allowable payload is not exceeded and to ensure that the load is distributed so that the aircraft is within its centre of gravity limits. The pilot often has to rely upon the advice and knowledge of the passengers; therefore, extra items should never be loaded on the aircraft without the pilot’s knowledge. The weight of items should be determined as accurately as possible.
If legally permitted, externally loaded equipment must be tied on helicopter racks under the pilot’s supervision to avoid loss of items or possible damage to the helicopter during flight by loose buoyant equipment being sucked into the main and tail-rotor blades. Use only tie down ropes provided by the pilot as they will have been cut to specific lengths both for utility and safety reasons.
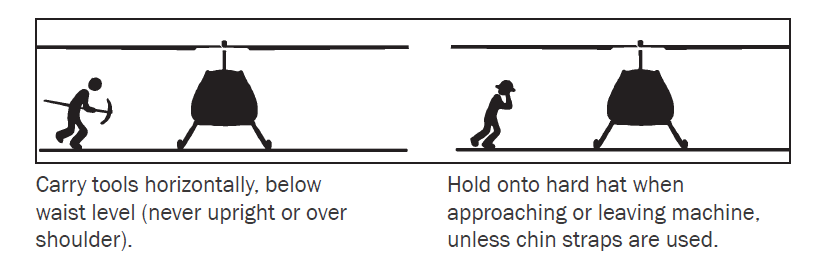
Slinging
For guidance related to slinging, view AME’s Helicopter Slinging Training tool.
Bulky items (e.g. fuel drums, drilling equipment) are frequently slung under the helicopter with lanyards and a net attached to a hook which can be released by the pilot. The pilot will provide instructions on the correct procedure for arranging and hooking up such loads and the signals to be used. Ground personnel should have training on slinging safety procedures before they are permitted to hookup loads.
- All items must be securely held within the cargo net since loss during flight could cause the net and remaining items to be sucked into the main blades or tail rotor with disastrous results.
- Keep clear of approach and take-off paths when sling loads are being carried.
- Wear gloves to protect your hands, particularly since a static charge can build up in a light rain, snow, or dust.
- If a helicopter is lifting a heavy load and appears to have difficulty getting airborne, NEVER try to assist by lifting the load. If the machine cannot lift it, it cannot fly with it.
In snow there are special considerations:
- The pilot must hover above the doughnut of blowing snow and may not have visual contact with individuals on the ground.
- Static electricity from sling gear can knock you down. Get briefed on grounding the helicopter.
- Allow plenty of time to prepare the aircraft for flight.
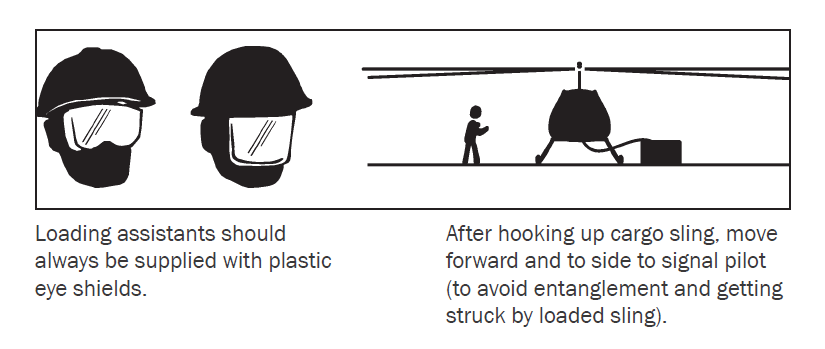
Passengers are not permitted to travel in the helicopter during a slinging operation.
Pilots should familiarize the appropriate workers with external load hook up procedure, as per this checklist:
Non-Company External Load Assistant – Training Criteria
- ✔ Describe in detail aircraft hook components and functions, including manual and electric release functions.
- ✔ Demonstrate correct method of closing both aircraft and carousel hooks.
- ✔ Demonstrate downward tug on lanyard method to confirm hook is closed correctly.
- ✔ Allow trainee to experience closing hooks and attaching lanyard without aircraft operating.
- ✔ Explain radio and hand signals to be used on current assignment.
- ✔ Explain pilot site lines during hookup phase.
- ✔ Demonstrate correct method for hookup personnel to clear aircraft after hookup.
- ✔ Explain personal protective equipment required during hookup operations.
- ✔ Explain hazards to personnel and aircraft posed by unsecured material in the working area.
- ✔ Explain in detail safety procedures required while working in the proximity of helicopters, including risks associated with fouled long lines.
- ✔ Establish an emergency response plan.
- ✔ Allow trainee to experience a minimum of three demonstration hookups with the aircraft operating.
Signals
Hand Signals
Effective communication must be established before initiating airlift operations as per WorkSafeBC regulation. This may include both radio communication and hand signals.
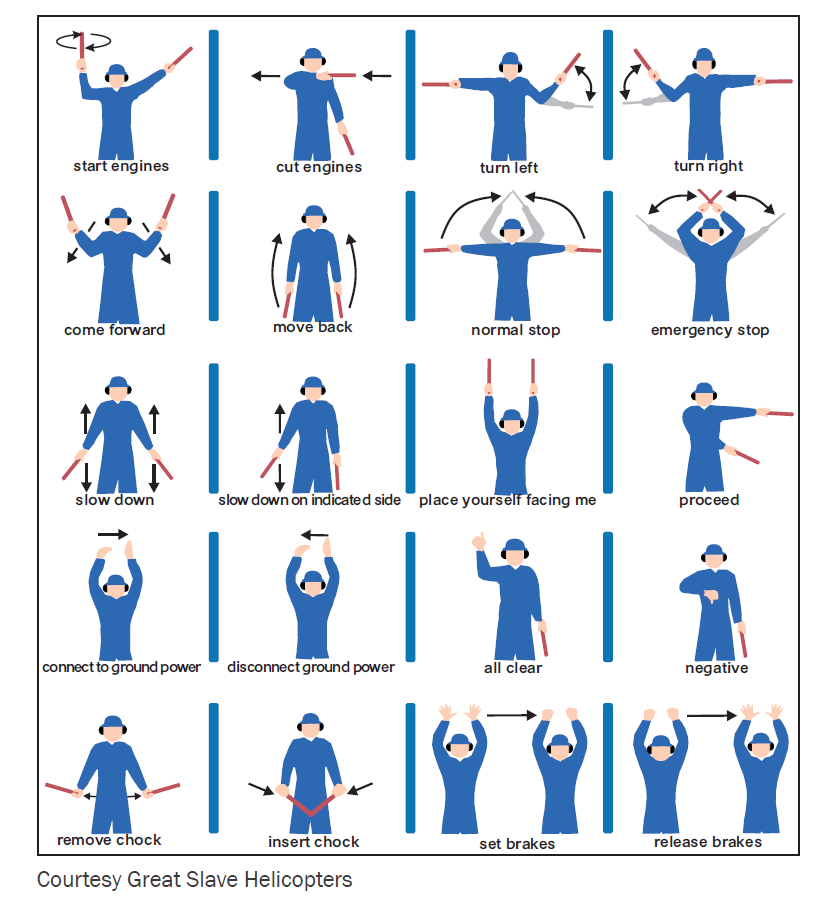
Air-to-Ground Signaling
Without adequate air-to-ground radio communication, the pilot has extremely limited ability to communicate with the crew on the ground. The most common signal, the ‘wing-waggle’, the pilot notifies those on the ground that they have been sighted or that a message has been received.
The helicopter pilot must brief passengers on pick-up or emergency pick-up arrangements before they leave the aircraft (e.g. proceed for pick-up in the direction of the helicopter after three tight circles).
Ground-to-Air signaling
There are many established procedures for signaling aircraft among which the following are most common:
- Bright Coloured Clothing – fluorescent jackets, vests, or caps can be spotted more easily than natural coloured bush gear.
- Fluorescent Orange and Red Cloths – generally made of nylon and should be at least 2×2 metres in size. When on a traverse, drop the folded cloth over your packsack if expecting a helicopter pick-up.
- Pocket Flare Gun – this is pen-shaped with a pocket clip and a spring-loaded mechanism, that when released, can discharge flares to a maximum height of 60-70 metres. It is particularly useful when a helicopter is trying to locate personnel in forests.
- Heliograph Mirror – most useful for attracting fixed-wing or rotary wing aircraft on sunny days. The mirror contains a small sighting hole to pin-point targets. Avoid use of the mirror when close to a helicopter.
- Mirror, Brunton Compass Mirror, Metal Clipboard, etc. – similar principle to the heliograph mirror but less precise. The best signaling procedure is to extend one arm with the thumb held vertically on target and, with the other hand, line up the reflection of the mirror held at eye-level on the thumb. The top of a small tree at greater distance can be used for greater sighting accuracy.
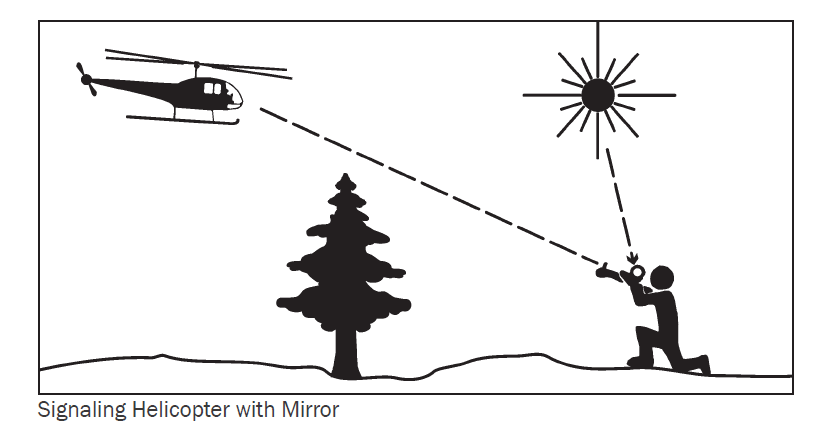
- Smoke Fire – On bright days, smoke is more noticeable than fire, while on dull days or in twilight, the reverse applies. Smoke dissipates quickly in a strong wind and a small fire is useless in these conditions. Keep green boughs available to create smoke on a well established fire.
Three fires, about 20-30 metres apart at the apices of a triangle are an international distress signal and should be used only in an appropriate emergency. For practical purposes, a single column of smoke is as effective and is far easier to maintain.
- Signal Code – Previously recommended ground-to-air signal codes, using visual elements laid out on the ground, are so rarely used that the cryptic messages are unlikely to be recognized by current pilots and are no longer recommended for communication purposes. These may be useful to attract attention if you are lost or stranded, but during Search and Rescue, it is important to use a variety of ways to attract attention to yourself.
- Portable VHF Transceivers – Two types of VHF hand-held radios are available for air-to-ground communications. One less-familiar type makes use of the VHF-AM radio system installed in all aircraft. These radios are used in all airport air-to-ground and air-to-air communications.
The flexibility of being able to talk to any aircraft flying overhead makes this system of communications very advantageous. These portable radios have crystal-controlled frequencies so a great range of frequencies are available. Each hand-held unit usually carries two to five different frequencies. The recommended frequencies to carry are:
- 122.5 MHz: Common air-to-air and air-to-ground “gossip” frequency, almost always monitored by aircraft.
- 121.5 MHz – EMERGENCY FREQUENCY. All aircraft including commercial flights monitor this frequency, so in an emergency, one can call for help. The frequency 121.5 MHz should never be used un-less there is an absolute emergency and only to call for help.
The most popular type of radio system is the VHF-FM system. These radios are smaller than the VHF-AM sets and are much easier to license. Unless the pilot has extra hands available to hold onto his own portable set, an addition must be made to the aircraft’s present avionics system. This system is limited to use in aircraft which have the special VHF-FM package and thus does not have the flexibility of the VHF-AM systems.
Both radio systems, depending upon the qualities of the ground units, have very good range and resolution. VHF-FM is also very useful in line-of-sight and ground-to-ground communications between field crews.
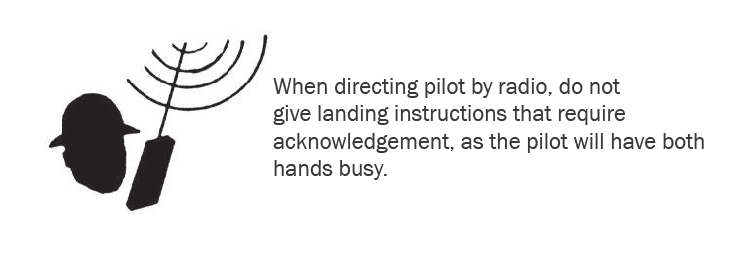
Emergency Equipment for Fixed-Wing Aircraft and Helicopters
All aircraft, both fixed-wing and helicopters, should be equipped with the following emergency equipment:
- ELT, preferably equipped with both an impact and a manual switch
- First aid kit
- Sleeping bags sufficient to accommodate all passengers
- Tent large enough to accommodate all persons on board (in the Arctic only, north of treeline)
- Portable compass
- Axe
- Signaling mirror
- Gun (12-gauge shotgun is ideal) and ammunition (No. 4 shot, SSG and rifle slugs). Documentation is required
- Hunting knife
- Fire makers (matches in waterproof container)
- Pyrotechnical distress signals
- Snare wire
- Fishing tackle and fishing net
- Cooking utensils
- Survival booklet
Additional items in winter:
- Snowshoes
- Extra socks and mitts
Additional items in summer:
- Mosquito repellent
- Mosquito nets
Emergencies
- In the event of an emergency, follow the pilot’s instructions.
- In the event of a crash landing, do not attempt to leave the aircraft until it and the propellers or rotors have stopped moving. Then exit as quickly as you can and move to safe ground. If an aircraft is going to catch fire, it will usually do so within 60 seconds of impact.
Airstrip Safety
The airstrip should be treated with caution. There may be times when an airplane will land at unscheduled times. Before doing any work at the airstrip, make sure to check with the Camp Manager to find out about flights. Listed below are general safety requirements for the airstrip:
- Always be aware of low flying airplanes over the airstrip (the pilot will usually make one pass over the airstrip before landing. If you are on the runway at this time, make sure that the runway is clear and leave the runway immediately).
- Always remain clear of the runway during take-off and landing.
- Only approach the airplane once the pilot has given the ok signal.
- When loading and unloading be careful about driving around the airplane and under the wings.
- Remove any obstacles for the runway or notify the Camp Manager if there are any problems so the pilot can be informed.
No one is obliged to fly in charter aircraft when conditions are unsafe.
Remotely Piloted Aircraft Systems (Drones)
Safety protocols and legislation for remotely piloted aircraft systems (RPAS; commonly known as drones or unmanned aerial vehicles (UAVs)) are evolving as their use becomes widespread. Mineral explorers should be aware of both the benefits and risks of using RPAS as well as legislation.
The benefits of drones include being able to safely perform reconnaissance and basic surveying. However, there are various safety considerations including proximity to other aircraft and privacy issues. Although these may have limited application in the field, these inform legislation and best practices.
Drones with a mass exceeding 250 grams along with their pilots are subject to extensive legislation including certification. Transport Canada has comprehensive guidance that includes applicable legislation. Most drone use in exploration is considered to be “basic operations” – generally not within proximity of bystanders or aviation facilities.
The following are components of a drone safety program:
Operations manuals
- Premobilization and on-site site surveys
It is important to note any potential obstacles in an area that may be flown using a drone. Note that authorization is needed to fly in controlled airspace (e.g. in the proximity of an airport). - Safety and emergency procedures
Consider who is authorized to use the drone, be familiar with loss-of-control procedures for the drone as well as incident reporting (e.g., wildlife and bird strikes)
Regular operation procedures
- Equipment safety and maintenance
This includes battery safety, propeller safety and maintenance manuals. - Fly-away procedures
Be prepared in the event that the drone flies away, and cannot be recovered. - Pre-flight checklists
These should cover the above considerations and include weather check, appropriate documentation (proof of drone registration, pilot certificate, proof of recency (training with past 24 months), drone operator manual); airspace check; surroundings check; emergency plan.
Oversight and training structure
- Awareness of drone rules
Awareness of both legislation as well as site-specific rules - Certification requirements
Note that certification is not required, but recommended, for people flying drones of less than 250 g). Advanced certification is required for advanced operations
Traversing
Individuals with previous experience in the outdoors including hikers, campers, and those engaged in exploration work will likely have developed an awareness of the preparation and precautions that are required for traversing. Travel on foot is the most common outdoor activity; however, familiarity should not preclude safety awareness. New and unexpected hazards are often encountered when traveling on unfamiliar terrain.
General Traversing Precautions
- Traverse in pairs, preferably with at least one experienced person within communication distance (use hand-held radios between groups). The less experienced person should be learning, not just following; the experienced person should be teaching.
- Travel at the speed of the slowest party member.
- Use greater caution if it is necessary to travel alone. Even a minor mishap may be fatal if there is no one to come to your assistance promptly.
- Avoid following too close to a person ahead of you to prevent branches from springing back into your face or being stung if the lead person stirs up a wasp nest.
- Inform others of your travel plan. If no one is immediately available, leave a note and a map in camp showing your planned route and any alternate routes that you might take. Include the expected time and date of your return.
- Be aware of the location of cliffs, particularly on snow-covered terrain.
- Avoid walking above cliffs on snow-covered terrain.
- Avoid walking near edges that may crumble, i.e. snow, soil, or rock.
- Avoid prolonged walking or working below a cliff face, but if it is necessary to do so, be alert for the sound of rock falls commencing above you, especially when the sun shines on frozen cliffs.
- Watch where you step and avoid such dangers as slippery mud and logs, or unstable rocks. When travelling in very dense underbrush, look before each step. You may hear rushing water before you see it. A stream bank, dark pool, or hole may be obscured in front of you, particularly if the stream is only a few feet wide and the forest floor appears uninterrupted. When snow is on the ground, especially in spring, be aware of the possibility of breaking through the snow into an open space below.
- Stay alert to the possibility of a slip or fall; take extra care so not to land on snags, cut saplings, or sharp rocks.
- Never smoke while travelling in the bush during the summer.
- Be cognizant that as the day wears on you will likely become tired, less alert, and less agile.
Plotting and Executing Traverses
- Plot your route carefully and use the best information available such as air photos, maps, and the comments of others familiar with the area.
- Be realistic in assessing what traverse can be made in the available time. For long traverses, have a back-up plan by identifying an alternate shorter route in case your proposed traverse cannot be completed.
- Be thoroughly familiar with the use of your compass and GPS unit. Before departure, check that the magnetic declination and GPS settings are correct for the area. Check that these instruments are working correctly while you still know your location so that you can trust the instrument readings later. You may have to depend on your instruments. As such, carry an extra set of batteries for the GPS.
- A GPS unit does not remove the need to carry a map and compass or eliminate the need for skills to use them. Your GPS unit may not give reliable readings in heavy timber or steep-walled canyons.
- Attach your instruments to your body or pack or stow them in pockets which can be closed up. Losing equipment is potentially dangerous and costly in time and efficiency.
- The compass needle aligns with the strongest magnetic field, and therefore may produce inaccurate readings when near belt buckles, magnet or lanyard clips, iron formations, or ultramafic rock. Check accuracy by taking bearings back toward your last compass checkpoint.
- Note natural indicators of general direction, such as: a brighter sky in the east in the morning and west in the evening; moss on the north side of the trees; wetter slopes and indicators of cooler microclimate on the north side of mountains.
- Always “navigate” when you are travelling in the field. This requires checking compass bearings, keeping track of time, and possibly pacing (a simple means of measuring linear distance by walking).
- Practice your pacing skills where there is chance to check them (e.g. on or beside marked lines cut for geological, geochemical or geophysical surveys). Learn how to adjust your pacing count for changes in terrain conditions such as dense underbrush, swamp, or steep slopes.
- Avoid the temptation to stop navigating when your goal seems within easy reach, such as on the return leg of a traverse. If your goal does not materialize as anticipated, mentally review your progress and noted landmarks, such as the shapes of high points, and the direction of drainages.
- Be cautious about using game trails or logging roads to make travel easier. Direction may gradually change and take you considerably off course. Continue to “navigate” particularly with respect to direction. Be aware that a normal pace will carry you almost twice the distance on a hard road surface compared to the usual bush surface.
Slippery Surfaces
- Be very cautious about walking along logs (or avoid them entirely). If working exclusively in heavily timbered area, such as Vancouver Island, consider using a pair of caulked boots. Caulked or equally effective footwear must be worn on logs or similar slippery surfaces.
- When the inner bark of a log begins to rot, it becomes very slippery when the surface is wet from dew or rain. The weathered surface of an old log (with no bark) may offer firm footing when it is completely dry, but becomes very slippery when the surface is wet from dew or rain.
- Lichen (a plant made from the combination of an alga and a fungus) on outcrops is very slippery when wet (the colour often changes from black or grey to brown as the lichen absorbs water).
- Do not carry pointed or sharp items in your front or hip pockets; they may injure you in an uncontrolled fall.
- Avoid areas of active rock fall, steep road cuts, recent slide areas, and un-vegetated glacial moraines. If you must work in such places, a hard hat or climbing helmet is absolutely necessary.
- Do not follow another person in steep terrain where rocks may be dislodged. Wait for each person to clear the danger area before proceeding, or pick a parallel path a couple of metres to one side.
Crossing Snow Patches
- Be careful when crossing patches of steep snow which can result in an uncontrolled slide onto rocks or over a cliff. Be aware of snow-filled hollows as there is potential to break through into a mountain torrent or pool.
- The surface hardness of a snow patch will vary with the time of day.
- In the morning, while the slope is still in shadow, it may have an icy glaze that is too hard to allow you to make adequate footholds with your boot. This is particularly dangerous because there is little hope of stopping if one starts to slide.
- In the late afternoon, the snow surface may soften considerably and make walking very slow and arduous.
- Cornices (overhanging crests of snow on ridge crests) are particularly dangerous. If you are travelling on a snow-covered ridge, be certain that you are not walking on a corniced part of the ridge; the unstable overhang cannot be seen from above. Travel well back from the edge. Avoid slopes below a corniced ridge because of the possibility of the cornice breaking off, which might trigger an avalanche.
Crossing Creeks
Use extreme caution in crossing streams. Many of the techniques used to overcome the difficulties are learned only through proper training and instruction.
Falls and slips in mid-stream can be disastrous. The type of danger will vary with the characteristics of the stream being crossed. Choose the place to cross with care. Understand the hazards downstream and plan for the worst. Should you be carrying a load so heavy that you are in danger of being off balance, consider dividing and carrying your load across in two trips so that half your load will always be on the bank (keep matches and dry clothing in each half).
Mountain streams are generally fast and cold.
- It is not wise to cross a fast flowing or “swift water” stream unless you are properly trained in shallow water crossings.
- Water above your knees can easily sweep you off your feet.
- A tethered crossing technique the standard method for crossing swift water. Seek expert instruction.
- If a rope is to be used, the only proper type of rope is a static, buoyant line. Proper techniques must be used, or the event has the potential to be more deadly than crossing without a rope.
- If possible, carry a stout pole (should be as tall or taller than you) on the upstream side leaning into it slightly to give better footing.
- Remove socks and replace boots.
- Cotton clothing creates a hazard. It should not be considered a replacement for a wetsuit in any circumstance.
- Remember that mountain streams are subject to extreme variation in volume during spring-summer melting and after rainstorms. Plan your traverse to avoid being stranded by a stream in flood in the late afternoon; however, if this occurs, it is better to remain stranded than to risk being drowned.
- When travelling with a group, make sure that at least one member of the party checks that all other members have safely crossed.
- If you are carrying a heavy pack, undo the hip belt and chest strap so you can drop the pack quickly if you fall. Remove your pack before attempting to drink from a stream or pond as the pack can tip over, pinning your head beneath the water.
Slow-flowing, meandering streams with swampy banks present a different type of hazard.
- The water may be fairly shallow at the swampy margin of the stream, but the bottom may drop off vertically at the edge of the main flow channel.
- Muddy water may obscure this sudden change in depth; if you are carrying a pack full of rocks, you may drown before you get clear of your pack (loosen straps, as mentioned above). A staff can help you “feel” your way.
- If the water is not too cold, it may be better to remove pants or wear shorts while crossing.
- Although narrower streams can be bridged by falling a suitable-sized tree, remember that the tree may become very slippery or be swept away.
- If the water is fairly deep, the shortest crew member should lead the way so that a taller person does not inadvertently lead shorter companions beyond their depth.
- Adequate rafts require a great deal of hard work to construct; poorly constructed rafts are a safety hazard. Rather than rafting, an alternative crossing should be sought in most cases.
- If the crew is set out by helicopter on a gravel bar, it is mandatory for the pilot to wait until all personnel are safely on the bank of the river, regardless of other flying commitments.
Do not panic if you are lost or become disabled. Remember that your greatest resource is your intelligence.
Be aware that reasonable anxiety can gradually be replaced by panic. This is particularly true if it is late and you are hurrying to reach camp or a pick-up point before dark. Continue to travel carefully and maintain the compass sightings and pacing that you would normally use. When you start to travel blindly, STOP; you are dangerously close to panic! (see Chapter 8: Survival).
Clothing and Equipment
In addition to the information listed below, refer to Chapter 3: Personal Protective Equipment (PPE), Tools and Equipment.
- Footwear should be in good condition and suitable for the terrain that you expect to encounter.
- Clothing should be in good repair, without loose ends that can snag branches or sharp rocks.
- Carry extra clothing or equipment for any foreseeable emergency, including rain and an unexpected night outdoors.
- A compass, map, GPS unit, sheath knife, waterproof matches, signal flag, flare, first aid kit, and signaling mirror are essential for even the shortest trip. A mosquito net and insect repellent are necessary during insect season. A lightweight tarp or plastic sheet will make unexpected nights out far more comfortable and, if it is wet, may mean your survival.
- An axe is a very useful tool in wooded terrain; one should be carried if there is any possibility of remaining out overnight. Each axe should have a sheath. When carrying the axe, keep the blade facing away from you. Never carry an axe over your shoulder!
- Consider carrying other emergency equipment such as a space blanket, candle (for lighting fires), and signal flares.
- Matches should be in a waterproof container – do not become separated from your matches (e.g. by leaving them in a packsack).
- Individual first aid kits with EpiPens and/or antihistamines should be carried. EpiPens are used for injecting adrenalin to counteract anaphylactic reactions. Antihistamines are used for less severe allergic reactions.
Mountain Travel
All areas in Western Canada above timberline present special difficulties and hazards. Many of the techniques used to overcome the difficulties are learned only through proper training and instruction and the judgment necessary to recognize many dangers comes with experience in mountain travel. These notes are not a substitute for practical instruction or experience. It is desirable that parties working in high and rugged mountains have several people on the crew who are trained in mountaineering.
Special Clothing
Boots
Medium to heavy-duty mountaineering boots are mandatory. Such boots should have padded sides that are higher than the ankle and stiff and rugged soles.
Clothing
Mountain weather is unpredictable and often cold and windy even in summer. Clothes must protect against rain, wind, snow, and sun. For warmth, several lighter garments that can be layered are preferable to one heavy item. Clothing made of fleece is excellent and has largely supplanted wool. Fleece is warm, durable, and dries quickly. Cotton clothing has good durability and offers protection from wind, but is useless when wet and is very slow to dry. Warm mittens and a toque should be in your pack. A high-quality Gore-Tex or equivalent jacket and rain pants will cut the wind and keep out most rain. A rainproof (coated nylon) parka or anorak will keep out the rain but keeps the perspiration in.
Sun Protection
At high altitudes, ultraviolet radiation is much stronger than at lower elevations. The light can cause snow blindness (burns on the retina), even on overcast days. Shaded safety glasses or goggles are essential; these offer both impact resistance and side shields. You should also carry sunblock (SPF 30 or higher; suntan lotion is inadequate) for all exposed surfaces.
- Many climbers use a good quality lip salve to protect the lips.
- Wear a good hat (preferably with a wide brim) when you are in the sun; a full head of hair is no substitute!
Special Equipment for Steep Rock, Snow, and Ice
Specialized tools have evolved for rock climbing , ice climbing, and skiing. It is important to purchase the best quality you can afford and from salespeople who can advise on their proper use and care. Adequate training is essential before these items can be used effectively. Carrying tools without knowing how to use them properly gives a false sense of security.
Ice Axe
An ice axe is used for travel on steep snow and ice. It can prevent and stop slips, provide an anchor for a safety rope, and cut steps.
Climbing Rope
A climbing rope is used for safety and rappelling (easy descent of steep ground), and should only be used by properly trained and certified personnel. Be sure to seek experienced advice and buy a rope only after you have learned how to use it. 45 metres of 11 mm thickness is the best compromise in length and weight. Follow instruction for proper use. Never use it to tow a vehicle, hold up tents, or tie gear onto car-top carriers. Once it has become abraded or knotted, it is unsafe to hold a person in a life-threatening situation. Climbing ropes are weakened by sunlight, battery acid, and other chemicals.
Crampons
Crampons are spiky contraptions that strap onto stiff-soled boots to ease climbing on ice or hard snow. Proper fit is essential to avoid unpredictable release or tripping. The points must be kept sharp to work properly and they should be kept in a dry, padded container when not in use.
Incidents typically occur on relatively easy terrain due to carelessness or over-confidence. Proper planning of the traverse may avoid some of the inherent difficulties. If scouting the route by helicopter, remember that obstacles that appear insignificant from the air commonly increase in size and difficulty when seen on the ground. It is better to fly alongside the ridge so that the crest is seen in profile than to fly directly above it.
Slips and Falls
- Slips and falls can be reasonably mitigated only with proper equipment and training.
- Rope up or turn back when the least experienced member of the team feels uncomfortable or when there is the slightest doubt about their ability to handle the terrain.
- A rope system must be utilized to move up or down steep terrain (30-50 degrees) or high angle terrain (50+ degrees).
- When difficulty is combined with exposure, (such as a dangerous distance to fall) rope climbing is mandatory. Get expert training and/or help.
- Before crossing a snow or rock slope, ask the question “What could happen if I fall?” Take the necessary precautions.
- Beware of slopes that increase in angle as you descend. Make sure you can see all the way to the bottom.
- Beware of wet, lichen-covered rock. Beware of carpets of moss on rock slabs as they can peel off without warning.
- On snow, keep an upright position. Your footholds will tend to break out if you lean into the slope.
- Pay attention to the nature of the snow slope below you. A slope studded with or ending in rocks, cliffs, talus, trees, or bare ice is inherently more dangerous than a smooth unbroken slope. Serious injuries result when you slam into rocks at the end of an uncontrolled slide.
- Slips on steep, soft snow are best prevented by digging in knees, toes, elbows and ice axe, and by making little jumps to try to regain your feet. When descending fairly soft snow, it is often best to hold the ice axe by the head and keep it somewhat below you so that in case of slip the weight of your body will drive it into the snow.
- On steep, hard snow, falls can often be stopped only with the ice axe. If you are sliding feet-first, on your back, hold the ice axe with one hand on the head (adze on the thumb side), and with the other hand low on the shaft. Roll over towards the head of the axe, and slowly dig the pick in. Keep the spike end of the shaft clear of the snow. Dig in your knees and toes (unless you are wearing crampons) to help you stop. This technique should be thoroughly practiced near camp before approaching a hazardous area.
- Many geologists incorrectly think that a rock hammer is an adequate substitute for an ice axe. A rock hammer is too short in the handle and is easily torn from your grasp.
If you find yourself using roots, tree trunks, and rocks to pull yourself up, you can safely assume that you have entered a steep angle terrain. If unsure about the traverse, do not attempt it.
Falling Objects
Rockfall
The danger is most severe in gullies and least severe on ridges. The greatest hazard is material kicked loose by people above or freeze/thaw action dislodging rocks from cliffs. The use of a hard hat is highly recommended on steep terrain. Party members should take parallel paths so that one climber is not below another. If this is not possible, move one at a time past the difficult spots with other members of the party under cover.
Icefall
Keep away from areas beneath ice cliffs and hanging glaciers, especially if there is recently fallen debris. Danger from icefall is generally the lowest near dawn and greatest during the afternoon and evening, when rain is falling, or after the weather warms rapidly.
Cornices
When approaching a ridge from the leeward side (the direction downwind from the point of reference), cornices are readily visible. Do not travel in the potential fall-line of a cornice. Look for fracture lines and signs of cornices on other parts of the ridge and be extremely wary when approaching the ridge crest as it is often impossible to judge where the cornice commences. Many people have been killed by avalanche when the ridge they were standing on (or beneath) collapsed without warning.
Glacier Travel
- Crevasses and icefalls are the special dangers of glacier travel. Even a small or flat glacier can have hidden dangers. Many hazardous crevasses are completely covered by surface snow or appear only as narrow cracks, but widen beneath the surface snow.
- On snow-covered glaciers, the party must be linked by a rope. An unroped fall into a crevasse is usually fatal. An inexperienced or ill-equipped party has no choice but to stay off snow-covered glaciers. It is easy to move unawares from a safe snowfield to a snow-covered glacier.
- Rescuing someone who has fallen into a crevasse, even if roped, is generally a very difficult task, even for a party trained in crevasse-rescue techniques.
- On “dry” glaciers (bare ice without snow cover), it is safe to travel unroped if crampons are worn and if steep areas are avoided. Falls on ice normally cannot be stopped with an ice axe.
Bad Weather
- Weather changes dramatically and rapidly in the high mountains, even in summer. Snow and fog are common in many ranges.
- Route-finding in bad weather above timberline can be very difficult. It is easy to proceed from safe and familiar terrain to dangerous and unknown obstacles. With fog, the perception of distance and direction may be distorted. A major hazard is the inability to discern dangerous terrain such as cliffs below or potential avalanche slopes.
- If you are lost in the mountains in bad weather, you must decide whether to stay where you are or attempt to get below the base of the clouds. This decision depends on how exposed you are to the weather and how easy it is to reach a sheltered spot. A good map with knowledge of your position and information (via radio) on the level of the clouds are the best information to have.
Travel dangers must be balanced against the possibility of exposure and hypothermia. Always carry extra clothing and some means to rig an emergency shelter so to avoid an uncomfortable night becoming a life-threatening emergency.
Medical Problems
Dehydration
Dehydration is a common and often unrecognized problem. It is easily prevented by an adequate fluid intake. Drink plenty of liquids such as water, fruit juice, non-caffeinated pop, or soup. Avoid alcoholic and caffeinated drinks such as tea, coffee, caffeinated pop, and hot chocolate, because alcohol and caffeine speed water loss. Dehydration increases with altitude.
Hypothermia
Hypothermia is the depression of body core temperature. It is a serious danger in bad weather where the lack of shelter and inadequate clothing accentuate the effects of the harsh mountain climate. See Chapter 4: Health, Allergies and First Aid for prevention, symptoms, and treatment.
Frostbite
Frostbite most commonly affects toes, fingers and face. Adequate clothing and proper fitting boots will prevent frostbite. For superficial frostbite, re-warm with body heat. Deep frostbite should not be re-warmed except by competent medical aid.
Altitude Sickness
Altitude sickness is symptomized by shortness of breath, headache, and weakness at altitudes as low as 2,100 metres.
Pulmonary Edema
Pulmonary edema is a fairly common and frequently fatal form of altitude sickness at elevations as low as 2,700 metres. It is marked by cough, nausea, weakness, rapid pulse, dizziness, and a gurgling sound when breathing. Immediate removal to lower altitudes and medical aid are essential for survival.
Avalanches
Avalanches are a leading killer in mountain terrain. Sometimes the causes are complex and the timing unpredictable. If you are working in an avalanche-prone area, an avalanche safety program is now required by the HSRC as part of the Emergency Response Plan. Prior training and having access to experienced aid are strongly advised, and an avalanche beacon is required.
Kinds of Avalanches
Dry Snow or Powder
Dry snow or powder avalanches are common in the winter after storms, particularly if windy; they are rare in spring or summer.
Wet Snow
Wet snow avalanches consist of heavy, wet sun-heated or rain rotted snow, or wet new snow. The avalanches start at a point and grow in force and size as they descend. They are most common in spring and summer, particularly on south-facing slopes.
Slab
Slab avalanches consist of fairly cohesive layers of snow and are poorly bonded to the snow beneath. Unlike loose snow avalanches, slab avalanches start over wide areas. The whole slab begins sliding at once and with great force. Slab avalanches are the most dangerous avalanches.
Avoiding Avalanches
There is no easy, sure way to tell if a given slope is stable or not. Slabs, in particular, can survive for months after they have formed and can be covered with new snow. The resulting surface can look and feel safe, but the unstable slab-substratum interface may be present at depth.
- The best plan is to avoid areas that might be prone to avalanching.
- Avoid old avalanche paths. Look for bands of slide alder, small bent conifers, shattered trees and down-sloping bush. Avoid hollow-sounding areas and slopes that suddenly settle when you are on them. These can indicate the presence of dangerous slab conditions.
- Most avalanches start on slopes ranging from about 30 degrees to 45 degrees in steepness, but once moving, they can sweep over flat valley floors for great distances.
- Particular care is needed during and shortly after storms or snowfalls.
- Conditions change from day to day. Yesterday’s safe route may be today’s death trap.
- Cornices provide a useful guide to prevailing wind direction. Do not climb beneath corniced areas.
Danger Areas
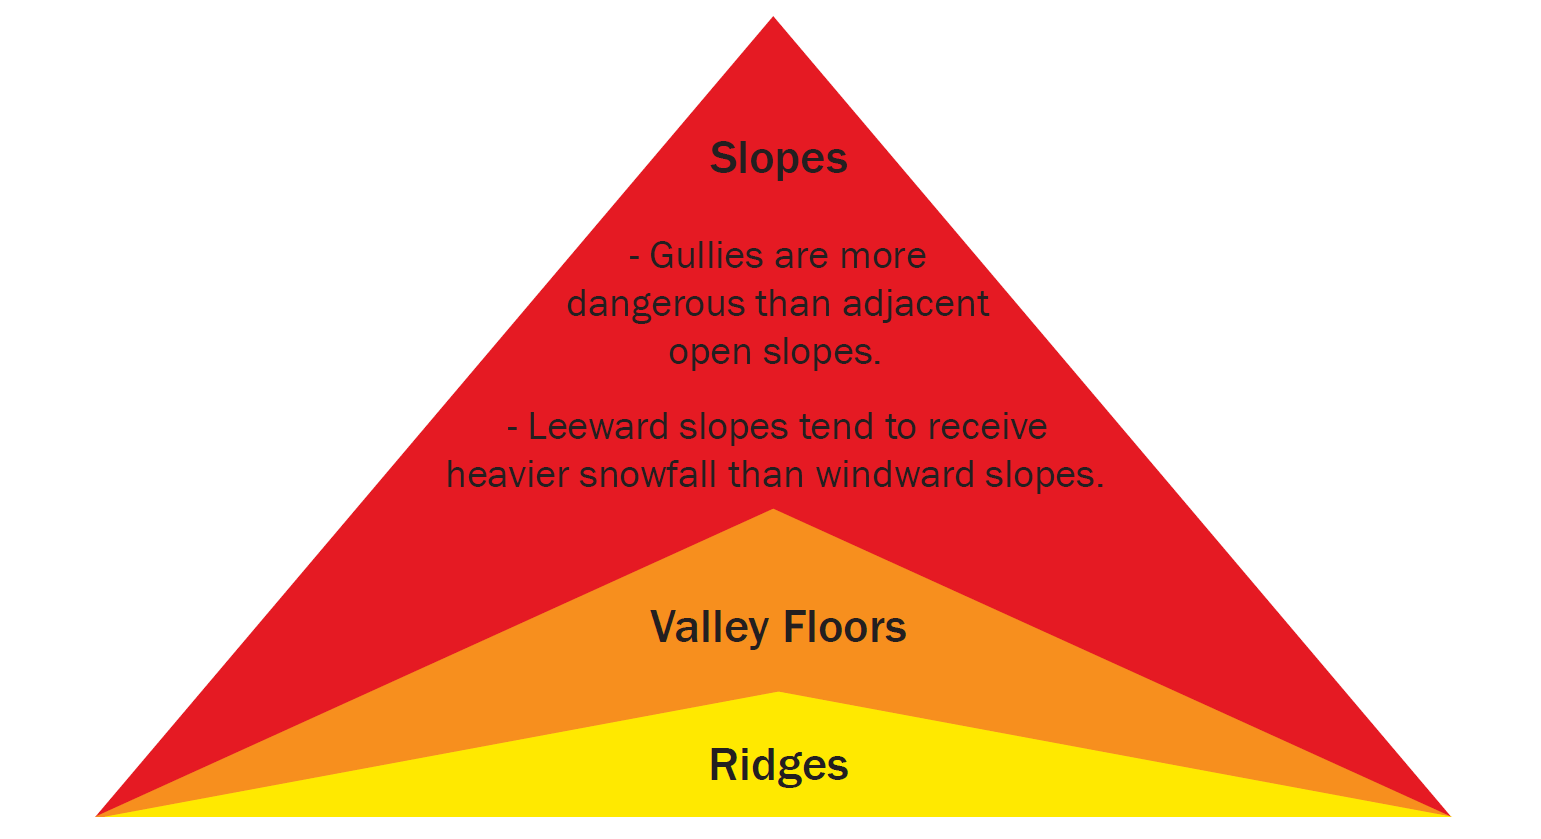
Crossing Suspect Slopes
- Cross as high as possible, leaving most of the dangerous snow below. Put on mittens and spare clothing. Loosen pack and skis so that they can be discarded quickly if caught.
- Cross one person at a time and cross quickly. The rest of the party should watch closely. Should an avalanche occur, note the spot where the victim was last seen.
Caught in an Avalanche
- Discard pack, skis, and other equipment.
- Fight to stay on the surface: make swimming motions. Try to make your way to the side of the avalanche.
- If buried, inhale deeply as the avalanche slows to a stop and try to make a breathing space in front of your face. Stay calm. Don’t try to fight to the surface unless you can see light.
- Death is common by asphyxiation. The snow consolidates almost instantly after coming to a stop. The crushing weight and eventual lack of oxygen are the leading killers.
Searching for Survivors
- Call for help – a satellite phone is a must.
- Further avalanches are possible. Post a lookout and pick an escape route.
- Mark where the victim was last seen.
- Make a quick search down the fall line from the marked point. Pay particular attention around trees and outcrops. Listen for the victim’s voice.
- Probe suspect areas with reversed ski poles, blunted ice axes, or the nearest equivalent items.
- If a hasty search proves futile, decide whether or not to go for help. Remember, half of all victims die within 30 minutes – many die within five minutes. After two hours, a buried victim’s survival chances are very low.
- First aid for survivors should treat suffocation and hypothermia. Many victims have head and internal injuries as well. Evacuation to a hospital is essential.
These notes have hardly begun to treat the subject of avalanches. If you plan to work in areas of high avalanche danger, the following steps are recommended before field work begins:
- Take a course in avalanche safety.
- Ensure there are enough avalanche beacons (electronic search devices) for the field party. Thorough practice with experienced individuals is necessary for these to be of value.
- Find out if experienced personnel have been hired to monitor snow conditions.
Learn from the past…
Whatever the landscape, mineral explorers need to be aware of winter hazards and how to address them. In October 2012, two experienced surveyors were working on a slope taking GPS coordinates near the camp when an avalanche occurred. One of the workers was able to get to safety; the other was swept off a cliff into a gully and did not survive.
Survival
A 20-year-old man was doing fieldwork on Dahl Mountain in central British Columbia when a cliff edge he was standing on gave way. Due to the efforts of his colleagues and the local search and rescue agency, a rescue was eventually possible through a helicopter airlift after approximately 23 hours. The crew had only a satellite phone at the camp, which was about four hours away, and due to the rugged terrain of the area, the rescue took significant effort.
There were two key lessons:
- Pay attention to your surroundings, assess risks and prepare accordingly. Be very careful around steep slopes and unstable cliff edges.
- Exploration parties should carry satellite phones (or cell phones in areas of cell coverage) or maintain regular radio call-in schedules with another member of their organization who does have satellite and/or cell communication.
Prevention
The following recommendations are very basic and must be supplemented by thorough preparation and safety measures. In addition, it is the responsibility of Exploration Managers to consider all aspects of field staff tracking in order to prevent a life-threatening situation.
Utilize Technology
In addition to satellite phones, radios, and cellphones used in conjunction with handheld GPS, satellite messengers can provide instant notification of where people are in case of an emergency and active local search and rescue. Such locators meet nearly any field program and budget. The SPOT2 devices, for example, have multiple options – field crews can check in regularly with the camp (e.g., three times per day) by pressing the “OK” button to send a location update. The in-camp medic can then update the crew’s location on a map posted in camp. Pre-programmed messages (e.g., “vehicle trouble, please send assistance to my location, NON life-threatening”) can also be sent. InReach messengers have the advantage of two-way texting as well as tracking down to 10 minute intervals. Messengers are more reliable than satellite phones because they will send the text as soon as satellite signal is obtained. Phones require a signal (which is not always available) to transmit.
As per the HSRC, people working alone can’t go any more than 2.5 hours without contact; it is advised that regular check-ins be done with all remote workers. Companies should also have a response plan in place for missed check-ins.
Know the Location of Emergency Response Personnel
Crews should ensure that their Level 3 first aid attendant is accessible in case of an emergency. Consider how long it will take for the first aid attendant to arrive at the scene. For example, have you allowed for how the first aid attendant will transport their Level 3 kit through the woods to the injured person? Plan and be prepared. Always ask yourself: “What if?”
Be Prepared
Case histories of survival incidents indicate that adequate preparation and rehearsal, both mental and actual, are the most effective measures for correct survival response. Many fatalities are traced to a lack of proper preparation, usually related to a mental attitude called the “it can’t happen to me” syndrome. The following section deals mainly with survival preparation – that is, measures that can be taken prior to finding yourself in an emergency situation. Specific survival techniques represent a lengthy subject that is treated in various published survival manuals. Also, refer to Chapter 6: Transportation and Chapter 7: Traversing.
- All exploration personnel should be trained in survival techniques and supplied with a copy of a recommended survival manual.
- Each individual/party on a reconnaissance or isolated set-out should be equipped with a satellite telephone and a global positioning system (GPS) for emergency use.
- All vehicles should contain a survival kit at all times and be sufficient for the number of passengers carried. Charter aircraft and boats are required by law to carry this kit – know the location. Be cognizant that survival kits often get tossed out on the landing pad, particularly on charter helicopters, so be diligent. Companies should specify in aircraft charter contracts the type and contents of the survival kit required – a good bush survival kit does not make a good arctic survival kit.
- Helicopter set-outs for a day’s work often place a person beyond walking distance to camp. Ideally, full scale survival kits including sleeping bags and a tent/tarp should be set out at the pick-up point. This procedure also allows both the pilot and passenger to identify and agree upon the location of the pick-up site.
- When, traversing on ground, the appropriate equipment must be carried and individuals must have the knowledge to enable them to survive an unexpected night out of camp.
- Have a sleeping bag with you when going on an aircraft or beyond walking distance from camp.
- At base camp, a dated log should be kept in conjunction with a map detailing locations being worked by each individual. It should indicate pick-up and drop-off points if an aircraft is being used. This data will be essential to a replacement helicopter pilot if the camp helicopter becomes unavailable for pick-ups. If all personnel are leaving camp, this information should be included in a daily radio log transmitted so that someone will know if and where to look if anyone is missing.
Equipment to Carry in Pockets or Backpack
- At least two forms of communication are recommended (e.g. satellite phone and cellphone, or satellite phone and satellite messenger) as both connections and batteries can fail.
- Global Positioning System (GPS).
- Compass and topographic map or air photograph of general area to be traversed. A compass with mirror such as the Brunton type can also double as a signaling device.
- Fire starting kit – matches in waterproof container, cigarette lighter, dry wood shavings, or flammable material.
- Pocketknife – large two-bladed jackknife or Swiss army knife.
- Notebook and pencil to record notes and leave messages.
- Food – nuts, raisins, prunes, dried fruit, chocolate, sugar cubes.
- Safety glasses and polarized green-lens plastic goggles if travelling over snow.
- Fluorescent-red aircraft-signaling cloth minimum size 2×2 metres.
- Large plastic garbage bag for instant body shelter (preferably orange).
- Space blanket.
- Small survival kit including nylon cord, wire, gill net, dried food, tea, spare large handkerchief, candle, aluminum foil.
- Small first aid kit.
- Small backpack survival manual in waterproof bag.
Don’t Panic – The Psychology of Survival
Fear and ensuing panic in an emergency survival situation are your biggest enemies. A person who can recognize the symptoms and is well prepared to deal with pain, cold, hunger, thirst, fatigue, boredom, and loneliness will be best able to cope with the normal fear and confusion which confronts anyone in an emergency situation.
Remember that someone else on your crew knows your approximate position and that a search will commence as soon as you are overdue. During summer, a person properly equipped with a survival kit will not suffer from exposure. Your greatest danger is injury to yourself or making your plight worse through panic.
Assisting the Search
The search will be from a helicopter or other aircraft. A person can be very difficult to see if situated in timber or not moving. In addition to communicating by satellite telephone assisted by GPS, make yourself conspicuous by waving both arms in a clearing or on a ridge, by using fire, flare, signal mirror and/or signal flag, and by wearing bright-coloured clothing. On bright days, smoke is more noticeable than fire, while on dull days or in twilight, the opposite applies. Smoke dissipates quickly in a strong wind and a small fire in these conditions is ineffective. In positioning your flag or in timing your flares, remember that the pilot will be looking ahead or possibly to his side of the helicopter.
If your intended pick-up site was above timberline, stay there as late in the day as you can, but move below treeline or wherever you can keep dry and warm overnight. The emergency equipment you carry is for situations such as this and you would certainly regret not having it when it is needed. Moreover, by not being able to signal your position, you will be wasting a great deal of money and time in the search.
The following are a few general rules covering special situations:
1. If you take the wrong route or suffer a crippling injury during your traverse and do not appear at your pick-up spot, do not attempt to retrace your steps unless you have ample time to spare.
When the pilot realizes you are overdue, his first search will be along your planned route to see if you are injured and have lit a fire or made other signals. If you are not found, a crew will start following your planned traverse on the ground while the helicopter searchers anticipate where you may be. If you are off your route and can walk, go to the most conspicuous point nearby (a ridge, lakeshore, river bar, or meadow), light a fire, prepare a smoke or flare signal, and wait. If you are using flares, try to optimize placement so that the pilot can be sure to see them.
2. If you are in the correct place and the helicopter does not come – stay where you are.
The helicopter may have suffered a breakdown and it may take a few hours or even several days to send a replacement. Your traverse is recorded at camp and everything possible is being done to bring you in. Depending on the time of the breakdown, a number of people may be scattered through the area or be stranded with the helicopter. If you went out in the morning with another person and his traverse is close to yours, you can try to meet up with him, but if you are unsuccessful in this, return at once to your own point. Never try to walk back to camp unless you are within 10 kilometres of easy walking, know your position and route completely, have a map, and are in good physical condition. If you do leave your pick-up point for any reason, leave a prominent signal and a note indicating your plans.
3. If you are involved in an aircraft incident or breakdown, follow the pilot’s orders.
In absence of the pilot, the senior or most experienced person is in charge. An aircraft cannot always be spotted easily in the water, in thick timber, or if covered with fresh snow, and consequently appropriate signals should be prepared. If your aircraft is close to its flight plan route, you should be found quickly.
If you are far off your planned route, stay with the aircraft and be prepared for a longer wait. If the aircraft is not easily seen, you may have to make a decision to move to a more obvious or safer location, but this should only be done in special circumstances. Leave a note with your plans at the aircraft. If you are not found quickly, keep busy preparing signal fires and ration your provisions, bearing in mind that a full-scale search is being organized by Air Rescue. The search will be conducted on clear evenings as well as in daylight; your signal, smoke or fire is most important then. All helicopters and fixed wing aircraft are equipped with an ELT crash-position indicator and you should ensure that it is activated properly. As indicated in Chapter 6: Transportation, you should obtain information from the pilot of each aircraft on your operation concerning the location of the ELT and its operating instructions.
Tips for Surviving a Hotel Fire
With improved transportation facilities, exploration personnel may be accommodated in hotels or motels near work areas. Hotel and motel fires kill hundreds of occupants each year and these fires are not restricted to older, rundown buildings. In fact, fatal fires commonly occur in five-star hotels and large motel chains. Careless smoking is the greatest single cause followed by arson. It is important to be ready for a fire and to know what to do should it occur.
At Check-in
Ask for a room that is located no higher than the third floor and enquire how guests are notified of fire.
Escape Plan
Immediately after check-in:
- Locate the nearest exit and fire alarm; then find an alternate exit.
- Count doors to exit and note hallway obstacles.
- Does the window in your room open? If not, how would you break it?
- Keep the room key, a small flashlight, and eyeglasses on the nightstand.
Escape Action
- Grab your room key, flashlight, and eyeglasses.
- If the room is smoky, crawl to the door. Open the door slowly if the handle is cool. If hot – stay put.
- Crawl to stairs, hugging the wall on exit side. Then, walk down to the ground floor, hanging onto the railing. If smoke “stacks” in stairs, walk up to the roof and prop open the door – stay put.
- DO NOT USE THE ELEVATOR.
Room Survival
- Stay in your room if the door is hot and the hallway is smoky.
- Try to phone the front desk.
- Fill the bathtub with water and turn on the bathroom vent.
- Use an ice bucket or trash can to bail water on hot doors and walls.
- Stuff wet sheets or towels around door and vents.
- Tie a wet towel around your nose and mouth.
- If smoke fills the room, open the window (break as a last resort).
- DO NOT JUMP FROM ABOVE THE SECOND FLOOR.
- TRY NOT TO PANIC – THINK!
These guidelines will give you the basic elements of preparation and survival; however, a good survival reference manual should be left in camp or kept on person.
Wildlife
In terms of danger from wild animals or insects, Western Canada is a very safe place to work. Despite the large number of encounters, actual attacks from animals are rare. However, if they occur the consequences can be serious.
The main threats posed to humans are by:
- Bears, both black and grizzly.
- Cougars.
- Moose, mostly in rutting season (September).
- Animals with young.
- Rattlesnakes.
- Ticks.
- Bees, mosquitoes and blackflies.
An EpiPen is required to be in the first aid kit of any exploration program and should be used properly on a victim in the case that a beehive is inadvertently stepped on or disturbed in any way and there are signs or symptoms of anaphylaxis. If there are several stings, even those not typically allergic to stings can have a reaction.
In most instances, large mammal attacks are provoked because the animal:
- Feels its safety or that of its young is threatened.
- Is protecting food or territory.
- Is surprised.
- Has rabies (relatively rare in the wilderness) or other diseases.
Working safely means avoiding these circumstances. A bite from any animal, no matter what the size or extent of injury, is potentially dangerous because of the possibility of rabies or severe infection. The victim should seek medical attention as soon as possible.
Bears
Learn from the past…
Bears present the highest wildlife threat to workers in the bush; however, most attacks can be prevented. The chances of surviving an attack and minimizing injury are good provided you keep calm. Because of their size, grizzly bears seem the most formidable; but remember, black bears can be as unpredictable and dangerous. In British Columbia, black bears are ten times more numerous than grizzlies.
Identification
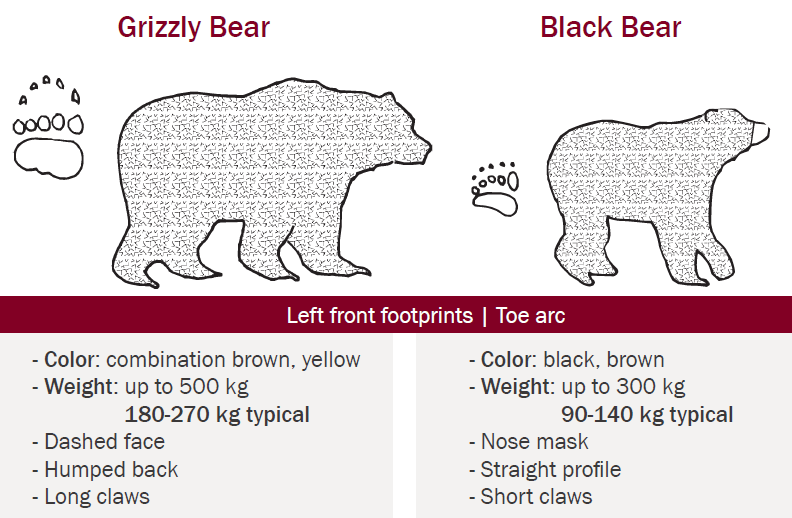
Habitat
- Alpine – treeless, high-elevation settings are extremely important to grizzly bears, but little frequented by black bears.
- Subalpine – offers a variety of bear foods, including ungulates. Preferred travel routes are also found here.
- Forest – year-round home for black bears, but also frequented by grizzlies. Recent burns, clearings, highway edges, survey lines, etc. offer succulent new growth for food.
- Rivers and floodplains – generally have high bear activity in spring when bears descend from snowbound dens in search of food. During spawning season, fish are an important food source.
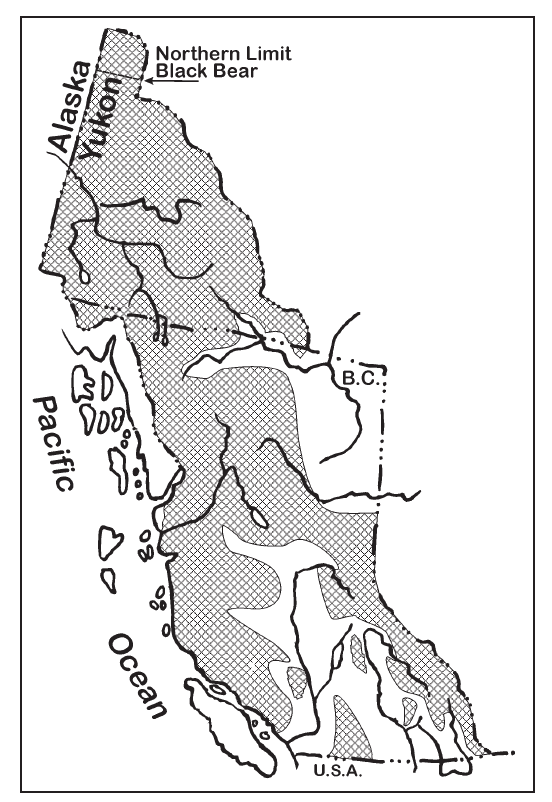
Range chart (stippled area) for grizzly bears in BC and Yukon. Black bears frequent entire region, including Vancouver Island and Haida Gwaii. Polar bears may be found in the north coastal area of Yukon.
Control Measures
- Avoid setting up camp near wildlife trails, spawning streams, or berry thatches.
- Find out about the area from local sources before entering. Local trappers, hunters, loggers, pilots, other explorers, and conservation officers will know the general location of recently spotted grizzlies and black bears.
- If flying in, do a reconnaissance flyover to identify any visible wildlife (especially in open terrain).
- Food storage should conceal odours, and if possible, be in bear-proof containers, some distant from quarters and general activity area.
- Completely incinerate all garbage and food wastes daily.
- Bears are attracted to the odours arising from scented cosmetics, hair spray, deodorant, etc. There is no evidence of increased risk of attack to women having their menstrual period; however, use of tampons and extra caution are advised.
- Almost all dogs except well-trained bear dogs are detrimental in the bush, as they may encounter bears and lead them back to their owners.
- Under no circumstances should bears be fed.
- Keep wildlife officials informed; they may wish to deter or relocate curious bears that enter the camp area before they become conditioned to garbage availability or start to terrorize the camp.
- When possible set up camp in open areas where bears cannot use cover to give them security while approaching a camp.
- When possible work camps should be enclosed in an electric fence or with a trip wire approach warning system.
Safety on Trails and Traverses – How to Avoid Bear Encounters
- Travel together where practical; there is safety in numbers.
- Predict areas that you would expect to have high bear activity (e.g. burns, old camps and dumps, fish spawning areas, berry patches).
- Carry a spray can of bear repellent containing capsaicin – a red-pepper derivative which has been proven effective in deterring bears in a non-toxic, non-lethal manner. Keep the spray can in an accessible place and be prepared to use it as required. Practise using the spray and be aware of wind direction so that you are not inundated by the spray.
- Be cautions around all streams. Running water can make it hard for the bear to hear you, and for you to hear it. Fish-bearing streams pose an additional risk.
- Make noise at all times to alert a bear to your presence. Air horns are recommended in areas where bears are numerous. The sound from bells does not usually carry far enough to be useful.
- Yell several times before entering heavy brush or when visibility is limited.
- Be alert to wind direction – expect to see bears upwind.
- Fly your traverse if possible to check ahead for bears before you hike.
- Be alert to strange smells – bears do smell quite strongly, particularly when excited.
- Be alert for unusual behaviours of other animals, especially scavengers such a ravens and coyotes that may indicate the presence of carcasses.
- Be alert to signs such as droppings, footprints, uprooted logs, dug holes, carrion, and scratch or bite marks on trees.
- Never approach a bear cub even if it appears to be alone. If you come across a cub, retreat in the same direction from which you came.
While hiking or walking remain alert and constantly look ahead for bears or signs of bears (bear scat, fur on trees, etc.).
What to Do if a Bear is Encountered
Upon seeing or hearing a bear, you have several choices depending on the situation. If the bear is at a fair distance away, seemingly unaware of you and is feeding, it is important to stay calm. Leave the area without trying to make the bear aware of your presence. In other situations where the bear is close, you will need to quickly assess if the bear is in a non-defensive or defensive state.
In a non-defensive state, the bear will show little stress and may look your way with its ears perked. In this situation, speak to the bear in calm yet assertive tone and slowly back away. The bear may simply want to continue on its path. However, should the bear be fixated on you and continues to approach, it may be ready to attack. Prepare your deterrent. It is important to make yourself as big as possible by standing on a rock or log and by waving your arms and shouting or speaking in an assertive tone.
A bear which is in a defensive state is one that feels threatened. Its intentions are not usually to attack, but to show dominance in order to remove the perceived threat. As in any bear encounter, stay calm. In this situation, do not provoke the bear by displaying a loud or aggressive behavior. Instead, talk softly and back away slowly. If the bear approaches, use bear spray or a firearm. If the bear does charge and attacks, play dead by falling to the ground face down, protecting your neck and head. Stay quiet. When the attack has stopped, wait for the bear to leave before moving.
Like other mammals, bears have evolved postures and other signals to communicate aggression and reduce the need for violent confrontation.
Knowledge of these signals can help you interpret what the bear’s next move will be and what action you should take. Stressed or aggressive signals include:
- chomping jaw actions.
- paw stamping and swatting.
- a variety of explosive vocalizations.
While making threats, the bear’s ears will point forward and it will watch closely for your response. Never run from or scream at a defensive bear – it may provoke or excite the animal and heighten the possibility of attack. Make every attempt to leave an avenue of escape open to a bear – it will feel threatened if cornered.
Always expect a variety of responses from a bear, including:
- a retreat.
- circling downwind of you.
- a slow approach or a charge.
Using Bear Spray
If a bear is approaching you and you feel threatened, fire two or three short bursts of spray at an angle pointing downwards between you and the bear while you back away. The spray will create a cloud of deterrent, which will probably stop the bear. Having the spray aimed downward should prevent the cloud from engulfing you. Ensure that you have enough left to spray the bear in the face at short distance if it continues to advance.
Using a Firearm
If you are carrying a firearm, do not use it until you are sure you have no other alternative. A wounded, adrenaline-charged bear is so dangerous that shooting should be the absolute last resort. Shotguns with rifled slugs are recommended.
Wait until the attacking bear is within 20 metres or closer if using a shot gun and preferably within 15 metres before squeezing the trigger because the bear may be bluffing. If it is not, the close range will increase the chance that your first shot will be disabling.
The first shot has to be your best. Be certain that no one is in the line of fire. Bears attack on all fours, walking or running in a low crouch. They do not charge on just their hind legs. The figure below shows where to shoot a bear if you are forced to destroy it. You must have practiced a lot with shooting at moving targets to be able to hit and disable a charging bear. Remember, bear spray is easier to deploy effectively.
The front and top of the head are not suitable targets when a bear is coming at you, as the brain is only the size of an orange.
If you have to shoot a bear, afterwards you must contact the Fish and Wildlife Branch or Conservation Officer Service in the area, identifying the sex, species (grizzly or black bear), and location of the kill, together with the circumstances concerning the shooting of the bear. Follow their instructions when disposing the carcass.
If you wound a bear, you have the responsibility to try and kill it, but under no circumstances should you attempt this alone. Be extremely careful, particularly if you must follow the bear into brush where it can squat and be very hard to see until you are only a few metres away. Wounded or frightened bears almost invariably head for dense brush where they feel most at home, where their superior senses of hearing and smell are more useful than your superior eyesight, and where you will usually have difficulty walking and handling a firearm. No one without a suitable firearm should help track down a wounded bear.
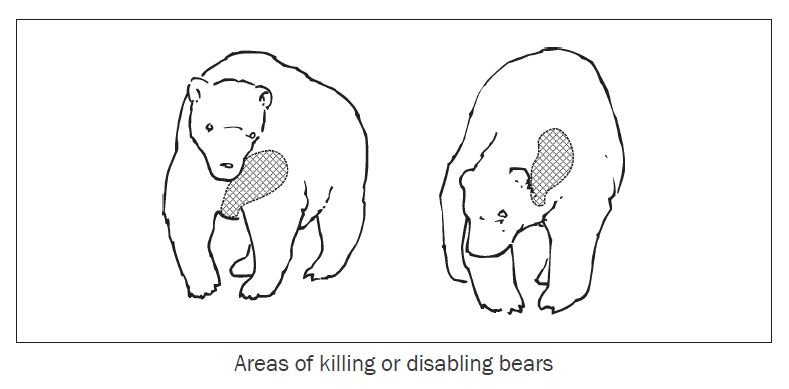
If Mauled
If you are mauled, spread your legs so that it is harder for the bear to flip you onto your back. Protect your organs.
In the unlikely event you are mauled, stay still, listen and try to assess the injuries you have received. While most bears move off, they may not travel far or quickly. After about five minutes, cautiously look around. Rationally decide your best course of action based on the nearest radio, the nearest help, first aid available, and amount of blood lost. The first priority is to stop the bleeding. Apply pressure to the wound and look for something to wrap it with. Wrap firmly, but loosen it if you get a pins-and-needles feeling.
You should sit and think. Don’t move until the blood has clotted. Drink the liquid in your daypack to help your body restore blood lost. If you have lost a lot of blood, you may be too dizzy to walk for help. If so, move a short distance, light a fire and sit down. After resting, gather more firewood, spread out your aircraft signal, and prepare to spend the night.
At this time, we hope that you will be comforted to know that you took the following precautions before leaving camp:
- Your personal first aid kit is adequate.
- You have a flare and a fluorescent-range fly sheet to alert aircraft.
- You have a “buddy” with you or working close by.
- You or your crew leader set up frequent radio-check times and they should start looking for you soon.
- Someone knows your exact travel route and schedule.
- You have matches, emergency food, and a space blanket in your survival kit.
- The rest of your crew are well-trained and care for your welfare.
An investigation should follow any bear attack; contact the BC Conservation Office Service at 1-877-952-7277. No other crew members should visit the site before conservation officers.
Moose
Moose frequent large areas of both British Columbia and the Yukon. Commonly sighted, they are seldom perceived as a threat to humans, but be aware – charges from moose do occur, particularly from a cow moose protecting a calf (in spring), from an ornery bull, or a bull in rutting season (September). Although moose appear large and ungainly, they can move extremely quickly. If you encounter a moose, it is best to increase the distance between you and the moose, keeping a nearby tree in mind to either climb or keep between you and the moose.
In relatively densely timbered areas, you may avoid injury from an attacking bull moose by using closely spaced trees as a barrier. Stand behind trees spaced about one foot apart (i.e. too narrow a space to permit access by the moose because of the spread of its antlers).
Extra caution is required when driving as motor vehicle incidents involving moose are often fatal.
Cougars
The cougar is the largest cat native to British Columbia and weighs on average between 45 to 55 kilograms. They are elusive and possess remarkable hunting skills. Cougars normally avoid humans; however, the frequency of attacks is increasing. These attacks are usually attributed to starving cougars. If you work where you know cougars are common, it is wise to carry a heavy walking stick to use if defensive action is required. If you come across a kill, leave it alone and do not bend over to examine the carcass. Leave the area calmly and as quickly as possible.
Two different scenarios may arise should you encounter a cougar:
1. You are being watched.
If you notice a cougar watching you, face the cougar, stand as tall as you can, and try to appear as large as possible – open your jacket. Back away slowly, still facing it. Do not crouch down or turn your back on it and DO NOT RUN. Climbing a tree will not help as they are excellent climbers and can easily drag you from the tree. Some say that staring down a mountain lion is folklore that actually works. So as long as you make eye contact, the cat is unlikely to charge. You may be able to diffuse the situation even further by yawning and showing the cat that you are bored with it!
2. The cougar is running at you.
If unarmed, there is probably little you can do but put your pack out in front of you to protect yourself, or protect yourself with an axe, club, or hammer. Try to inflict pain on the animal with your weapon or with a large stick or rock. A cougar’s pain threshold is very low. Aim for the face and eyes. You must never run away as this behavior triggers their instinct to chase. Throw rocks or branches at it. If you ward off an attack, treat any injury, assess the situation, and rationally plan your next move. Keep cool.
Report all attacks to the BC Conservation Office Service at 1-877-952-7277.
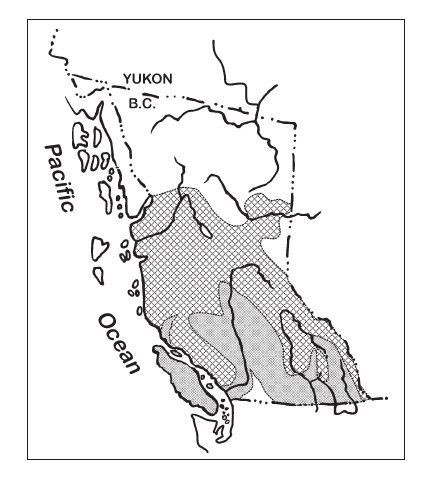
Distribution of cougars in British Columbia. Dark colour indicates moderate to plentiful in abundance; light colour indicates few or very few.
Rattlesnakes
Rattlesnakes, preferring dry desert-like areas, range into the southern interior of British Columbia. They favour a habitat in dry rocky areas, in grasslands, at the base of rockslides, in sagebrush country, or where there are boulders and scattered shrubs for cover. They are rarely found above the 2,600 metre elevation. During hot summer months rattlesnakes are most active at dusk and early evening, but they can be seen any time of day or night. In winter, they congregate in dens part way up rocky slopes to hibernate. Rattlesnakes are not particularly aggressive and unless startled or irritated, usually will not strike. When they do, newborn rattlesnakes can deliver a lethal bite even though they are not able to make a rattling sound until after the first molt. One new rattle is created with each molt so older snakes have many rattles. Be aware that some large snakes do not bother to rattle before striking.
Avoid rattlesnake bites by taking precautions:
- Be familiar with the various species of snakes that live in the field area where you work so you can recognize them.
- Learn where to expect to find snakes in your work area.
- Wear “high-cut” rather than “low-cut” leather work boots as strikes are commonly made to the lower part of the legs. Wear long pants that are not tucked in. Often, fangs are caught by loose clothing and never pierce the skin of the victim.
- Be alert to the potential presence of snakes behind rocks or other shady places.
- Keep your camp free of debris and clutter so snakes have no place to shelter from the sun.
- Keep your food carefully stored to avoid mice infestations. Snakes feed on mice and will follow them into camps.
- Keep a container (garbage can with lid) and a long blunt hooked stick available to use to confine a snake and then relocate it.
- If working where rattlesnakes are common and only in an environment where it would take more than two hours to travel to a medical facility, you may want to consider carrying a commercial snakebite “Extractor” kit. These kits extract a maximum of 30% of the venom and have an important calming effect on the patient. Research the hospitals in the area that have anti-venom in stock and can treat snakebite. Snakebite victims must be taken to a place where treatment is available. Not all hospitals may be widely stocked.
Treatment of a Snakebite
Bites from BC snakes are not usually fatal, but rattlesnake venom is necrotic and can cause severe tissue damage that may result in paralysis or amputation. As venom is transported in the lymphatic system, every attempt should be made to cut down the rate of lymphatic flow. There is no reason to kill the snake for identification, as there are no other venomous snakes in BC.
If you or your co-worker experiences a snake bite:
- Wash the wound immediately with soap and water (to decrease tissue damage) and cover with a sterile dressing.
- Remove any constricting jewelry.
- Stay calm, quiet, and reassuring.
- Immobilize the injured area by wrapping a pressure bandage around the limb gently as if wrapping for a sprain. This will restrict the flow of venom through the lymphatic system.
- Keep the limb or injured area below the level of the heart if possible.
- The patient must be transported to medical attention as soon as possible in a horizontal position. If it is necessary to walk, do so slowly and rest frequently. Do your best to get to a medical facility as this is the best first aid for snakebites.
- DO NOT apply ice to the bite area.
- DO NOT apply a tourniquet or restrictive bandage.
- DO NOT cut (excise) the wound and only use an extractor kit for suction when in an area where access to a medical facility is more than two hours away.
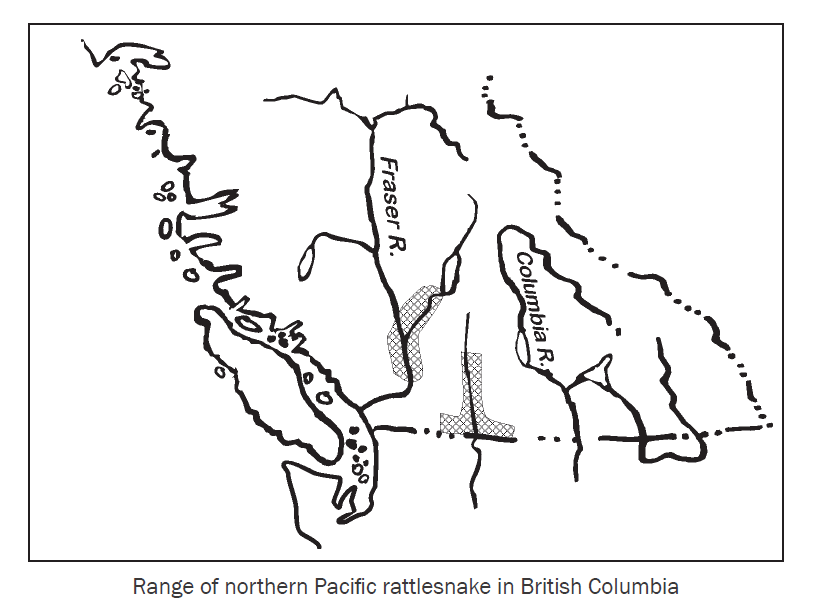
Bugs
Ticks
Of the 20-odd species of ticks in British Columbia, only three normally bite humans. They cannot run, jump or fly, but they are dependent on blood for their existence. Ticks are commonly found in most parts of BC south of Prince George. Most tick bites are harmless but some ticks cause paralysis and some carry diseases.
Lyme Disease
Lyme disease is a serious disorder spread by the bite of an infected deer tick or nymph (Ixodes pacificus). Lyme disease alone is reason enough to prevent tick bites. Other diseases that ticks carry are less widespread. Early detection and treatment of Lyme disease is crucial. See your doctor as soon as possible if you experience any of the following symptoms within days or weeks following a tick bite:
- Fever and headache, muscle and joint pain, fatigue or weakness of muscles of the face.
- Skin rash, especially a rash resembling a bulls-eye. The location may or may not appear at the site of the bite.
- Paralysis starting at the lower extremities and working upwards. This may develop within hours or over days.
The Rocky Mountain tick ranges into eastern BC and the interior dry belt. They are most abundant between March and June. During this period they are present on almost all scrub vegetation and grass. The ticks do not drop out of large trees. Symptoms occur after a tick has been feeding for about five days and generally involve:
- Numbness in the feet and legs, progressing to the hands and arms.
- Possible paralysis of the throat muscles or difficulty in swallowing.
- The tongue being affected causing inability to speak properly.
- No pain and seldom a fever.
Tick paralysis is a condition that establishes itself only when the (infected/female) wood tick is allowed to remain attached or goes unnoticed. A complete recovery typically follows the removal of the entire tick, if paralysis has not spread too far.
The Pacific Coast tick is common on vegetation along the Pacific Coast during the wet season. It does not cause paralysis but its bite may be painful and develop into a slow healing ulcer. The third group of ticks—soft ticks—have bites that are toxic and may cause a severe shock-like reaction.
Precautions During Tick Season
- When possible, avoid open grass areas surrounded by trees.
- Do not leave clothing on the ground or draped over bushes.
- Resist the urge to stretch out on or near vegetation; take rest or lunch breaks on bare rocks or surfaces that are free of plants.
- Wear high boots, long pants (tucked in boots), long sleeved shirts (shirts tucked in) when required to work or cross through highly vegetated areas.
- Apply insect repellent containing 5% permethrin to your clothing and insect repellent containing up to 35% DEET to your exposed skin. Reapply as required.
- Make frequent tick checks of all members of the party (especially those at the front of a hiking party).
- Before going to bed, remove all clothing and check each piece of clothing for ticks. Carefully and thoroughly check your body as well. Ticks prefer the groin and the head, especially the base of the neck and behind the ears. (They have been found inside the ear canal and the nostrils). Check hair, scalp, and arm pits. A little mutual grooming will go a long way in detecting the presence of ticks.
- If you find one tick, there are usually others. Recheck thoroughly.
Removal of Ticks
- Gently grasp the tick as close to the mouth part as possible with sharp pointed tweezers. Pull gently and slowly over a period of one to two minutes while lifting the tick up off the skin. Try to remove the entire tick, including mouth parts and a tiny cone of white cement (often assumed to be a piece of the victim’s skin).
- DO NOT twist or jerk the tick as mouth parts may break off in the wound. This will increase the possibility of infection should the tick carry diseases.
- DO NOT APPLY a lit cigarette, drops of gasoline, acetone, grease, etc., to the tick. These actions may cause the tick to spew out infecting microbes into your bloodstream.
After Removal:
- Wash the area thoroughly with soap and water and apply a mild antiseptic.
- Identify the tick using eTick.
- Consult a doctor if any symptoms develop.
- If working in an area known to have Lyme disease, visit the BC Centre for Disease Control website for options including identifying sending to laboratory for analysis.
Mosquitoes
Mosquitoes and blackflies are a notorious nuisance in northern latitudes, especially when conditions are cool and wet.
To avoid bites:
- Use repellent containing DEET (N, N-diethyl meta-toluamide) on your skin with the understanding that higher concentrations may cause reactions as it is absorbed through your skin.
- Treat your field clothing with permethrin products to repel insects, flies, ticks, leeches, etc. Wear treated bug-jackets and head-nets to reduce insect bites where the numbers of insects indicate needed protection.
- Avoid using cosmetics or soaps with fragrances.
West Nile Virus
Since 1999 when the disease was first found in North America, it has spread across the USA and through most of southern Canada. Although extremely rare, the West Nile virus has been detected in British Columbia.
- West Nile virus is transmitted to humans through the bite of an infected mosquito and, very rarely, through blood transfusion and/or organ transplant. One cannot recognize mosquitoes that carry West Nile virus so it is prudent to prevent mosquito bites by using appropriate insect repellent containing DEET.
- About one in five people bitten by an infected mosquito will develop symptoms of the disease. One percent of infected individuals will develop severe symptoms that may include encephalitis, meningitis, and/or paralysis.
- People with weakened immune systems are more vulnerable to West Nile virus.
Symptoms of West Nile Fever may include:
- Fever.
- Muscle weakness.
- Stiff neck.
- Confusion.
- Severe headache.
- Sudden sensitivity to light.
Drilling
The Canadian Diamond Drilling Association advocates for good diamond drilling practices at a drill site. Drilling Excellence certification was introduced in 2012.
Diamond and Percussion Drills
Drill sites are regulated by the Health and Safety standards set out in the Health, Safety and Reclamation Code for Mines in British Columbia (HSRC). Furthermore, Safety and Workplace Hazardous Materials Information System (WHMIS) binders should be supplied to the Project Manager and available at the work site.
Regular safety meetings are mandatory and should involve drill crews, helicopter pilots, and geological staff. In addition, it is important that the driller and the driller’s helper are always aware of a visitor’s presence at a drill site. Be sure to report any hazard to the driller or project supervisor.
Principal Hazards
- Loose clothing caught in the drill, particularly when rotating steel is unguarded, can cause serious or fatal injuries. All rotating equipment must be guarded, and area guards and interlocks to prevent operation with guarding open are most effective at isolating hazardous areas.
- Lack of fitness, particularly with drill helpers, can lead to serious injuries.
- Slippery floors in the drill shack can cause serious falls. Remove drill muds and ice, and use material, including sand, to improve traction. Report slippery floors to the driller.
- Noise can cause serious ear damage. Wear hearing protection at the drill site. Some drills such as reverse circulation drills may require double protection (i.e. ear plugs and muffs).
- Falling objects from the drill mast or upper deck. Hard hats must be worn in the close vicinity of the drill shack. Whenever possible, working at heights should be avoided, with masts lowered to perform maintenance work.
- Sampling in dusty environments, particularly around percussion rigs, can cause breathing problems. Wear a well-fitting dust mask in these environments. Always wear safety glasses.
- Licking core without knowing what drill additives are used is a health risk, as several additives are poisonous. Water is available at the drill site to wet the core for examination.
- High pressure fluids and air, including injection injuries from failed hydraulic and air lines. High pressure lines should have whip checks and hydraulic lines should be wrapped where they are close to work areas or are exposed to damage from moving parts.
- Moving parts, including drill rods, rod handlers and hydraulic rams have the potential to create pinch and crush points during normal drilling operations. Hazard areas should be identified, and guarding or barricading should be used to reduce exposure to the hazard.
Coal Exploration
When drilling for coal, use appropriate gas detectors and blow-out preventers/diverters as recommended by a qualified professional. All personnel should be trained in their use and understand the emergency response procedures.
Additional controls, including H2S Alive training, self-contained breathing apparatus (SCBA) or supplied air trailers may be required if there is an elevated risk of encountering toxic gases.
Drilling Procedures
- The driller is responsible for everyone’s safety at the drill site – follow the directions of the driller and get his or her attention prior to entering the drill site. If you are not familiar with the rig, ask for an orientation or have the supervisor escort you. If necessary, have the driller temporarily shut down to discuss work progress.
- Avoid exposure to hazards – do not wait or stand around without an intended purpose.
- Ensure that rotating equipment such as the drill stem and winch lines is guarded.
- Stay away from sump pits, and ensure these are clearly marked, fenced-off and filled in at the end of the drilling.
- Diesel permits are required, and if such equipment is operated underground, a “Notice to Start Work” must be filed with the District Inspector of Mines.
- The drill crew should have a process for inspecting equipment to ensure its safe operation, including inspecting winch lines for damage or wear, checking that e-stops and interlocks are functioning, and ensuring emergency equipment is available and accessible.
- All equipment should be fitted with a sufficient number of emergency stop buttons to safely shut down equipment in the event of an emergency.
Underground Workings
Great caution must be exercised before and during entry when investigating inactive or abandoned underground workings. Unless proven otherwise, all inactive or abandoned underground workings should be considered confined spaces and all applicable safety procedures for confined spaces should be followed.
All work other than initial exploration and evaluation in underground workings must be under the supervision of the holder of a valid underground shiftboss certificate.
Prior to Entry
Before beginning exploration of any type of underground workings, a “Notice to Start Work” must be sent to the Inspector of Mines with at least 10 days’ notice. No work should commence until approval has been granted. The Inspector may be able to provide information on the present conditions of the workings, including if they have been inspected recently. Furthermore, old mine plans may be available.
Hazards in Underground Workings
Underground workings present hazards which are unique to the environment. You should never enter these areas without inspection and guidance from someone with extensive experience.
Hazards commonly include:
- Hazardous Atmosphere
- Low oxygen (21% is normal, less than 19.5 % is hazardous)
- Carbon monoxide
- Flammable Gases
- Loose Rock
- Loose/Rotten Timbers
- Open Holes
- Unsafe Ladders in Raises
- Poor Visibility
- Animals – Bears, Bats
- Deep Water
Hazardous Atmosphere
Do not enter to explore abandoned openings unless you have and know how to use a multi-gas detector. Low oxygen and hazardous gases will probably be present. Even the dripping of water can cause the generation of deadly hydrogen sulfide gas. One of your best defences is good ventilation, which will probably not be present on initial exploration.
Loose Rock
Be alert for areas of loose rock which could fall unexpectedly. Unless you have been trained on proper scaling methods, you should avoid attempting to take down loose rock. If you see areas where rock has fallen from the walls or roof, do not proceed until the area has been made safe by a qualified person.
Loose/Rotten Timbers
Many old workings may use timbers for ground support. Be alert for broken timbers and if you see these areas, do not proceed. Constantly check the timbers for rot using a knife or hammer.
Open Holes
Many old ore passes, ventilation raises and manways may have some type of timber coverings. Never assume these timbers are safe to walk on until inspected by a competent person. Keep clear of these areas. Other open holes may have no coverings or guard fences. Keep clear of these also due to the potential for slippery or loose rocks near the edge.
Unsafe Ladders in Raises
Wooden ladders are especially unsafe if they have not been used in several years. These ladders should be avoided until inspected by a competent person.
Animals – Bears, Bats
Many animals will make their home in abandoned adits. This is especially true of bears looking for a winter den. If you encounter a bear, keep in mind you are in their avenue of escape as they will probably want to get out. They may also have cubs present. Check carefully for signs of animals and keep your bear spray handy. Never handle bats, whether flying or dead, because of a risk of rabies. Because of the risk of spread of fungal disease and white nose syndrome among bats, bats that are found dead during winter or early spring should be reported to the BC Community Bat Program at 1-855-922-2287 or [email protected].
Deep Water
Never assume a puddle of water is just a puddle. Deep puddles and uneven ground could cause you to lose footing and twist an ankle. Standing water in old sumps can also be location for hazardous gases, which will become airborne once the area is disturbed.
All crew members should understand proper ground sounding and scaling techniques.
Equipment
Crews must carry minimum safety equipment as follows and be oriented to its uses and emergency response procedures.
DO NOT WORK ALONE and do not share personal safety equipment.
Per Crew
- Oxygen detector.
- Toxic gas detector.
- Flammable gas detector.
- Safety line (20 metres).
- Two scaling bars.
- Bear deterrent.
Per Crew Member
- Safety belt with safety lanyard (2 metres) and self-rescuer.
- Hard hat, boots, and gloves.
- Battery-powered underground cap lamps.
- All equipment used in underground coal adits must be checked regularly.
Standby
One crew member should be stationed at the portal and given a firm indication of the time to be spent underground by the investigating crew, and a map that indicates where they will be exploring. This person must be familiar with the SAR (Search and Rescue) plan and be able to implement it should the need arise. Remember, this is confined space and all precautions for confined spaces and standby workers should be followed.
Entry
- Initial investigation should be staged – examine state of ventilation, condition of tunnel back and sides, and presence of water. Advance only when safe to do so and check back to portal at frequent intervals.
- Do not sample or break rocks on initial exploratory inspection through the workings.
- Retreat immediately if old timbers have collapsed or rock has fallen from backs or raises.
- Even solid-looking timbers may be completely rotten and have no strength – check with scaling bar.
- Retreat immediately and abandon all plans if there is any indication of a dangerous atmosphere (e.g. oxygen deficient, toxic, flammable, or explosive) for further immediate investigation.
- Underground ventilation can change from day to day and oxygen content can drop to zero in a horizontal distance of 10 metres.
- When underground, do not separate from your crew.
- Sampling of mineralized structures and wallrocks may be undertaken only after determining that the workings are safe – use common sense.
Continued Investigation
Any extraction of rock requires a certified shiftboss to be on site. If underground sampling is necessary, the services of a suitably qualified and certified shiftboss must be obtained.
Resources
The following are general resources; for more specific guidance, consult the links in each chapter.
Province of British Columbia
Health, Safety and Reclamation Code for Mines in British Columbia (HSRC)
Association for Mineral Exploration
AME Health & Safety landing page
Prospectors & Developers Association of Canada
PDAC Health & Safety landing page
Safety and First Aid Training (Selected Resources)
WorkSafe BC List of First Aid Training Providers (check with Regional Mines Offices for local contacts)
Provincial and Territorial Legislation (other than HSRC)
Checklists
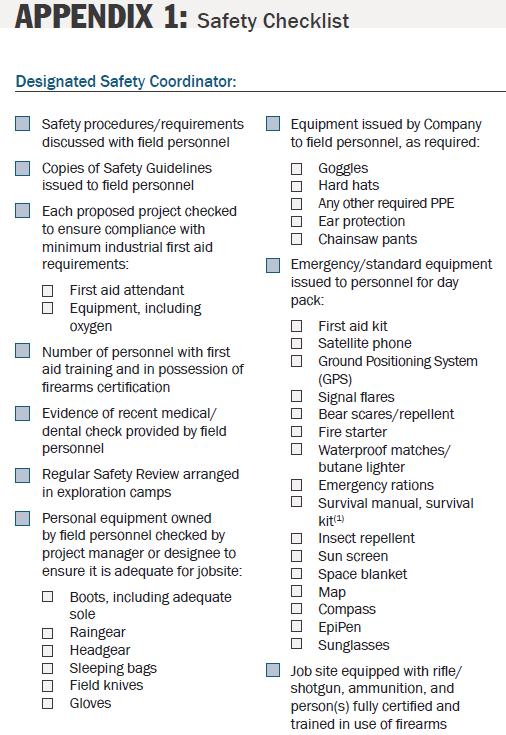
- See Appendix 2: Recommended Survival Kits
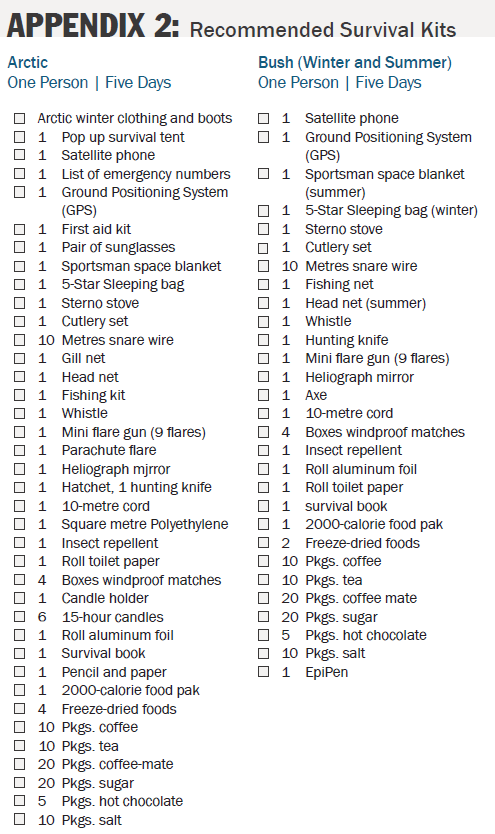
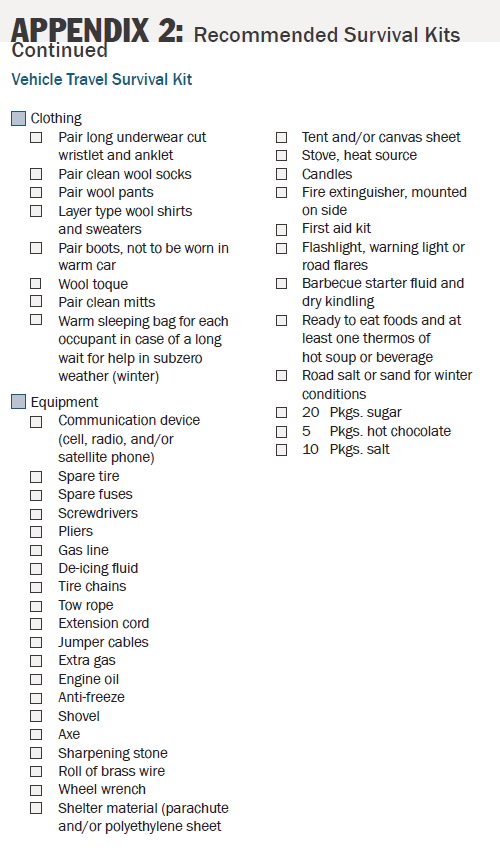
APPENDIX 3: Emergency Response Procedures in the Event of a Serious Incident or Fatality in BC
Immediately:
- Render all possible first aid.
- Arrange for local transfer of injured personnel, as required, to the nearest hospital.
- Hospital Telephone Number _____________________________________
- Air Charter Telephone Number __________________________________
- If necessary, phone Medivac (Phone BCAS at 9-1-1 or 250-374-5937 ) to coordinate air and land transfers of sick or injured personnel requiring transfer from one area to another. If you have a helicopter arrangement for these types of emergencies, this should be noted in your Mine Emergency Response Plan (MERP).
- In the case of a fatality, as per Part 1.7.1 of the Code, immediately contact the BC Mines Chief Inspector at 1-888348-0299. An incident investigation and follow-up report is required to be submitted in 6o days as per the Code.
- Phone local RCMP in the event of any fatality.
- Report incident to the Employer.
Telephone Number _____________________________________
Day Telephone Number _________________________________________
Night Telephone Number _________________________________________
For dangerous occurrences at a permitted exploration or mine site:
- Phone Mine Incident Reporting Line at 1-888-348-0299 or send a preliminary report to [email protected] as soon as practicable, but no later than 4 hours for a fatality and 16 hours after a non-fatal dangerous occurrence.
- Check appropriate requirements.
- Submit full report to [email protected]. Report template is here.
For examples of these types of occurrences the Ministry has a weekly list of them on this site.
Refer to the Health, Safety and Reclamation Code (MEMLI 2021) in Part 1 .7.3 for the dangerous occurrences that should be reported to the Mines Branch.
For serious incidents occurring at a place other than a permitted exploration or mine site:
- Check WorkSafe BC regulations concerning investigation and investigation requirements.
Report incidents to WorkSafe BC (reports must be submitted within three days of a claimed injury) - Submit reports online, fax reports to 604-233-9777 or 1-888-922-8807 or mail reports to:
P.O. Box 4700
Station Terminal
Vancouver, BC V6B 1J1
For spills:
- Call 1-800-663-3456 to verbally report any spill that may affect a body of water or that meets the reporting thresholds in the Spill Reporting Regulation. Note that typical spills may be petroleum or hydraulic oil from equipment, and the reporting threshold is 100 litres.
For wildfires:
- Report to 1-800-663-5555 or *5555.
- Be prepared to evacuate and in which direction if required, on the advice of the BC Fire Service.
For dangerous wildlife:
- Report to 1-877-952-7277 or *7277.