OCI FortiGate HA Cluster – Reference Architecture: Code Review and Fixes
Introduction OCI Quick Start repositories on GitHub are collections of Terraform scripts and configurations provided by Oracle. These repositories ... Read More
Learn more about why Eclipsys has been named the 2023 Best Workplaces in Technology and Ontario, Certified as a Great Place to Work in Canada and named Canada’s Top SME Employer!
Learn more!Today, we will conclude our “Oracle Cloud Automation” journey by deploying an instance using Ansible (roles). We will demonstrate how an Always-Free compute instance can be launched and accessed through SSH thanks to OCI Ansible Cloud Modules. This tutorial along with the previous Terraform and OCI-CLI shell labs will also help you prepare for the OCI Operations Associate exam (1Z0-1067). And as usual, playbooks used in this lab can be found in my GitHub repo.
NOTE >>: If you want to skip the concepts and get directly started with the lab just click on Ansible Setup.
– Content :
Overview and Concepts
I. Ansible Setup
II. Clone repository
III. Deployment
IV. Bummer
Configure once deploy everywhere!…
Ansible
Is a deployment and configuration management platform that automates the storage, servers, and networking. It can be run on the cloud, with dedicated servers, or even locally on your own machine. Today’s focus will be on its cloud provisioning capabilities.
The OCI Ansible cloud modules
Is a project created by Oracle to help OCI users provision, configure and manage OCI infrastructure using Ansible.
What have I tweaked
I have taken a sample playbook and adapted it to use oci ansible roles instead of modules because roles are cooler :D.
You’ll see that installing roles from ansible-galaxy (like a yum repo for ansible) is way simpler than the cumbersome manual module install.
Topology
The following illustration shows the layers involved between your workstation an OCI while running Ansible playbooks.
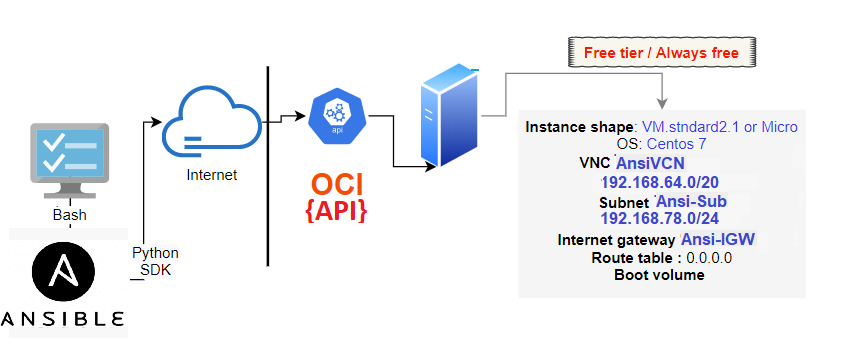
Besides introducing my GitHub repo, I’d like to discuss some principles before starting this tutorial.
Terminology
Ansible Features
Learn the hard way
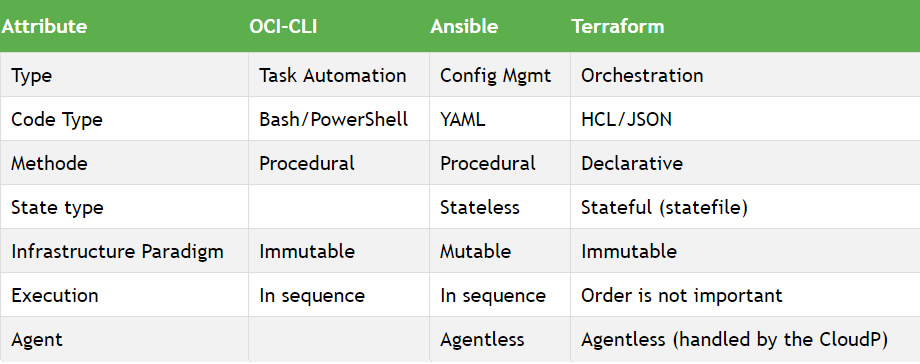
Comparison
- name: Create a VCN
  oci_vcn:
    compartment_id: "{{ instance_compartment }}"
    display_name: "{{ vcn_name }}"
    cidr_block: "{{ vcn_cidr_block }}"
    dns_label: "{{ vcn_dns_label }}"
    config_profile_name: "{{config_profile}}"
    register: result
- set_fact:
    vcn_id: "{{ result.vcn.id }}""
Currently, Ansible can be run from any machine with Python 2.7 or Python 3.5 (and higher) installed. This includes popular Linux distros (Red Hat, Debian, CentOS, BSD) and macOS. Windows is not supported by the control node. Therefore, I will use windows Linux subsystem WSL as a control node here.
1. Install Ansible
1- Install ansible
$ RHEL:
sudo yum install ansible
$ ubuntu :
sudo apt install python3-pip      ---> if oci isn't installed
sudo apt-add-repository ppa:ansible/ansible
sudo apt-get update
sudo apt-get install ansible
2- install sdk:
sudo apt install python-pip   --->[RHEL: yum install python-pip]
$ pip install oci
Once installed, run the version command to validate your installation
$ ansible --version
  ansible 2.9.7
  config file = /etc/ansible/ansible.cfg
2. Install Ansible OCI roles from Ansible galaxy
As mentioned before, this deployment can only work if you install oci-ansible roles from ansible-galaxy
since I adapted the playbooks to use roles instead of the original modules available in the Official GitHub Repo.
--- automatic galaxy install ---
default role path is the first writable directory configured in DEFAULT_ROLES_PATH:~/.ansible/roles:/usr/share/ansible/roles:/etc/ansible/roles

$ ansible-galaxy install --roles-path=/etc/ansible/roles  $ ansible-galaxy list - oracle.oci_ansible_modules, v1.18.0
PATH : ~/.ansible/roles/oracle.oci_ansible_modules
3. Authentication with OCI
– With Ansible and oci cloud modules(roles) installed our lab still requires an IAM user with its API signing key .
– You’ll need to configure OCI-CLI so Ansible could authenticate to your OCI account via the config file (~/.oci/config)
– Environment variables can still be defined before running your playbooks (i.e. SAMPLE_COMPARTMENT_OCID)
$ git clone https://github.com/brokedba/ansible-examples.git$ cd ansible-examples/oci-ansible/launch_free_instance/
$ tree
.
├── a_env_vars
├── check_network.yml --- test playbook before to check the setup
├── check_shapes.yaml
├── sample.yaml --- main playbook that’ll create the vm
├── setup.yaml --- child playbook that’ll create the vcn etc
├── teardown.yaml --- destroy playbook
└── templates
├── egress_security_rules.yaml.j2 --- egress security list template
└── ingress_security_rules.yaml.j2 --- ingress security list template
Repo content:
1. Environment variables and setup check
Assign SAMPLE_COMPARTMENT_OCID variable in a_env_vars with your compartment OCID and source the file.
Once done, run a test playbook that will generate an SSH keypair, and load security lists from our jinja templates.
$ cd ansible-examples/oci-ansible/launch_free_instance/
$ . a_env_vars
-- Test your setup using
$ ansible-playbook check_network.yml
2. Launch the instance
Let’s now launch our instance. You can click on the sample.yaml to see its content but it basically performs the below
$ ansible-playbook sample.yaml

[WARNING]: provided hosts list is empty, only localhost is available. Note that the implicit localhost does not match 'all'

PLAY [Launch a compute instance and connect to it using SSH] *********************************************************************************

TASK [Gathering Facts] *********************************************************************************
ok: [localhost]

TASK [Check pre-requisites] *********************************************************************************
skipping: [localhost] => (item=SAMPLE_COMPARTMENT_OCID)

TASK [List availbility domains] *********************************************************************************
ok: [localhost]

TASK [set_fact] *********************************************************************************
ok: [localhost]

TASK [print the availability domain] *********************************************************************************
ok: [localhost] => {
    "msg": [{"compartment_id": "ocid1.tenancy.oc1..xxx",
             "id": "ocid1.availabilitydomain.oc1..xxxx",
             "name": "twts:CA-TORONTO-1-AD-1"} ]     }

TASK [List images] *********************************************************************************
ok: [localhost]

TASK [set_fact] *********************************************************************************
ok: [localhost]

TASK [print img_id] *********************************************************************************
ok: [localhost] => {"msg": "the name of the image is CentOS-7-2020.07.20-0"}

TASK [List shapes in first AD] *********************************************************************************
ok: [localhost]

TASK [set_fact] *********************************************************************************
ok: [localhost] => (item={u'memory_options': None, u'networking_bandwidth_in_gbps': 0.48, u'ocpus': 1.0, u'local_disks': 0, u'networking_bandwidth_options': None, u'shape': u'VM.Standard.E2.1.Micro', u'max_vnic_attachments': 1, u'ocpu_options': None, u'local_disks_total_size_in_gbs': None, u'gpu_description': None, u'memory_in_gbs': 1.0, u'gpus': 0, u'local_disk_description': None, u'max_vnic_attachment_options': None, u'processor_description': u'2.0 GHz AMD EPYC\u2122 7551 (Naples)'})

TASK [List shapes in second AD] *********************************************************************************
skipping: [localhost]

TASK [set_fact] *********************************************************************************
skipping: [localhost]

TASK [List shapes in third AD] *********************************************************************************
skipping: [localhost]

TASK [set_fact] *********************************************************************************
skipping: [localhost]

TASK [Create a temp directory to house a temporary SSH keypair for the instance] ********************************************************************************
changed: [localhost]

TASK [set_fact] *********************************************************************************
ok: [localhost]

TASK [Generate a Private Key] *********************************************************************************
changed: [localhost]

TASK [set_fact] *********************************************************************************
ok: [localhost]

TASK [Generate a Public Key] *********************************************************************************
changed: [localhost]

TASK [Create a VCN] *********************************************************************************
changed: [localhost]

TASK [set_fact] *********************************************************************************
ok: [localhost]

TASK [Create a new Internet Gateway] *********************************************************************************
changed: [localhost]

TASK [set_fact] *********************************************************************************
ok: [localhost]

TASK [Create route table to connect internet gateway to the VCN] *********************************************************************************
changed: [localhost]

TASK [set_fact] *********************************************************************************
ok: [localhost]

TASK [create ingress rules yaml body] *********************************************************************************
ok: [localhost]

TASK [create egress yaml body] *********************************************************************************
ok: [localhost]

TASK [load the variables defined in the ingress rules yaml body] *********************************************************************************
ok: [localhost]

TASK [print loaded_ingress] *********************************************************************************
ok: [localhost] => {
    "msg": "loaded ingress is {u'instance_ingress_security_rules': [{u'source': u'0.0.0.0/0', u'protocol': u'6', u'tcp_options': {u'destination_port_range': {u'max': 22, u'min': 22}}}, {u'source': u'0.0.0.0/0', u'protocol': u'6', u'tcp_options': {u'destination_port_range': {u'max': 80, u'min': 80}}}]}"
}

TASK [load the variables defined in the egress rules yaml body] *********************************************************************************
ok: [localhost]

TASK [print loaded_egress] *********************************************************************************
ok: [localhost] => {
    "msg": "loaded egress is {u'instance_egress_security_rules': [{u'tcp_options': {u'destination_port_range': {u'max': 22, u'min': 22}}, u'destination': u'0.0.0.0/0', u'protocol': u'6'}]}"
}

TASK [Create a security list for allowing access to public instance] *********************************************************************************
changed: [localhost]

TASK [set_fact] *********************************************************************************
ok: [localhost]

TASK [Create a subnet to host the instance. Link security_list and route_table.] *********************************************************************************
changed: [localhost]

TASK [set_fact] *********************************************************************************
ok: [localhost]

TASK [Launch an instance]---->  ACTUAL VM SPIN *********************************************************************************
changed: [localhost]

TASK [Print instance details] *********************************************************************************
ok: [localhost] => {
    "msg": "Launched a new instance {u'instance': {u'time_created': u'2020-08-10T04:39:54.207000+00:00', u'primary_public_ip': u'132.145.100.168', u'shape': u'VM.Standard.E2.1.Micro', u'ipxe_script': None, u'id': u'ocid1.instance.oc1.ca-toronto-1.xxx', u'agent_config': {u'is_monitoring_disabled': False, u'is_management_disabled': False}, u'fault_domain': u'FAULT-DOMAIN-1', u'extended_metadata': {}, u'time_maintenance_reboot_due': None, u'compartment_id': u'ocid1.tenancy.oc1..xxx', u'defined_tags': {u'Oracle-Tags': {u'CreatedOn': u'2020-08-10T04:39:53.283Z', u'CreatedBy': u'oracleidentitycloudservice/brokedba’}}, u'primary_private_ip': u'192.168.10.2', u'freeform_tags': {}, u'source_details': {u'source_type': u'image', u'image_id': u'ocid1.image.oc1.ca-toronto-1.xxxx', u'kms_key_id': None, u'boot_volume_size_in_gbs': None}, u'dedicated_vm_host_id': None, u'metadata': {u'ssh_authorized_keys': u'ssh-rsa xxxbcG5fPEwc+yUGN4nYXbTWgTeV'}, u'system_tags': {u'orcl-cloud': {u'free-tier-retained': u'true'}}, u'image_id': u'ocid1.image.oc1.ca-toronto-1.aaaaaaaaxxxx', u'availability_domain': u'twts:CA-TORONTO-1-AD-1', u'display_name': u'ansi_inst', u'lifecycle_state': u'RUNNING', u'shape_config': {u'networking_bandwidth_in_gbps': 0.48, u'ocpus': 1.0, u'local_disks': 0, u'max_vnic_attachments': 1, u'local_disks_total_size_in_gbs': None, u'gpu_description': None, u'memory_in_gbs': 1.0, u'gpus': 0, u'local_disk_description': None, u'processor_description': u'2.0 GHz AMD EPYC\\u2122 7551 (Naples)'}, u'region': u'ca-toronto-1', u'launch_options': {u'remote_data_volume_type': u'PARAVIRTUALIZED', u'firmware': u'UEFI_64', u'boot_volume_type': u'PARAVIRTUALIZED', u'is_consistent_volume_naming_enabled': True, u'network_type': u'PARAVIRTUALIZED', u'is_pv_encryption_in_transit_enabled': False}, u'launch_mode': u'PARAVIRTUALIZED'}, u'changed': True, 'failed': False"
}

TASK [set_fact] *********************************************************************************
ok: [localhost]

TASK [Create a volume] *********************************************************************************
ok: [localhost]
TASK [Print volume details] *********************************************************************************
ok: [localhost] => {
    "msg": "Created a new volume {u'volume': {u'lifecycle_state': u'AVAILABLE', u'size_in_gbs': 50, u'display_name': u'ansi_vol', u'volume_group_id': None, u'compartment_id': u'ocid1.tenancy.oc1..axxxx', u'defined_tags': {}, u'system_tags': {u'orcl-cloud': {u'free-tier-retained': u'true'}}, u'kms_key_id': None, u'freeform_tags': {}, u'time_created': u'2020-05-25T02:03:21.633000+00:00', u'source_details': None, u'availability_domain': u'twts:CA-TORONTO-1-AD-1', u'size_in_mbs': 51200, u'is_hydrated': True, u'vpus_per_gb': 10, u'id': u'ocid1.volume.oc1.ca-toronto-1.ab2g6'}, 'failed': False, u'changed': False}"}

TASK [set_fact] *********************************************************************************
ok: [localhost]

TASK [Attach volume to new instance] *********************************************************************************
changed: [localhost]

TASK [Print volume attachment details] *********************************************************************************
ok: [localhost] => {"msg": "Attached volume to instance {'failed': False, u'changed': True, u'volume_attachment': {u'lifecycle_state': u'ATTACHED', u'availability_domain': u'twts:CA-TORONTO-1-AD-1', u'display_name': u'volumeattachment20200810044202', u'compartment_id': u'ocid1.tenancy.oc1..xxxx', u'iscsi_detach_commands': [], u'time_created': u'2020-08-10T04:42:02', u'id': u'ocid1.volumeattachment.oc1.ca-toronto-1.anxxx', u'instance_id': u'ocid1.instance.oc1.ca-toronto-1.anxxxx', u'is_read_only': False, u'volume_id': u'ocid1.volume.oc1.ca-toronto-1.ab2g6xxxx', u'device': None, u'is_shareable': False, u'attachment_type': u'paravirtualized', u'is_pv_encryption_in_transit_enabled': False, u'iscsi_attach_commands': []}}"}

TASK [set_fact] *********************************************************************************
ok: [localhost]
TASK [Get the VNIC attachment details of instance] *********************************************************************************
ok: [localhost]

TASK [Get details of the VNIC] *********************************************************************************
ok: [localhost]

TASK [set_fact] *********************************************************************************
ok: [localhost]
TASK [Print the public ip of the newly launched instance] *********************************************************************************
ok:[localhost]=> {"msg":"Public IP of launched instance 132.145.100.168"}

TASK [Wait (upto 5 minutes) for port 22 to become open] *********************************************************************************
ok: [localhost]

TASK [Attempt a ssh connection to the newly launced instance] *********************************************************************************
changed: [localhost]
TASK [Print SSH response from launched instance] *********************************************************************************
ok: [localhost] => {"msg": "SSH response from instance –>
[u'Linux ansi-compute 3.10.0-1127.13.1.el7.x86_64 #1 SMP Tue Jun 23 15:46:38 UTC 2020 x86_64 x86_64 x86_64 GNU/Linux']"}

PLAY RECAP *********************************************************************************
localhost:
ok=46   changed=11 unreachable=0  failed=0  skipped=5    rescued=0    ignored=0
$ ssh -i /tmp/ansible.VlmG3Dcert/id_rsa.pem opc@132.145.100.168
[opc@ansi-compute ~]$ cat /etc/redhat-release
CentOS Linux release 7.8.2003 (Core)
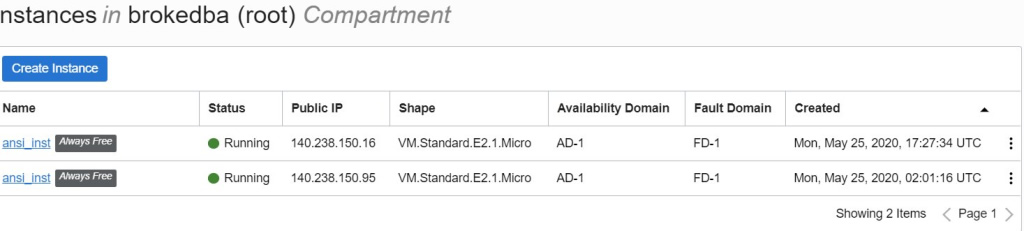
LAUNCH THE INSTANCE FOR THE 2ND TIME
Surprise!!!…. right on, it’ll create an exact copy of the previous instance (duplicates). Not a single warning when you run it.
Thanks for reading. Next stop AWS
Introduction OCI Quick Start repositories on GitHub are collections of Terraform scripts and configurations provided by Oracle. These repositories ... Read More

Introduction So far, I have used Oracle AutoUpgrade, many times in 3 different OS’. Yet the more you think you’ve seen it all and reached the ... Read More